How to Create Overpayments
Sometimes project costs are less than estimated, items get returned or clients change their mind. If you find yourself in this situation, you can create an overpayment (formerly called a credit), which means your client will have remaining funds available to use on the project.
You can create an overpayment on an invoice, proposal or estimate that has already been marked as paid. You cannot create an overpayment on an issued invoice; to do this, you will need to void the invoice and duplicate to create a new version for editing.
Important: Avoid editing paid invoices from previous reporting periods, particularly if sales tax has already been filed for that period. Changes to a previously reported invoice can affect your accounting and sales tax records.
Credit Memos vs Overpayments
It's worth knowing the difference between a credit memo and an overpayment (formerly called "Credits"), since they can look similar but come from different actions:
- Credit Memo: A manual document you create to adjust scope or record a debt owed to the client. Credit memos can include taxable items, which credits the associated sales tax to the client and reduces the amount reported on your current sales tax return.
- Overpayment: An automatic excess balance, created when a payment exceeds the balance due on an invoice, estimate or proposal, or when you edit a paid invoice down to a lower amount. For example, you invoice your client for $800, but they pay $1,000. This automatically leaves $200 as an unapplied balance
Both credit memos and overpayments can be applied to invoices as payment to reduce the balance of the document.
Learn more about credit memos in How to Create a Credit Memo.
Create an Overpayment
To create an overpayment, you must be on a document that is already marked as paid. Once in the relevant paid document, you have multiple options for creating a negative balance that can then be converted into an overpayment on the project. Let's look at each option:
Return an Item
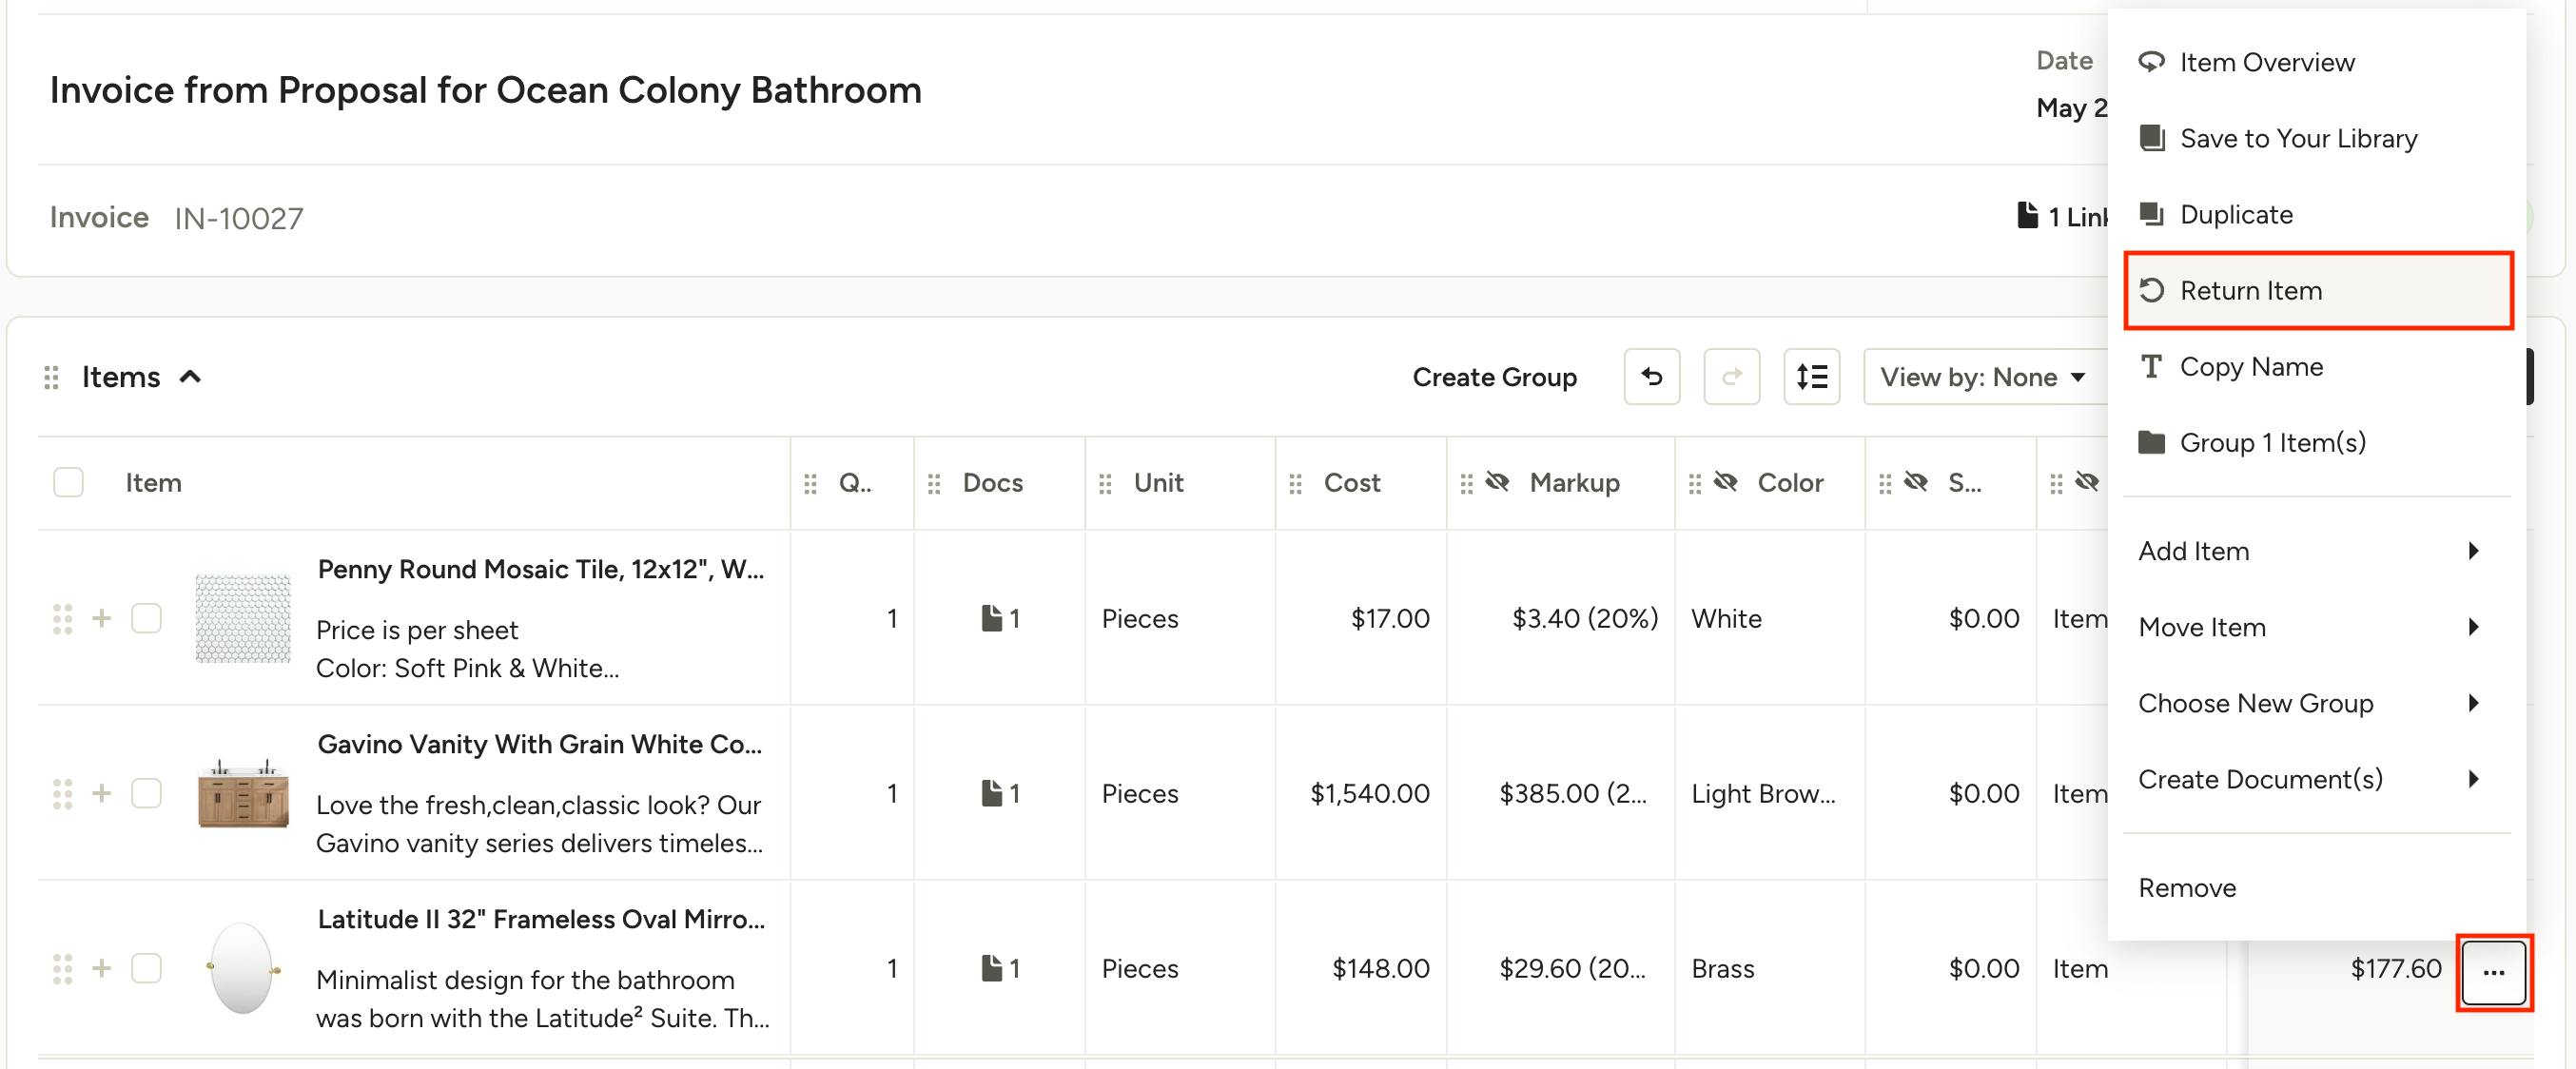
On paid invoices, if you need to return an item and credit the exact amount back to the client, you can use the three dots icon on the right of the line item to open the menu and select Return Item.
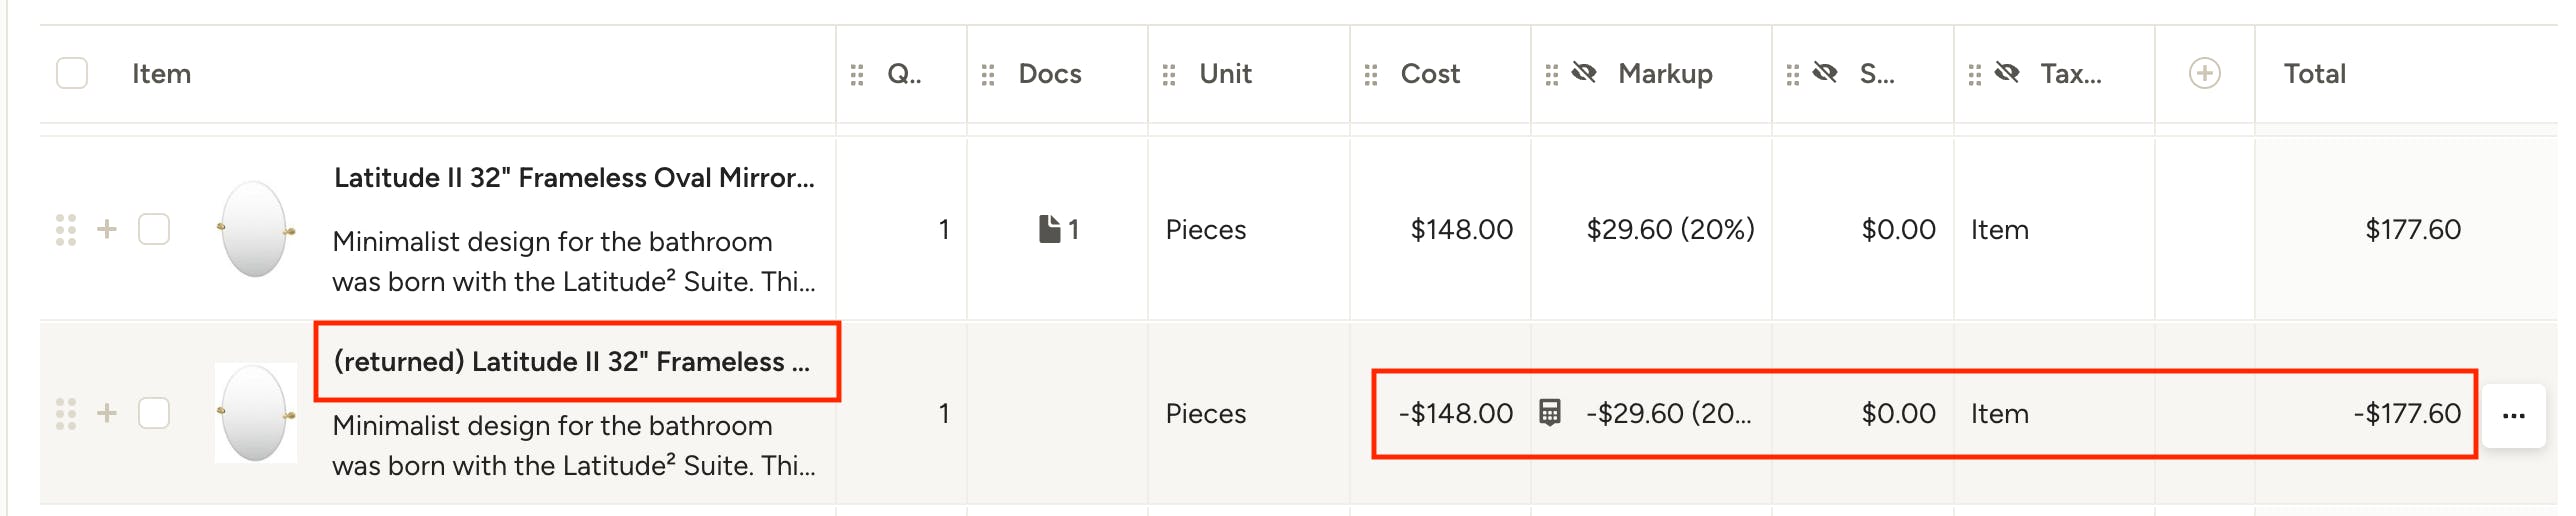
This will automatically create a line item directly below the original, with negative amounts for any applicable cost, markup, shipping etc. You will also see (returned) in the title of the new line item, denoting that the item was returned.
Duplicate and Edit Item
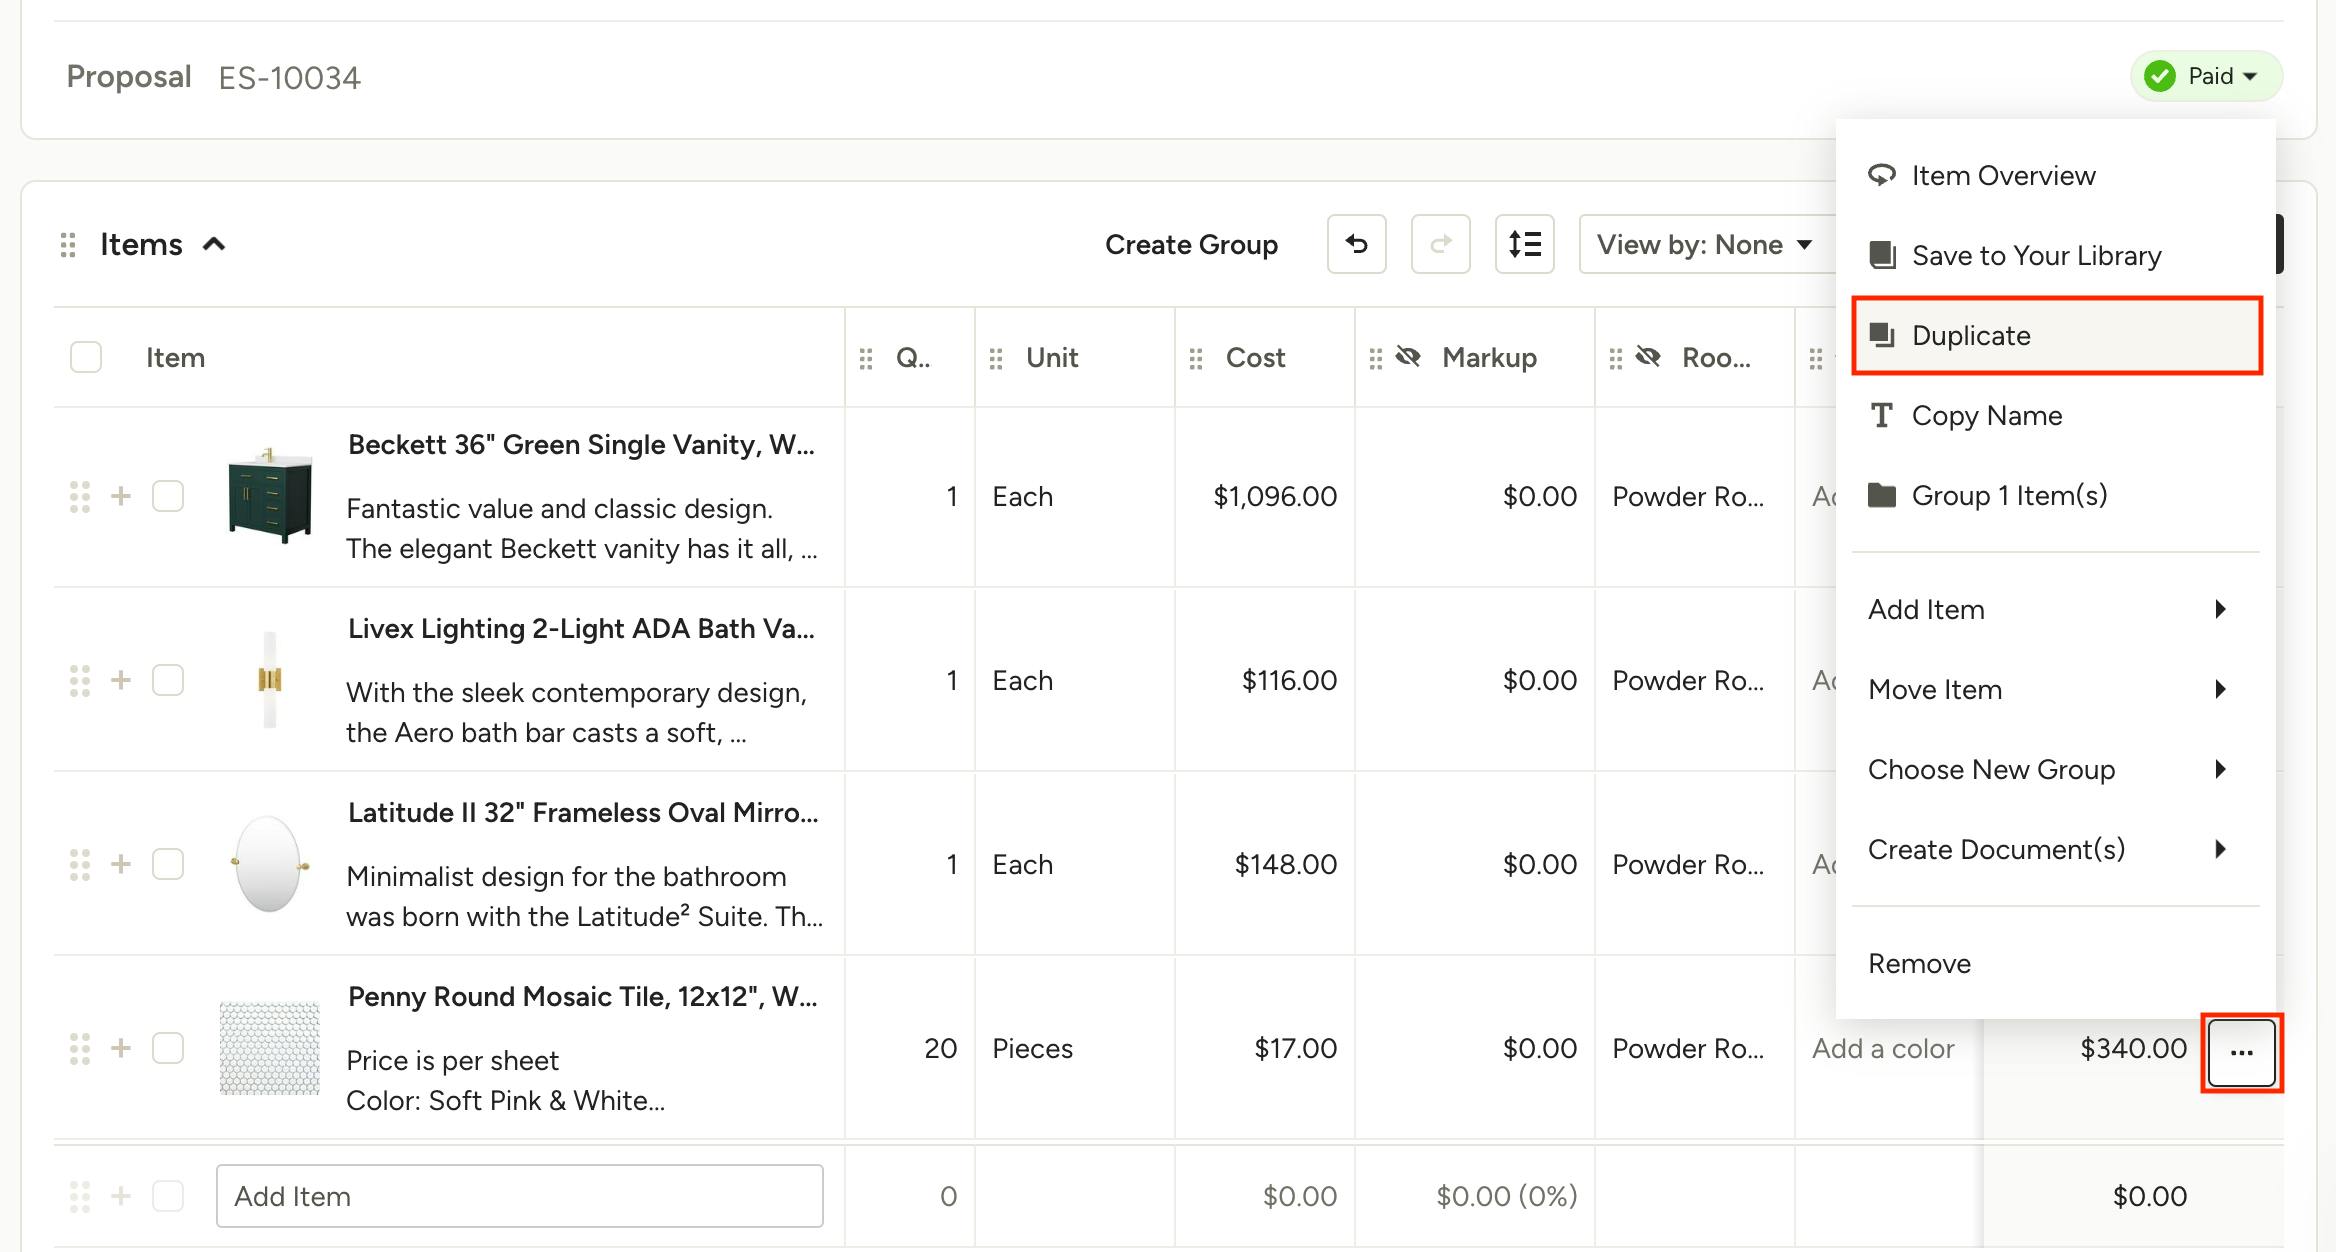
Another option to create an overpayment is to duplicate a line item and edit the cost details. To do so, use the three dots icon on the right of the line item to open the menu and select Duplicate.
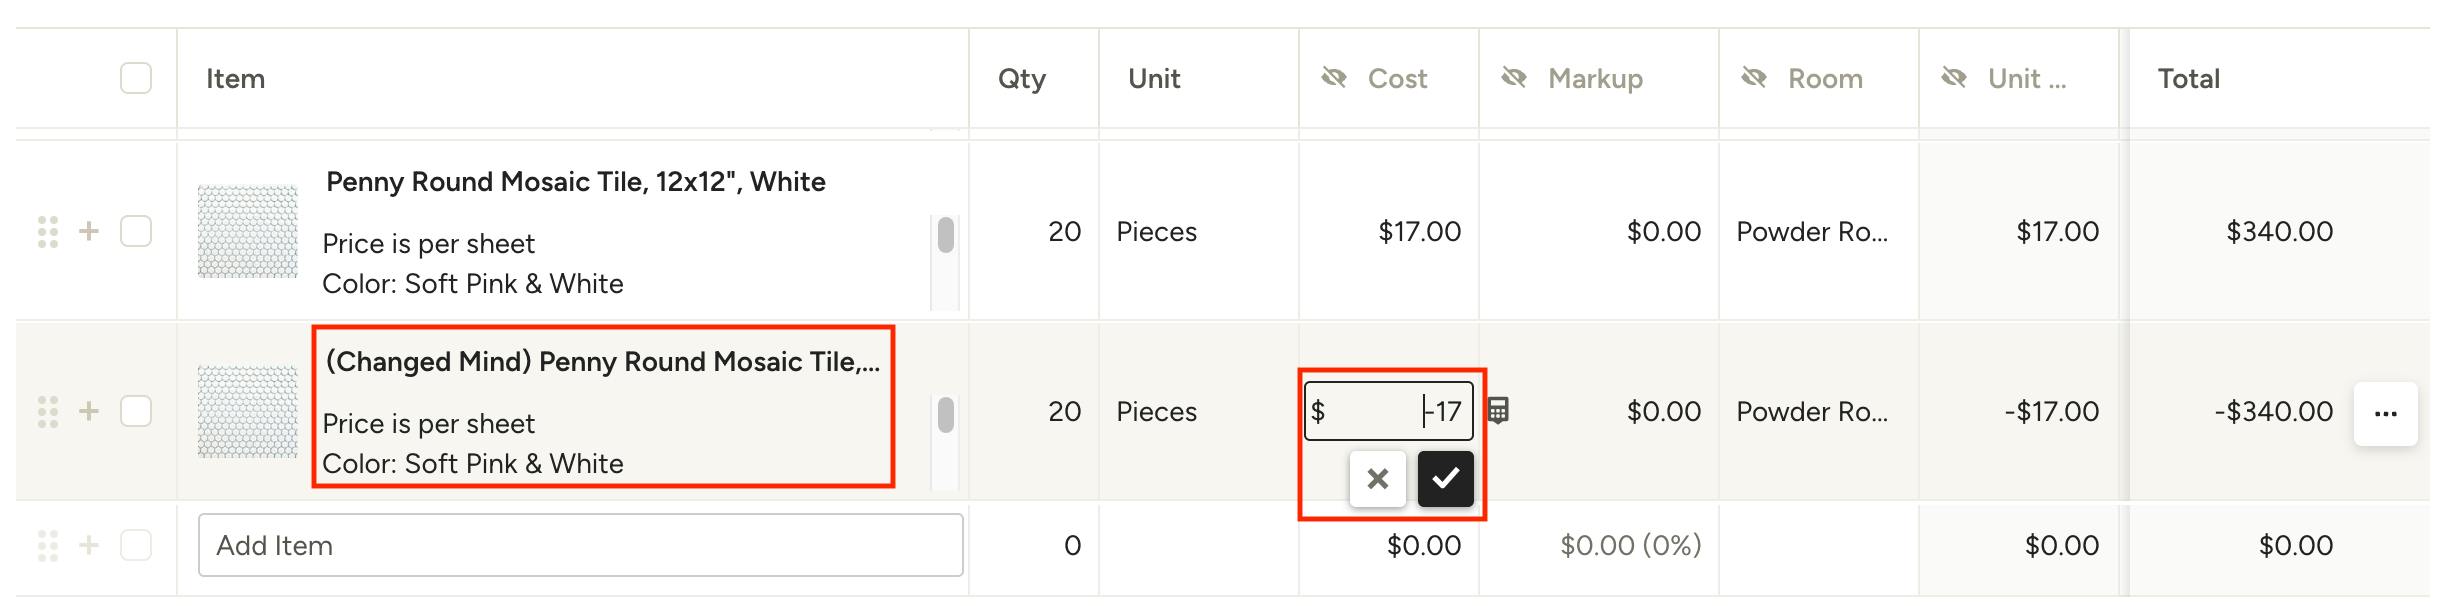
You will see an exact duplicate of the line item directly below. On this new line item you can edit the title and/or description to note the reason, such as "Changed Mind", "Return" or "Price Adjustment". Then update any applicable price details, including cost, markup or shipping, using a negative amount.

Add New Line Item
To show an overpayment that is not directly related to another item, you can add a new line item. To do so, type in the title and/or description to let the the client know what the line item is for. This could be for a referral credit or promotional credit, for example. Make sure you input a negative number for the cost and ensure you adjust your markup, taxes or shipping costs accordingly.
Remove Item
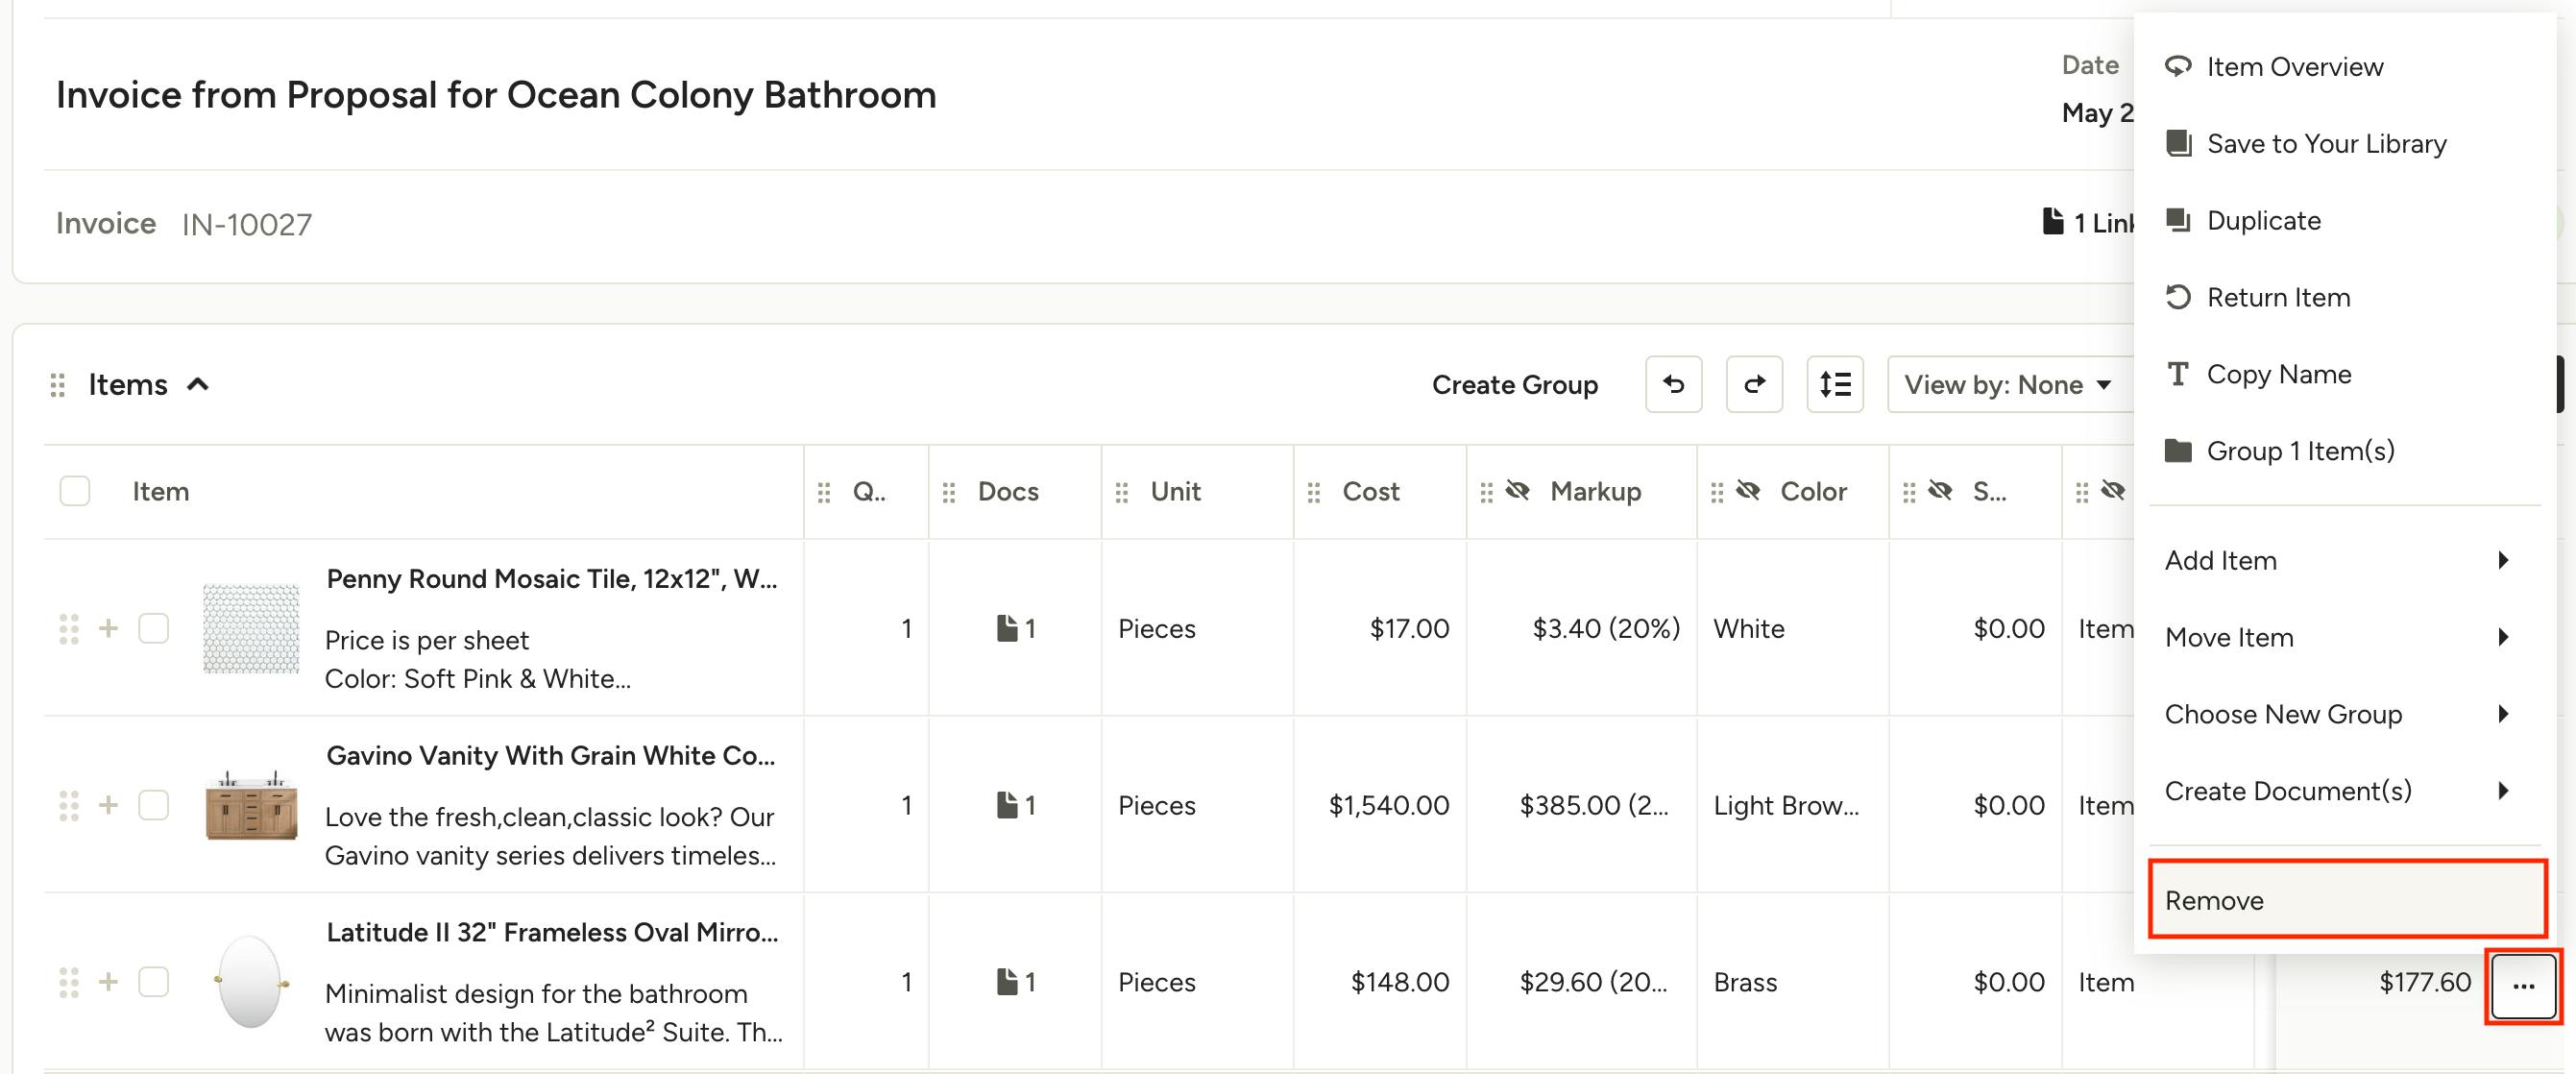
You can also remove an item from a paid document to create an overpayment for the amount of the removed item. However, using this method will make it difficult to account for the specific source (i.e. product or service) of the overpayment should you need to reference it later on. To remove an item, use the three dots icon on the right of the line item to open the menu, then select Remove. The item will no longer appear on the document and the document's balance will not longer include the cost of said item.
Convert Negative Balance to Overpayment
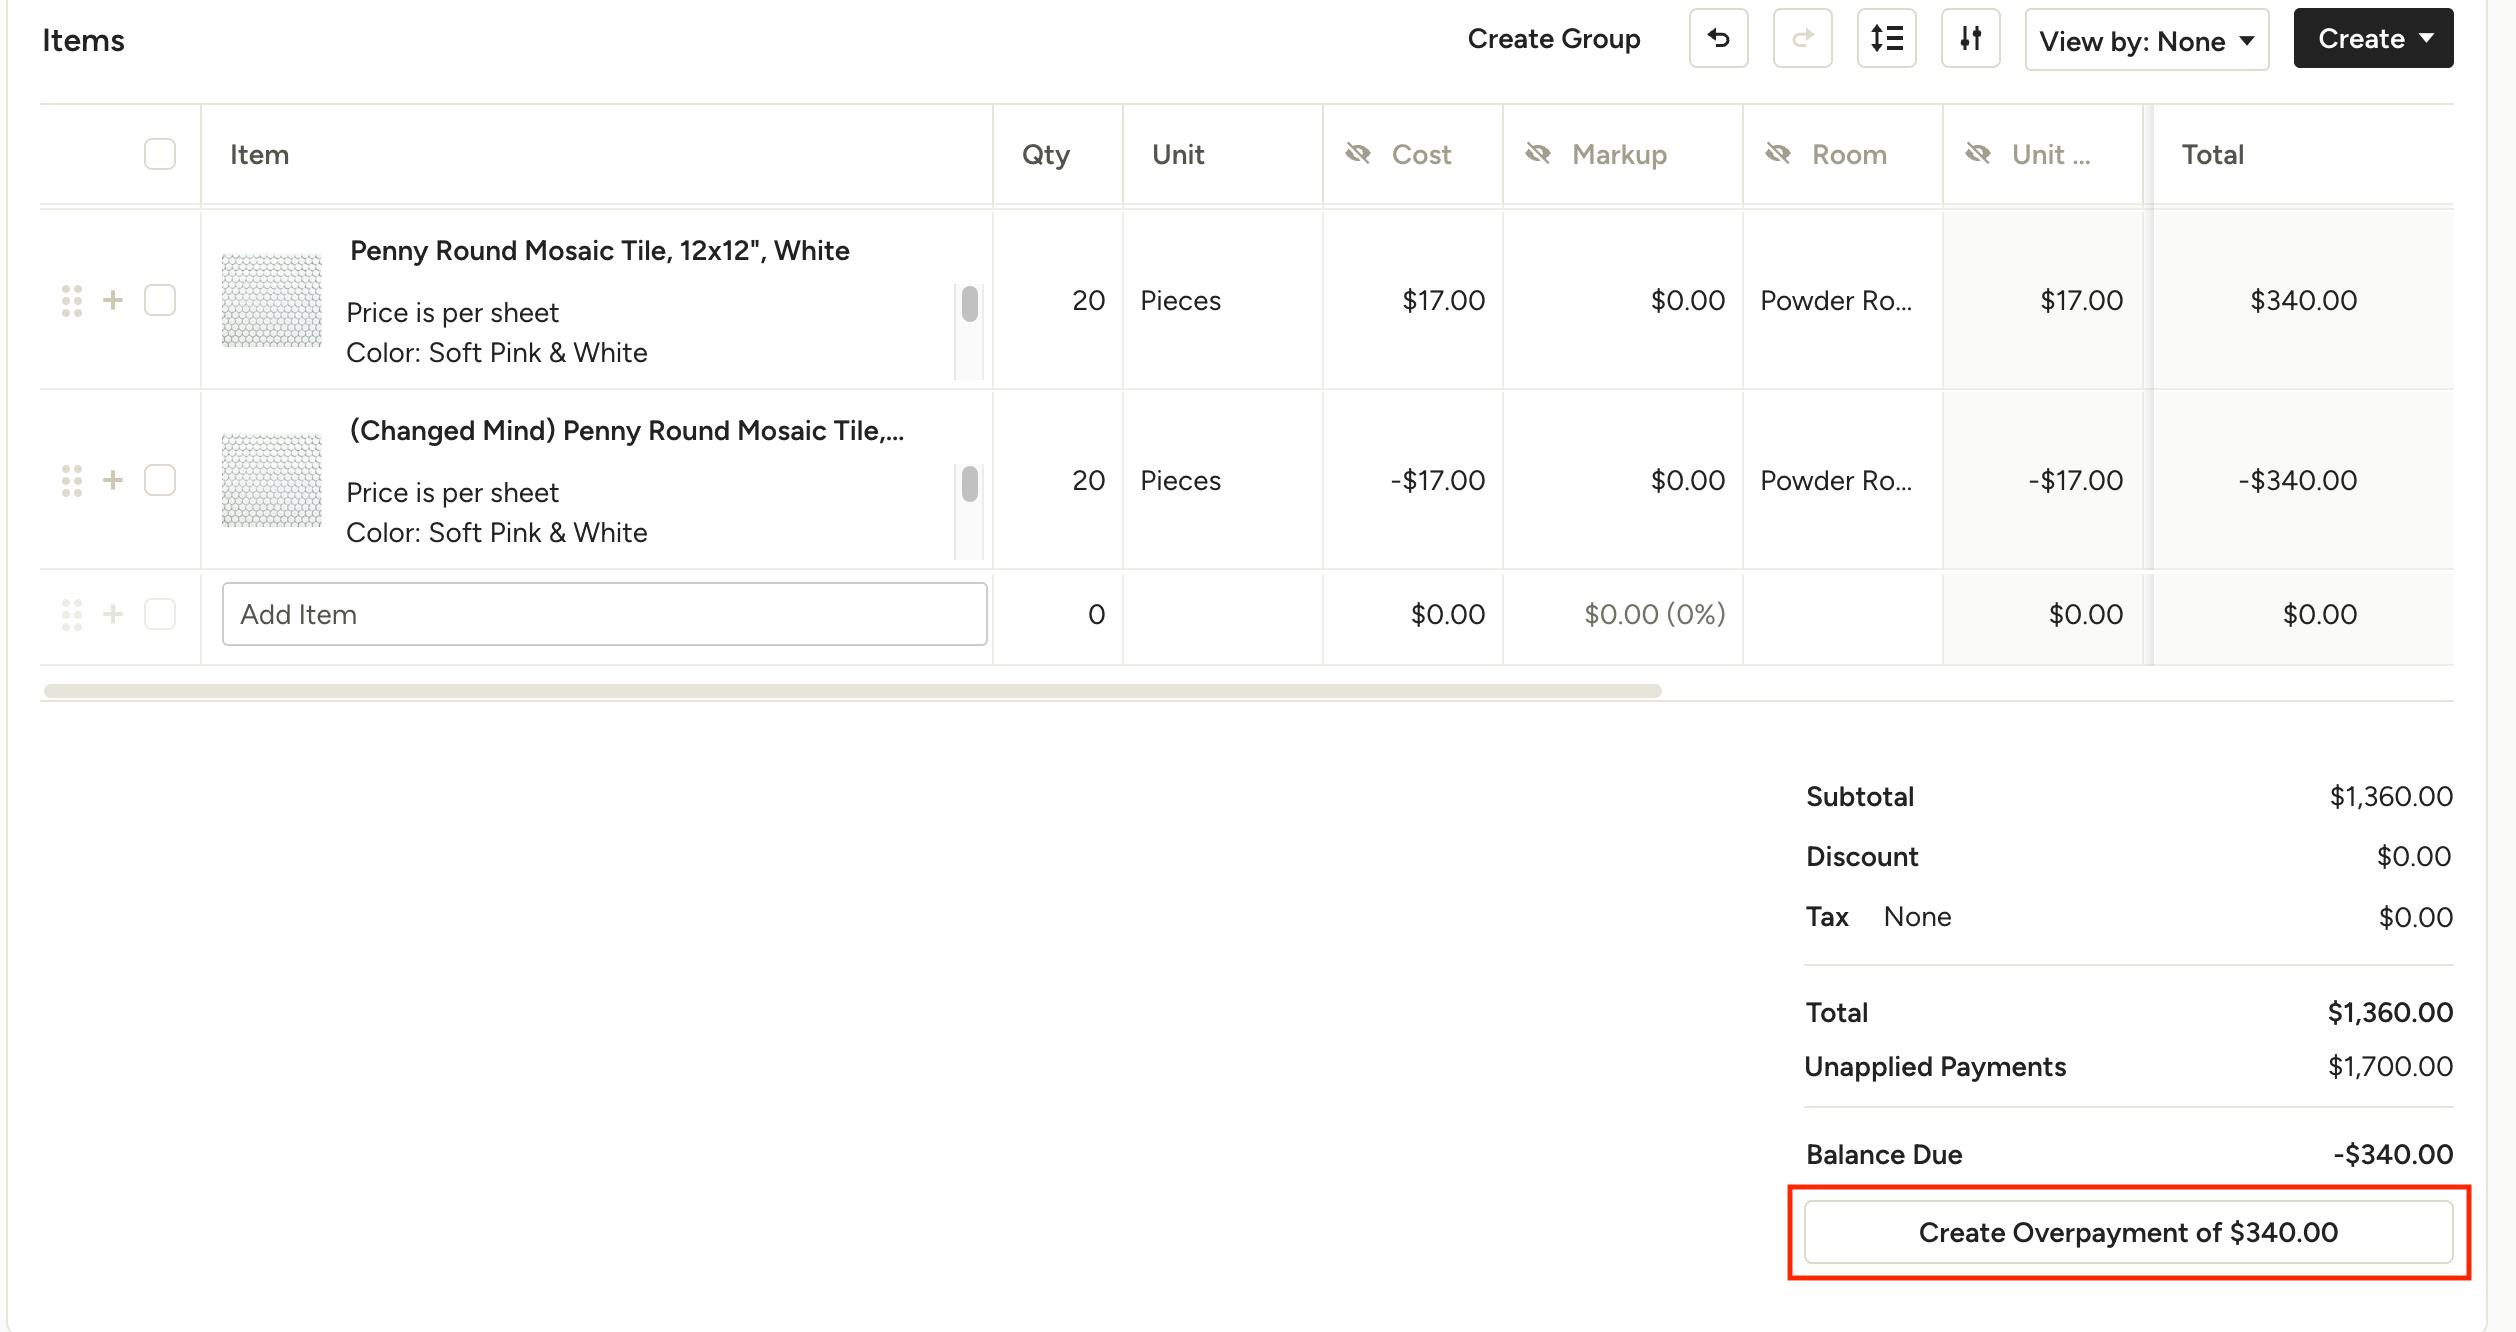
Once you have a negative balance on a paid document, whether from one of the methods above or from a logged payment that exceeds the document balance, you can turn it into an overpayment. Here's how:
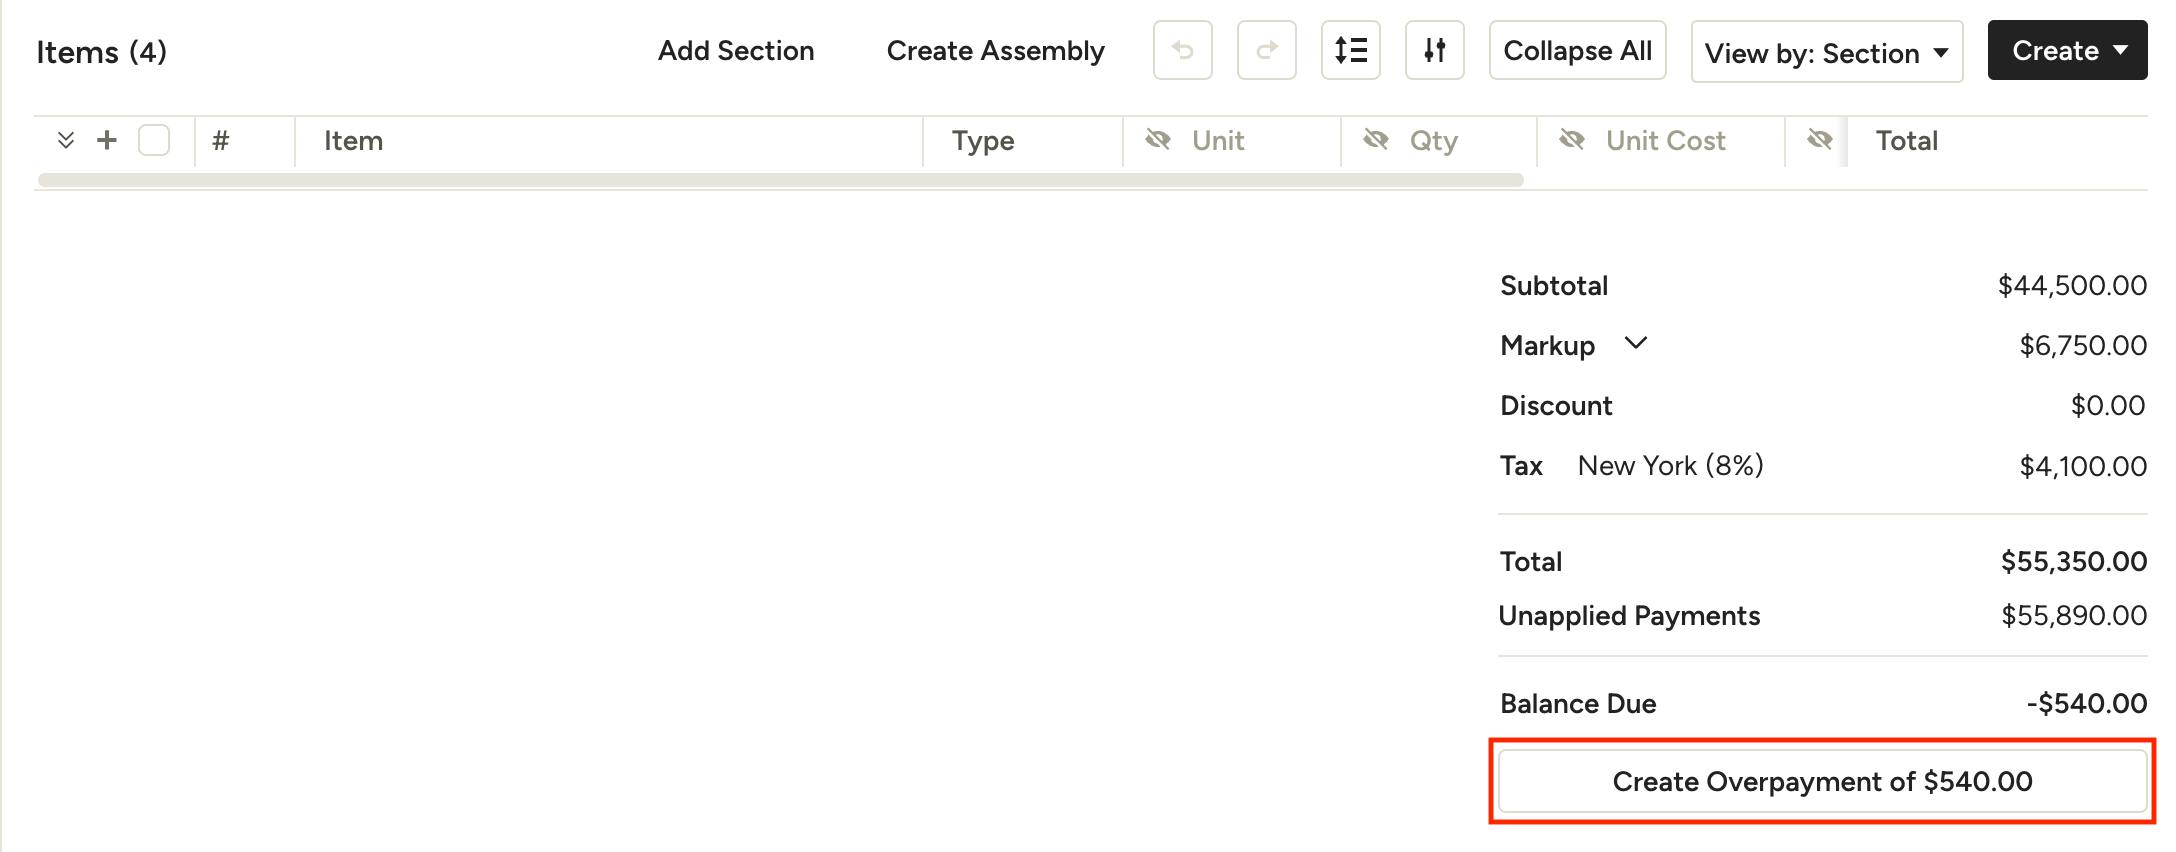
Estimates/Proposals: In the Total section of your estimate or proposal, click Create Overpayment beneath the negative Balance Due.
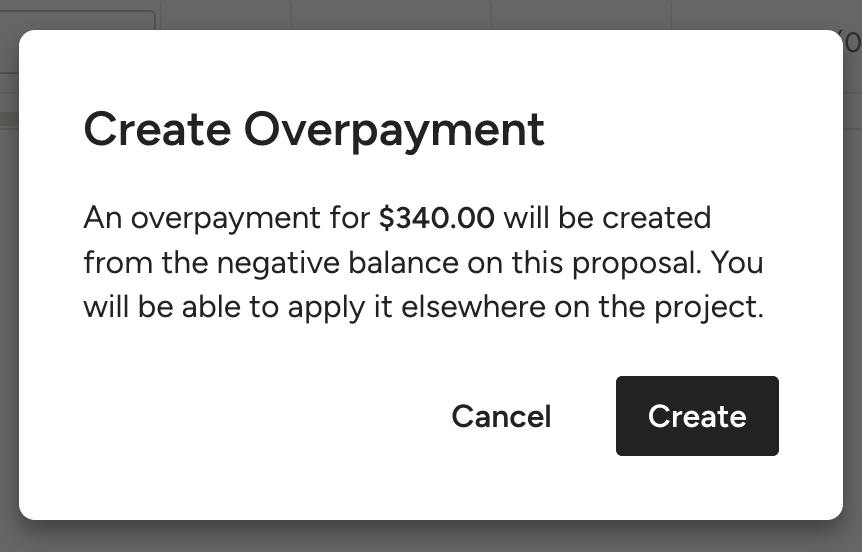
A pop-up will appear asking you confirm you want to create an overpayment for the amount shown. Click Create to confirm.
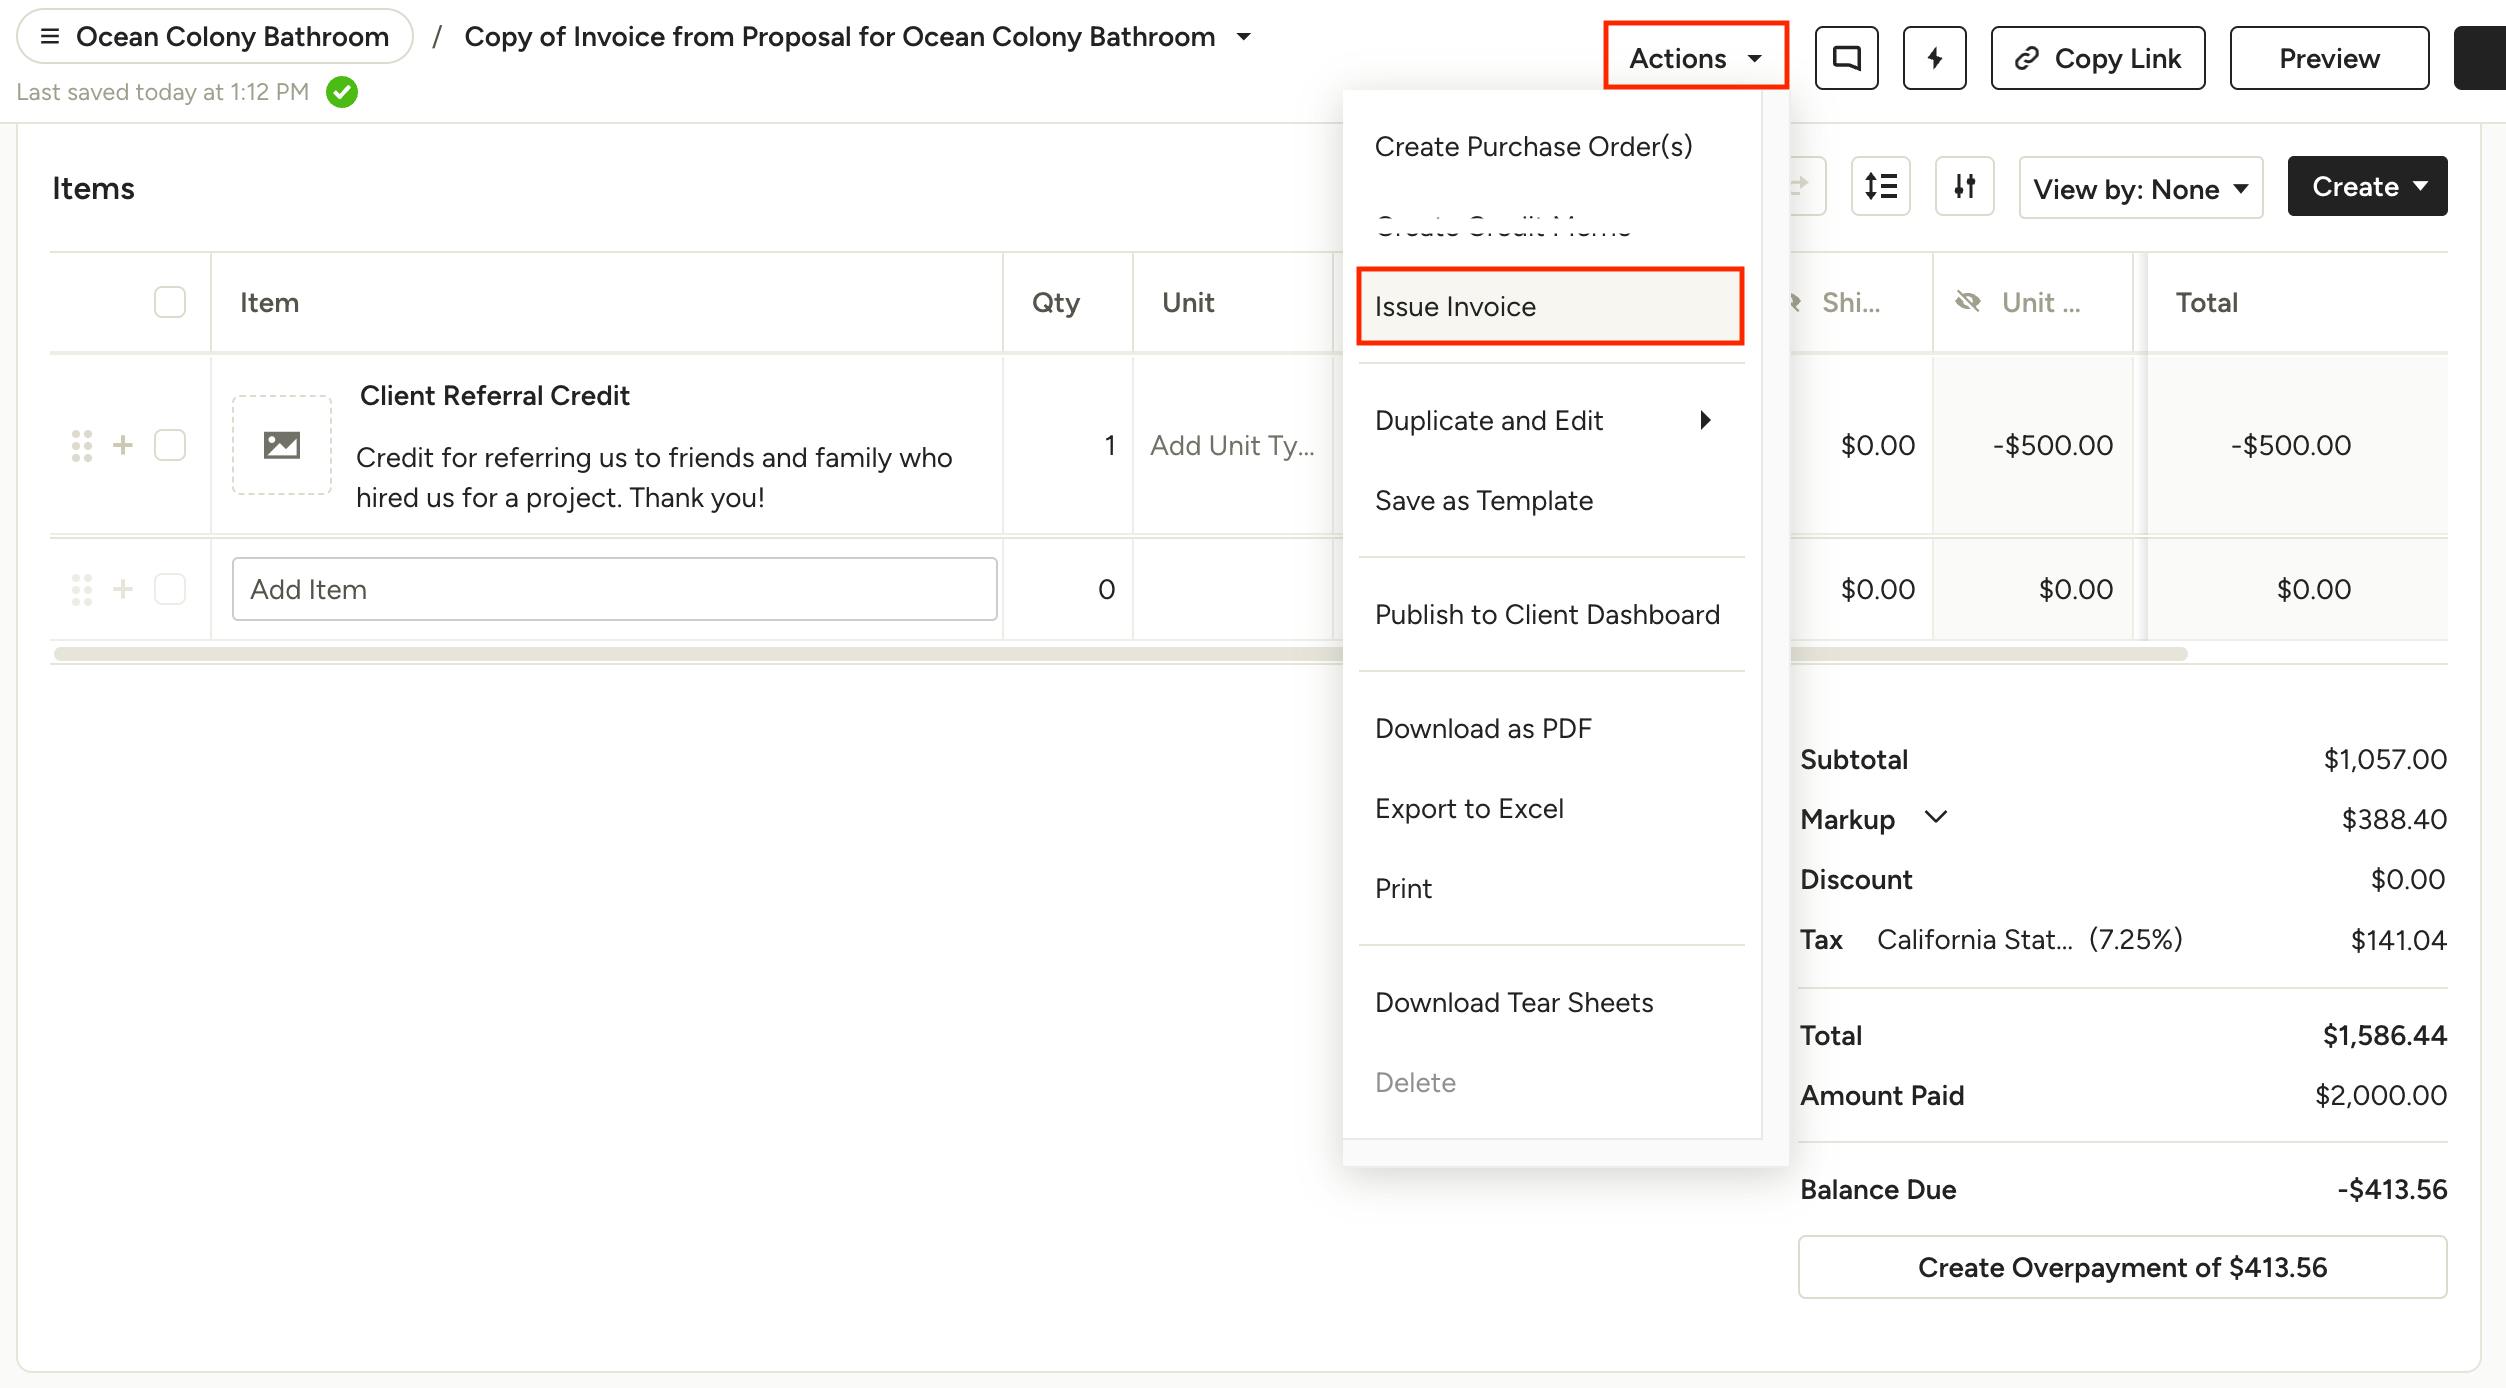
Invoices: You can create overpayments on invoices two different ways, depending on whether or not you are ready to issue the invoice. If you are ready to issue the invoice, which will lock the document from further edits, click on Actions in the top right and click Issue Invoice.
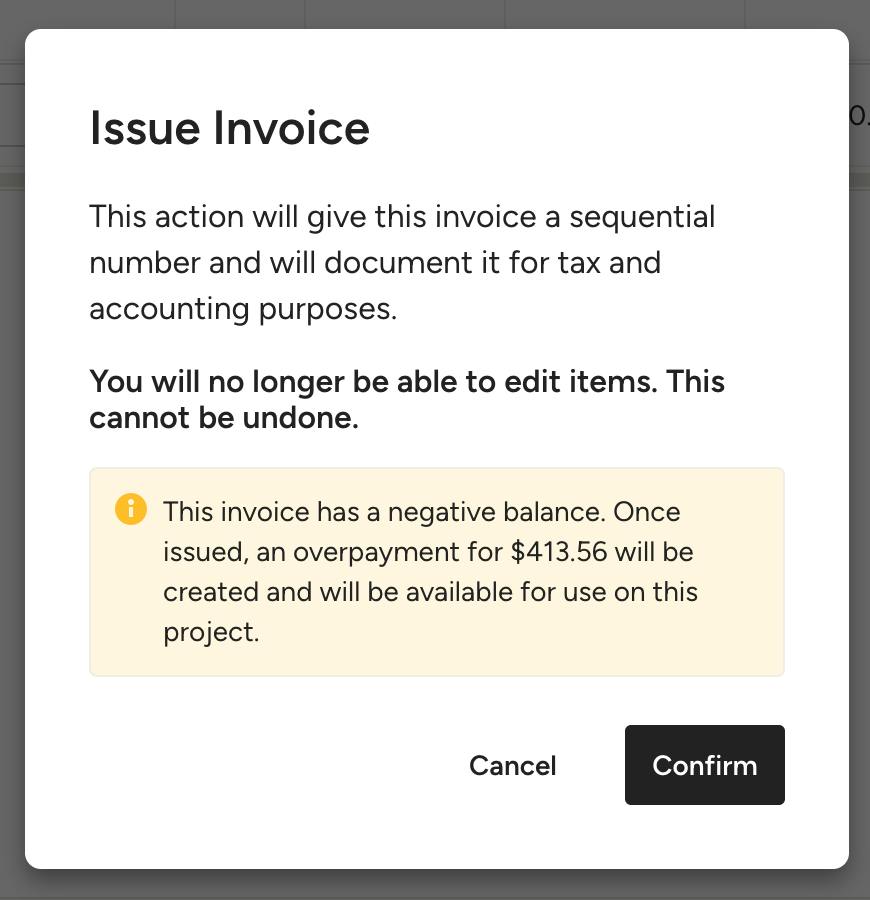
This action will give this invoice a sequential number and will document it for tax and accounting purposes. Once issued, an overpayment for the negative balance will be created and will be available for use on the project.
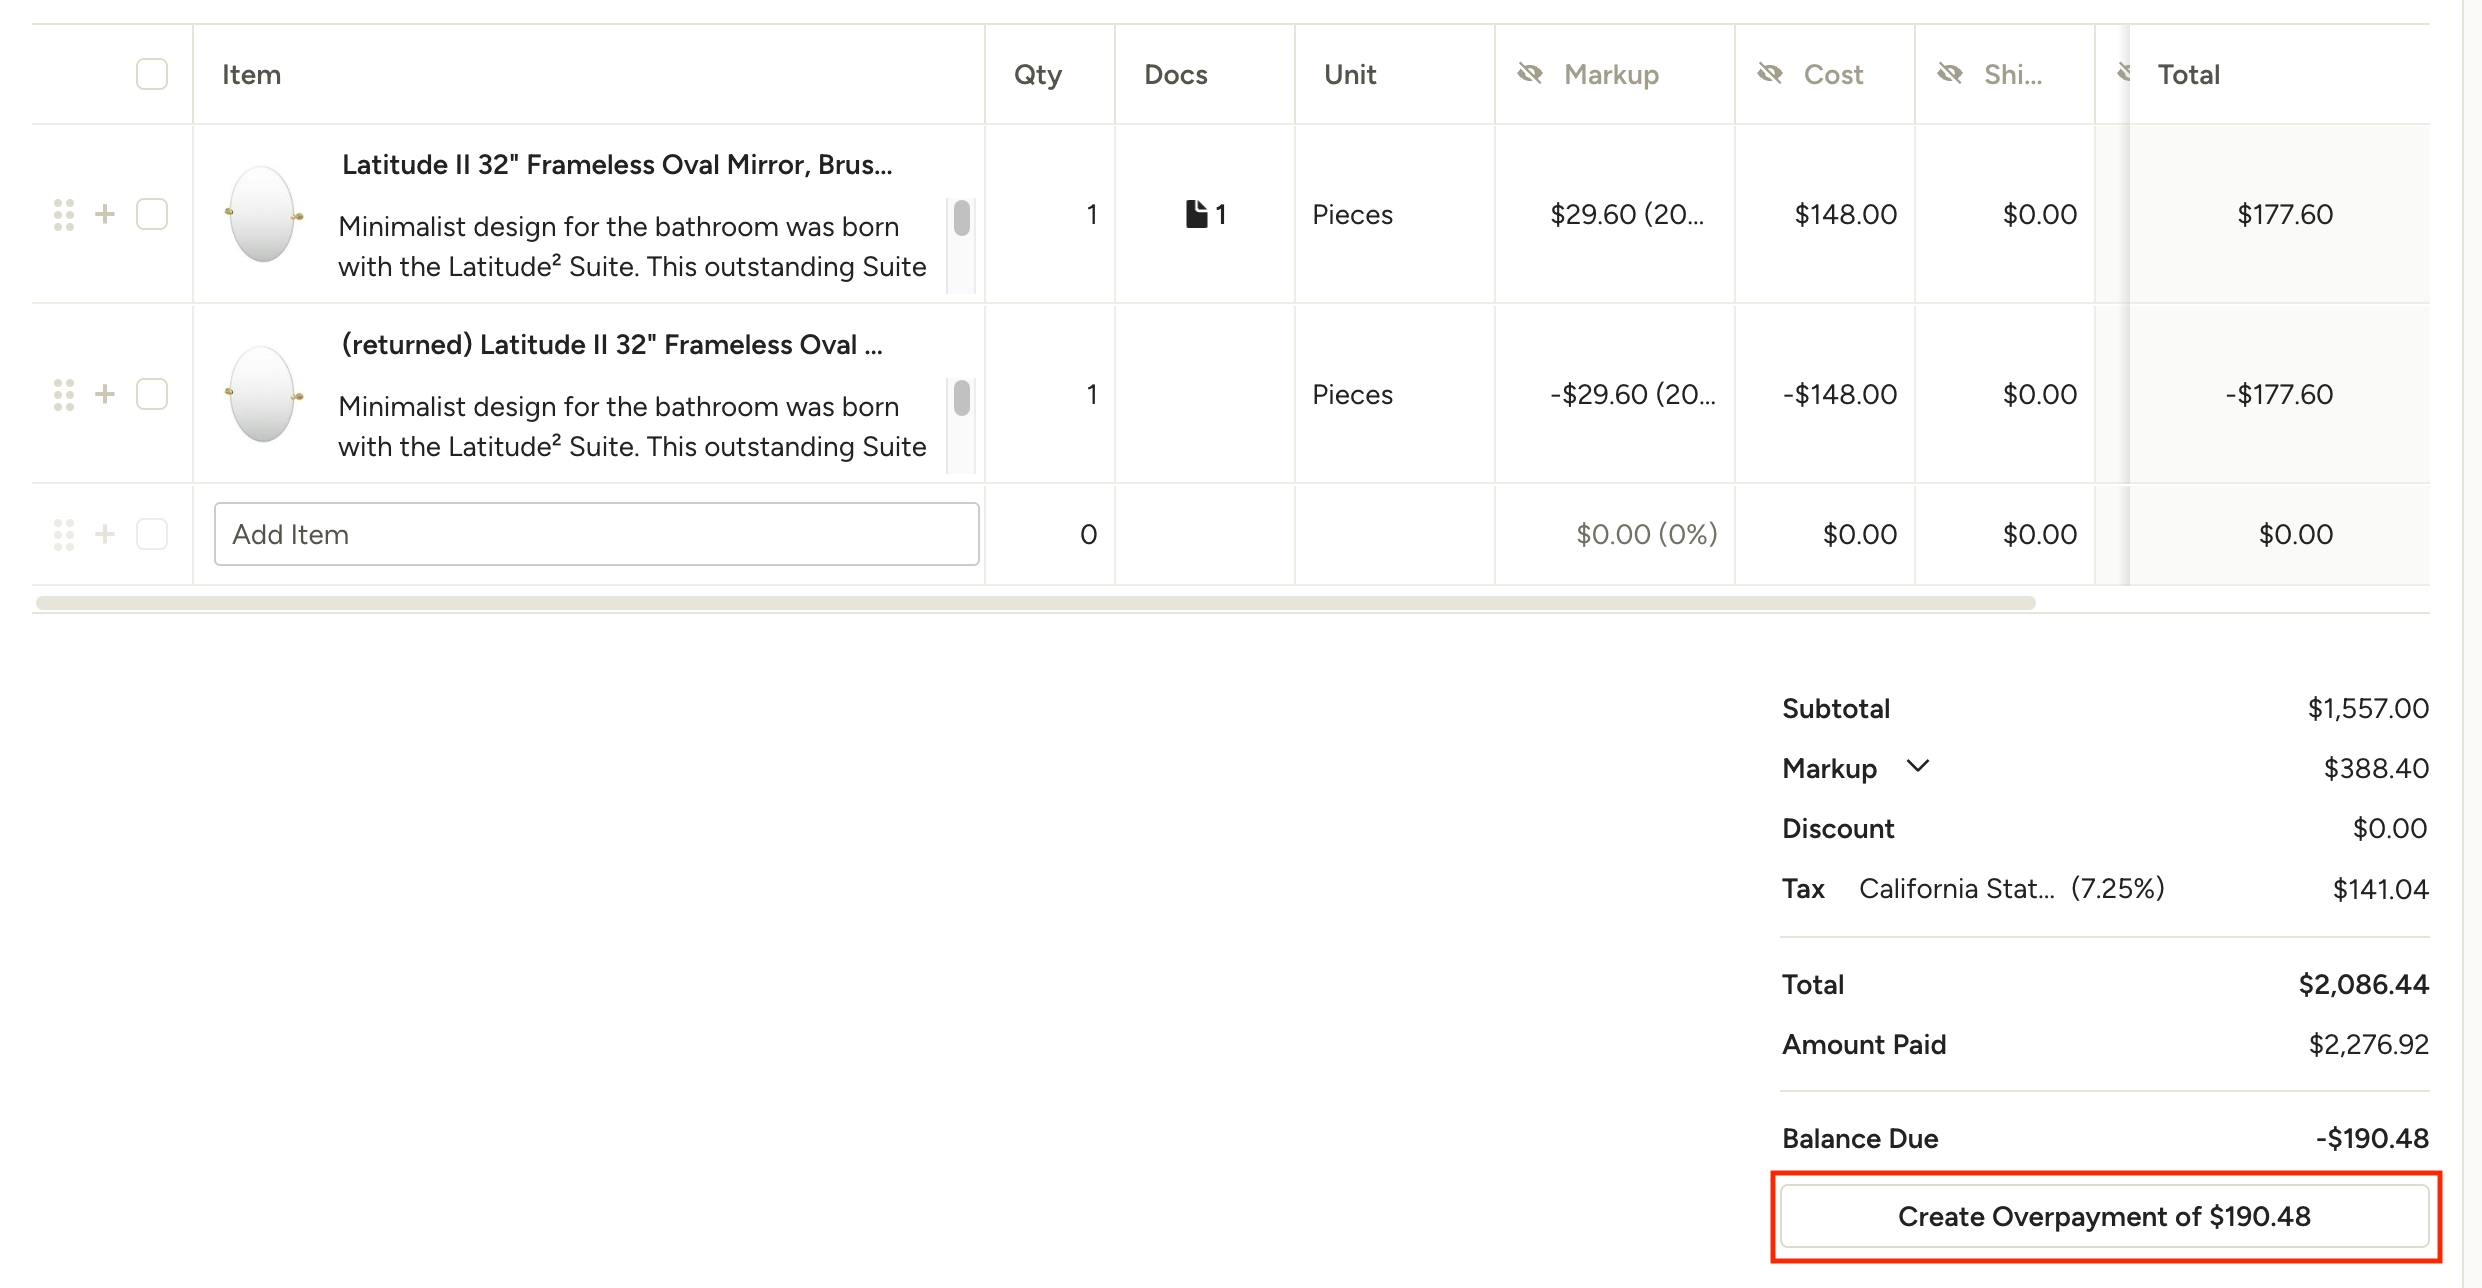
If you are not ready to issue the invoice but want to create an overpayment, click Create Overpayment beneath the negative Balance Due in the Total section of your invoice. A pop-up will appear asking you confirm you want to create an overpayment for the amount shown. Click Create to confirm.
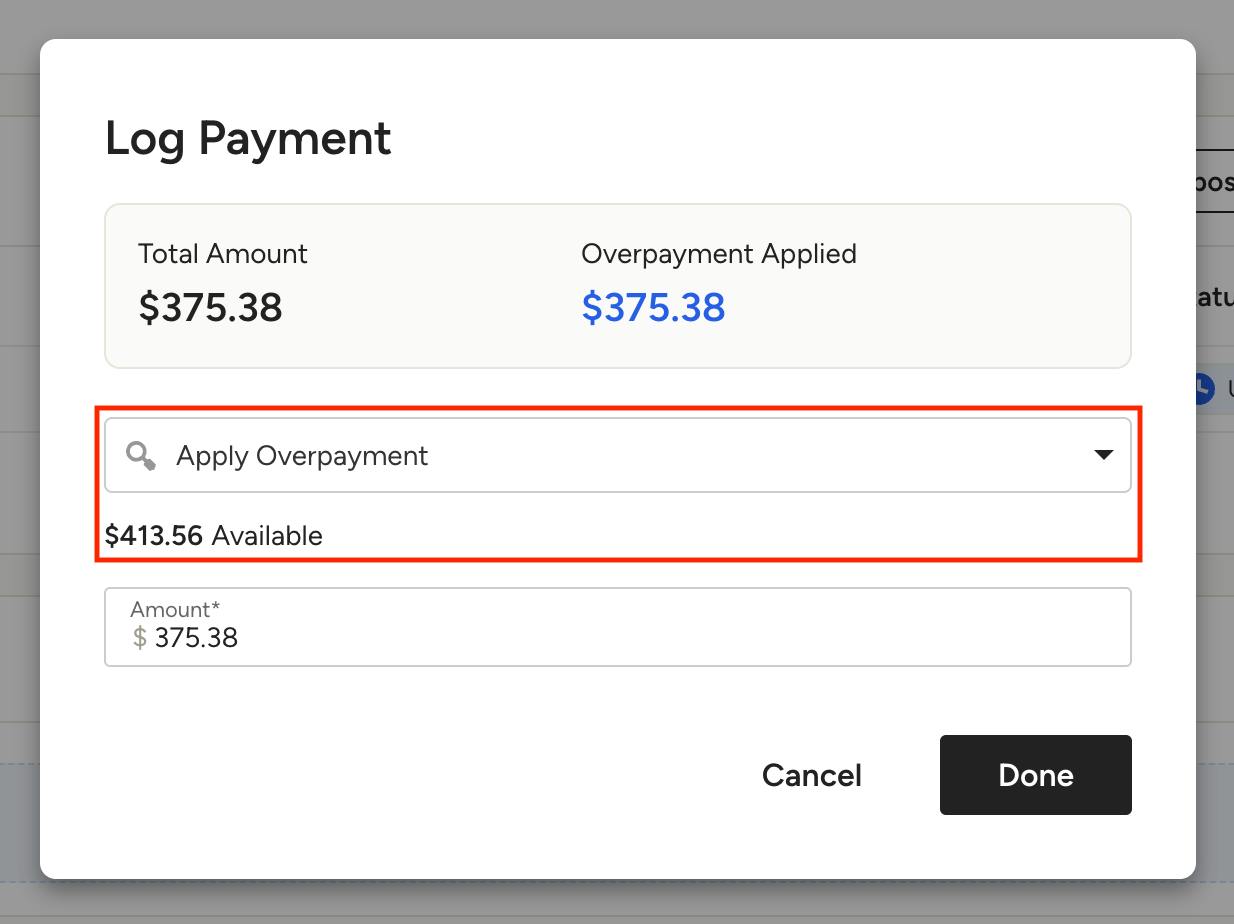
Apply an Overpayment
Once you have created an overpayment, you can apply it as payment towards other documents. Simply select Apply Overpayment from the payment type dropdown when logging a payment. You will see the available amount below. If the available overpayment is more than the payment being logged, the payment amount will be deducted from the overpayment and anything left will be available to apply to future payments.
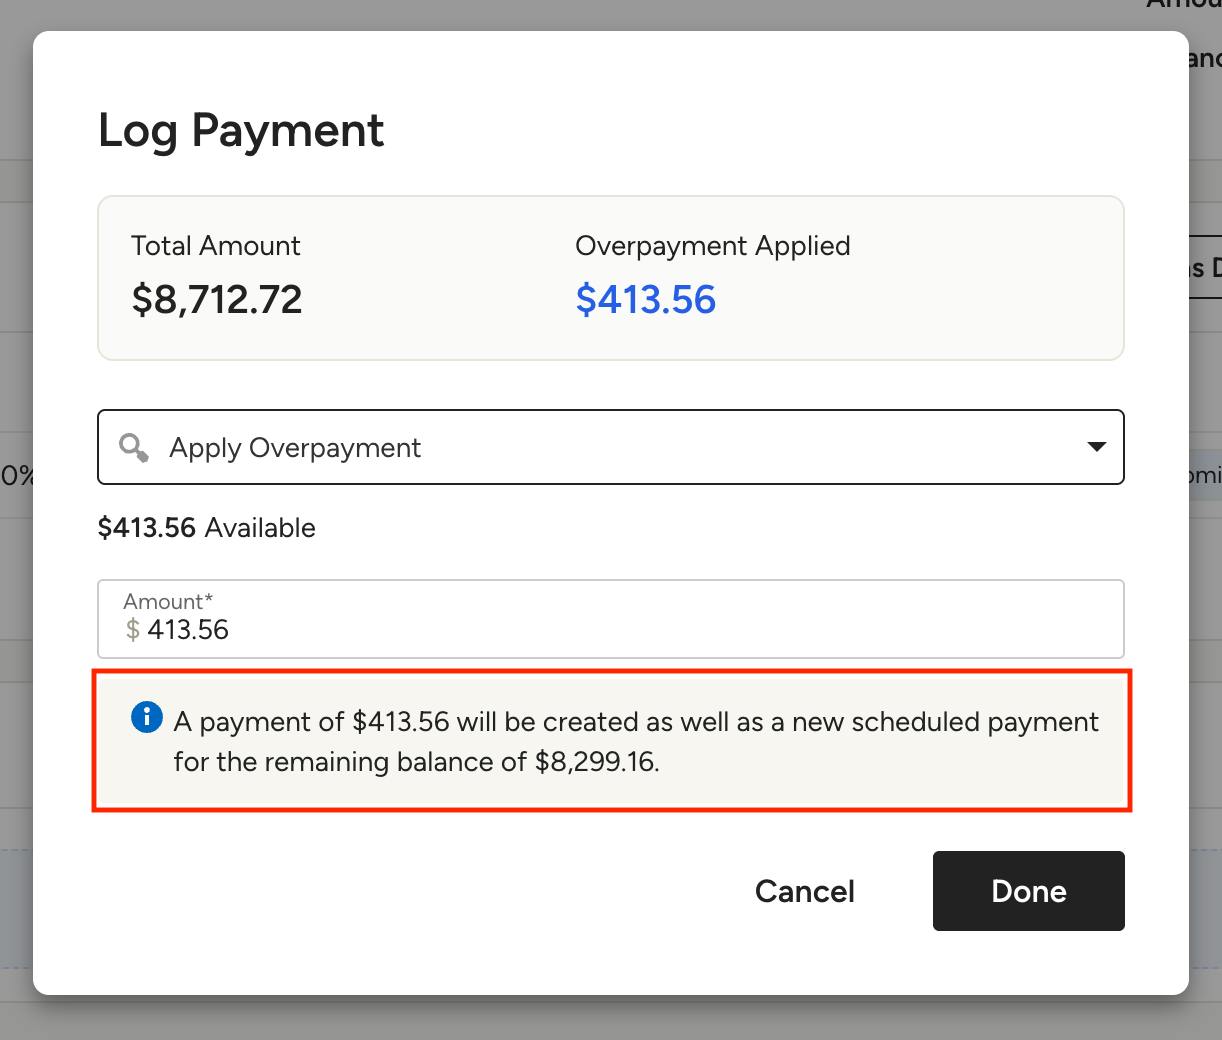
If the available overpayment is less than the payment amount, the available overpayment will be applied and a new payment will be scheduled for the remainder of the balance due, so that you can use an additional payment method.
View Project Overpayments
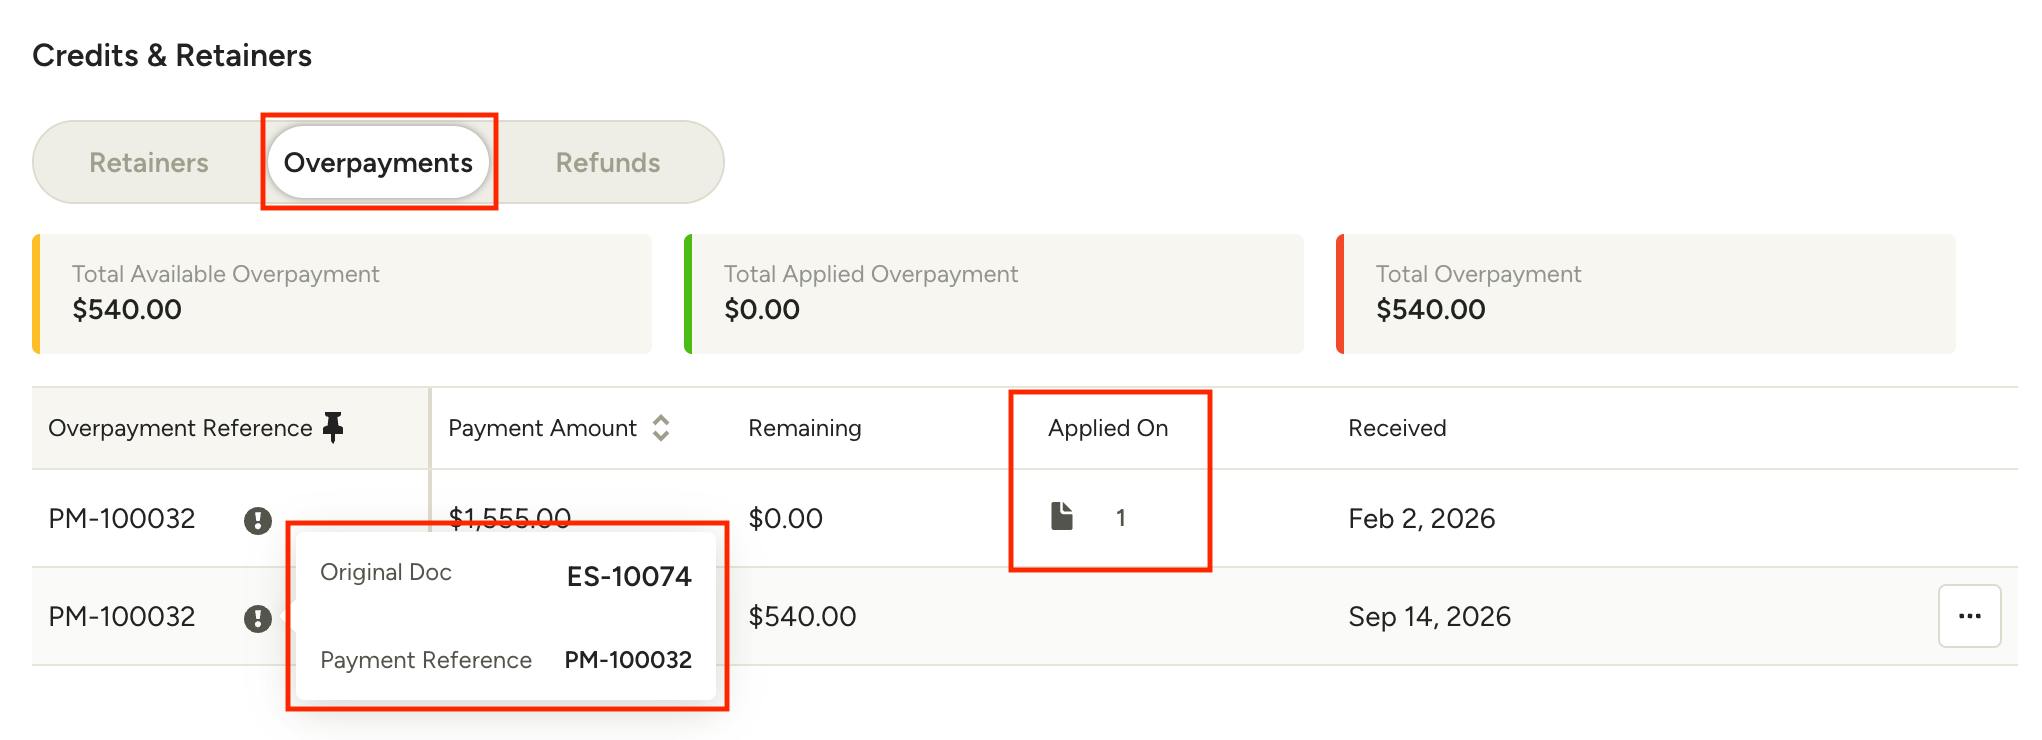
To see any overpayments for a specific project, go back to the overview page of the project and click Credits & Retainers in the left-hand menu. Click on the Overpayments tab at the top, and you’ll be able to see the total available overpayment balance as well as any individual overpayments you've created. Hover over the information icon to see the original document and payment reference for an individual overpayment. You can see which documents an overpayment was applied to in the Applied On column.
Delete Overpayments
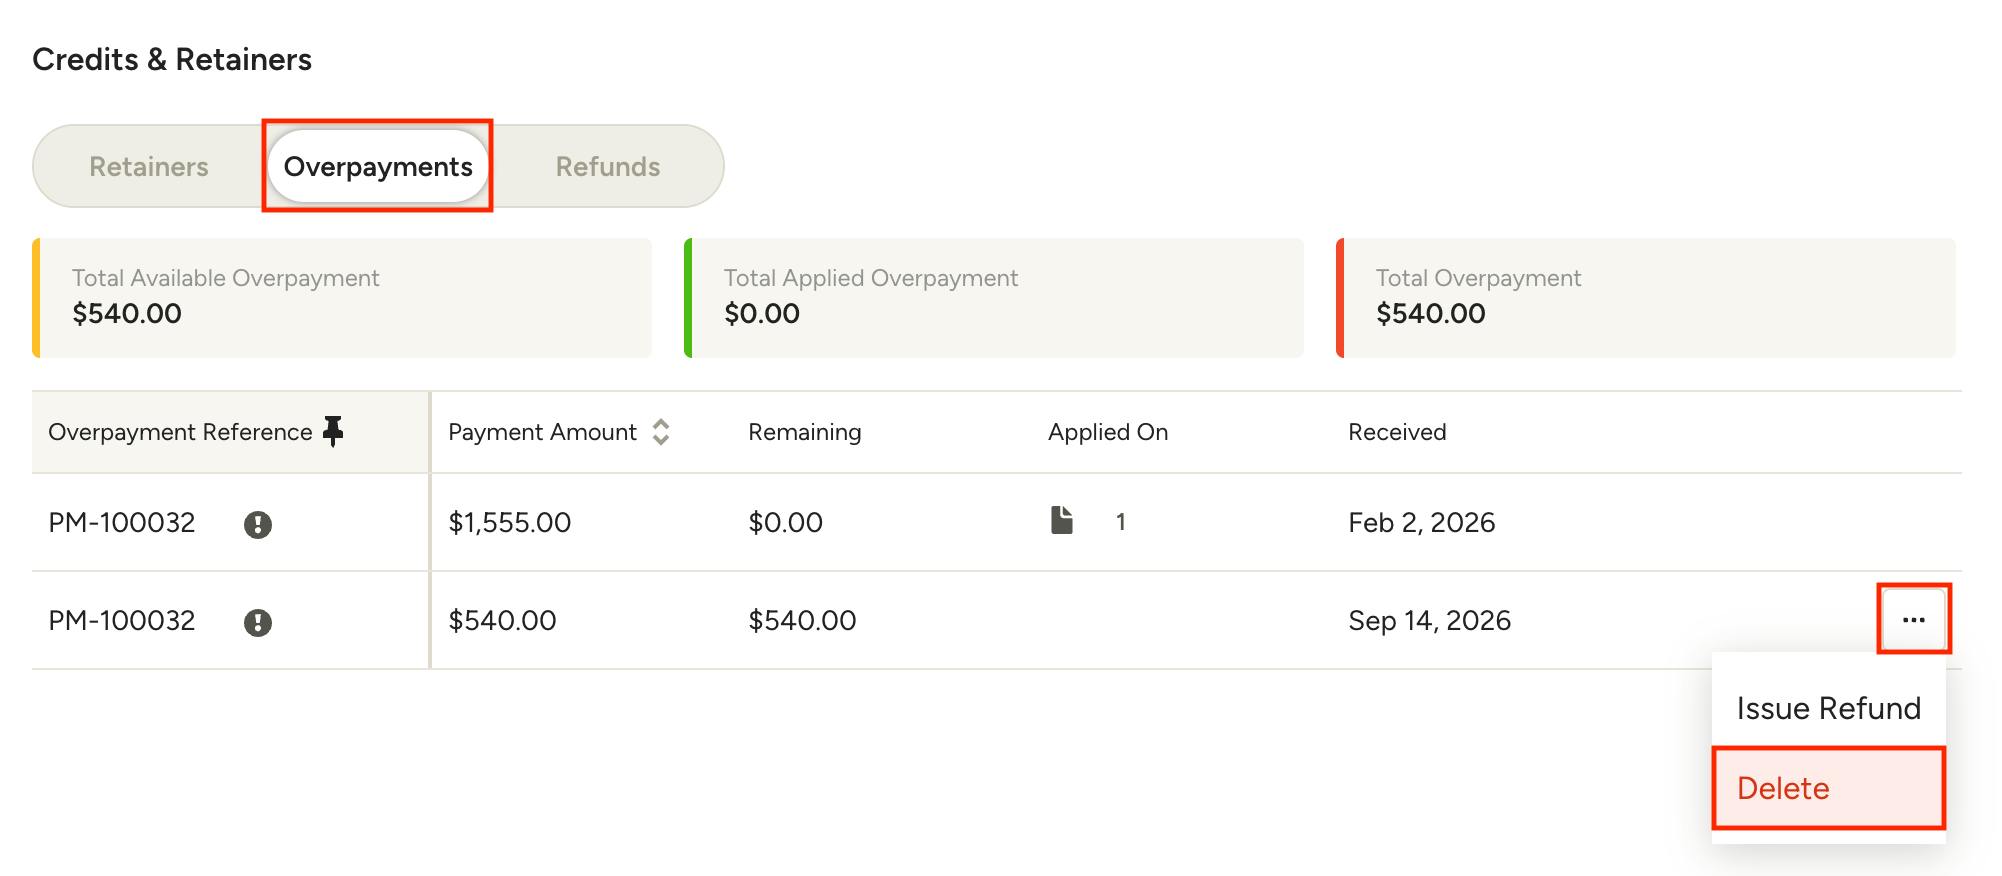
To delete an overpayment, navigate to the Overpayment tab in the Credits & Retainers section of a project, click the three dots to the right of the overpayment and select Delete.
Please note: To prevent accounting inconsistencies, an overpayment can only be deleted if:
- It has not been refunded.
- It has not been applied to any document.
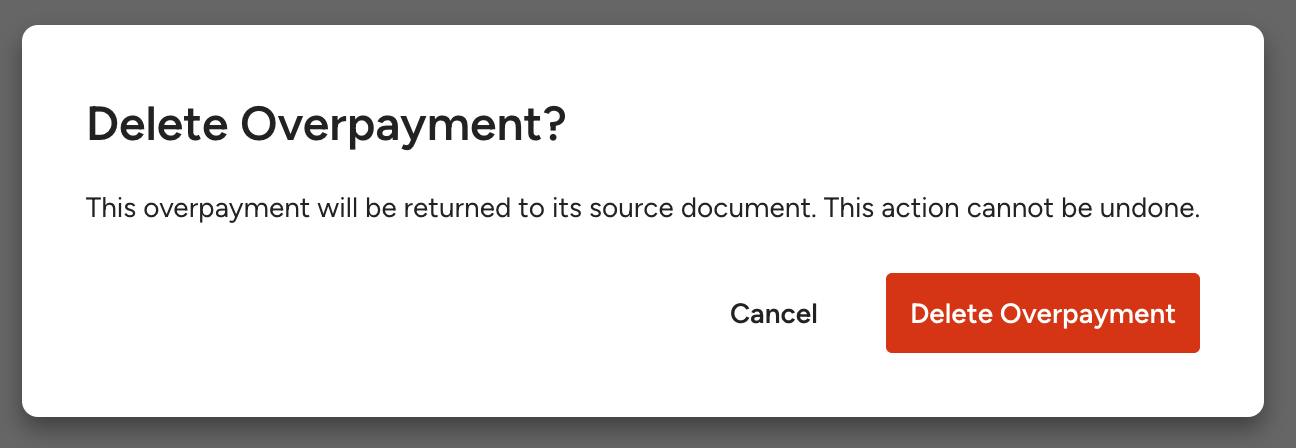
Confirm that you want to delete the overpayment — this cannot be undone.
Once confirmed, the overpayment will be returned to it's source document that it originated from.
Create an Overpayment from Invoices with Applied Retainer Payments
If a paid invoice has an applied retainer payment on it, and you attempt to create an overpayment by reducing the dollar value of the invoice itself, the difference in value will first be returned to the original retainer payments. Any leftover funds that you'd like to credit that do not come from applied retainer payments will be found as a separate overpayment in the project.
For example:
- You have a $1,000 invoice and applied retainer payment for the full payment amount of $1,000 to that invoice.
- When you attempt to create an overpayment for a returned item in the amount of $500, that $500 will be returned to the original retainer payment and you should see the balance of this retainer increase by $500 in the Retainers tab in your project. You will not find this $500 as a separate overpayment in the project itself.
- You will also see the applied payment recorded on the invoice itself reduce in value accordingly.