How to Use Allowances on Houzz Pro
Allowances are budget placeholders used in estimates or proposals that let you show estimated costs without having to finalize numbers yet. By including allowances in your early financial documents, you set budget expectations and provide clients the flexibility to make product selections later, all while keeping the project moving forward.
The allowance feature helps you manage costs for items that haven't been finalized at the start of a project — like fixtures, finishes, and appliances. If you'd like, you can link an allowance directly to a selections board, making it easy to set client expectations upfront, track cost variances as selections are made, and handle any overages along the way — though linking a board isn't required to create an allowance.
Once you have a clear idea of the actual budget, you can finalize an allowance, locking in the financial data. Finalized selections on an allowance board can be merged into the original estimate or turned into change orders, so you can reconcile allowances to keep your estimates and budgets perfectly aligned.
Create Allowance Item
Allowances can be set from an existing line item or created from scratch, each with the option to create a linked selections board.
Set Existing Item as Allowance
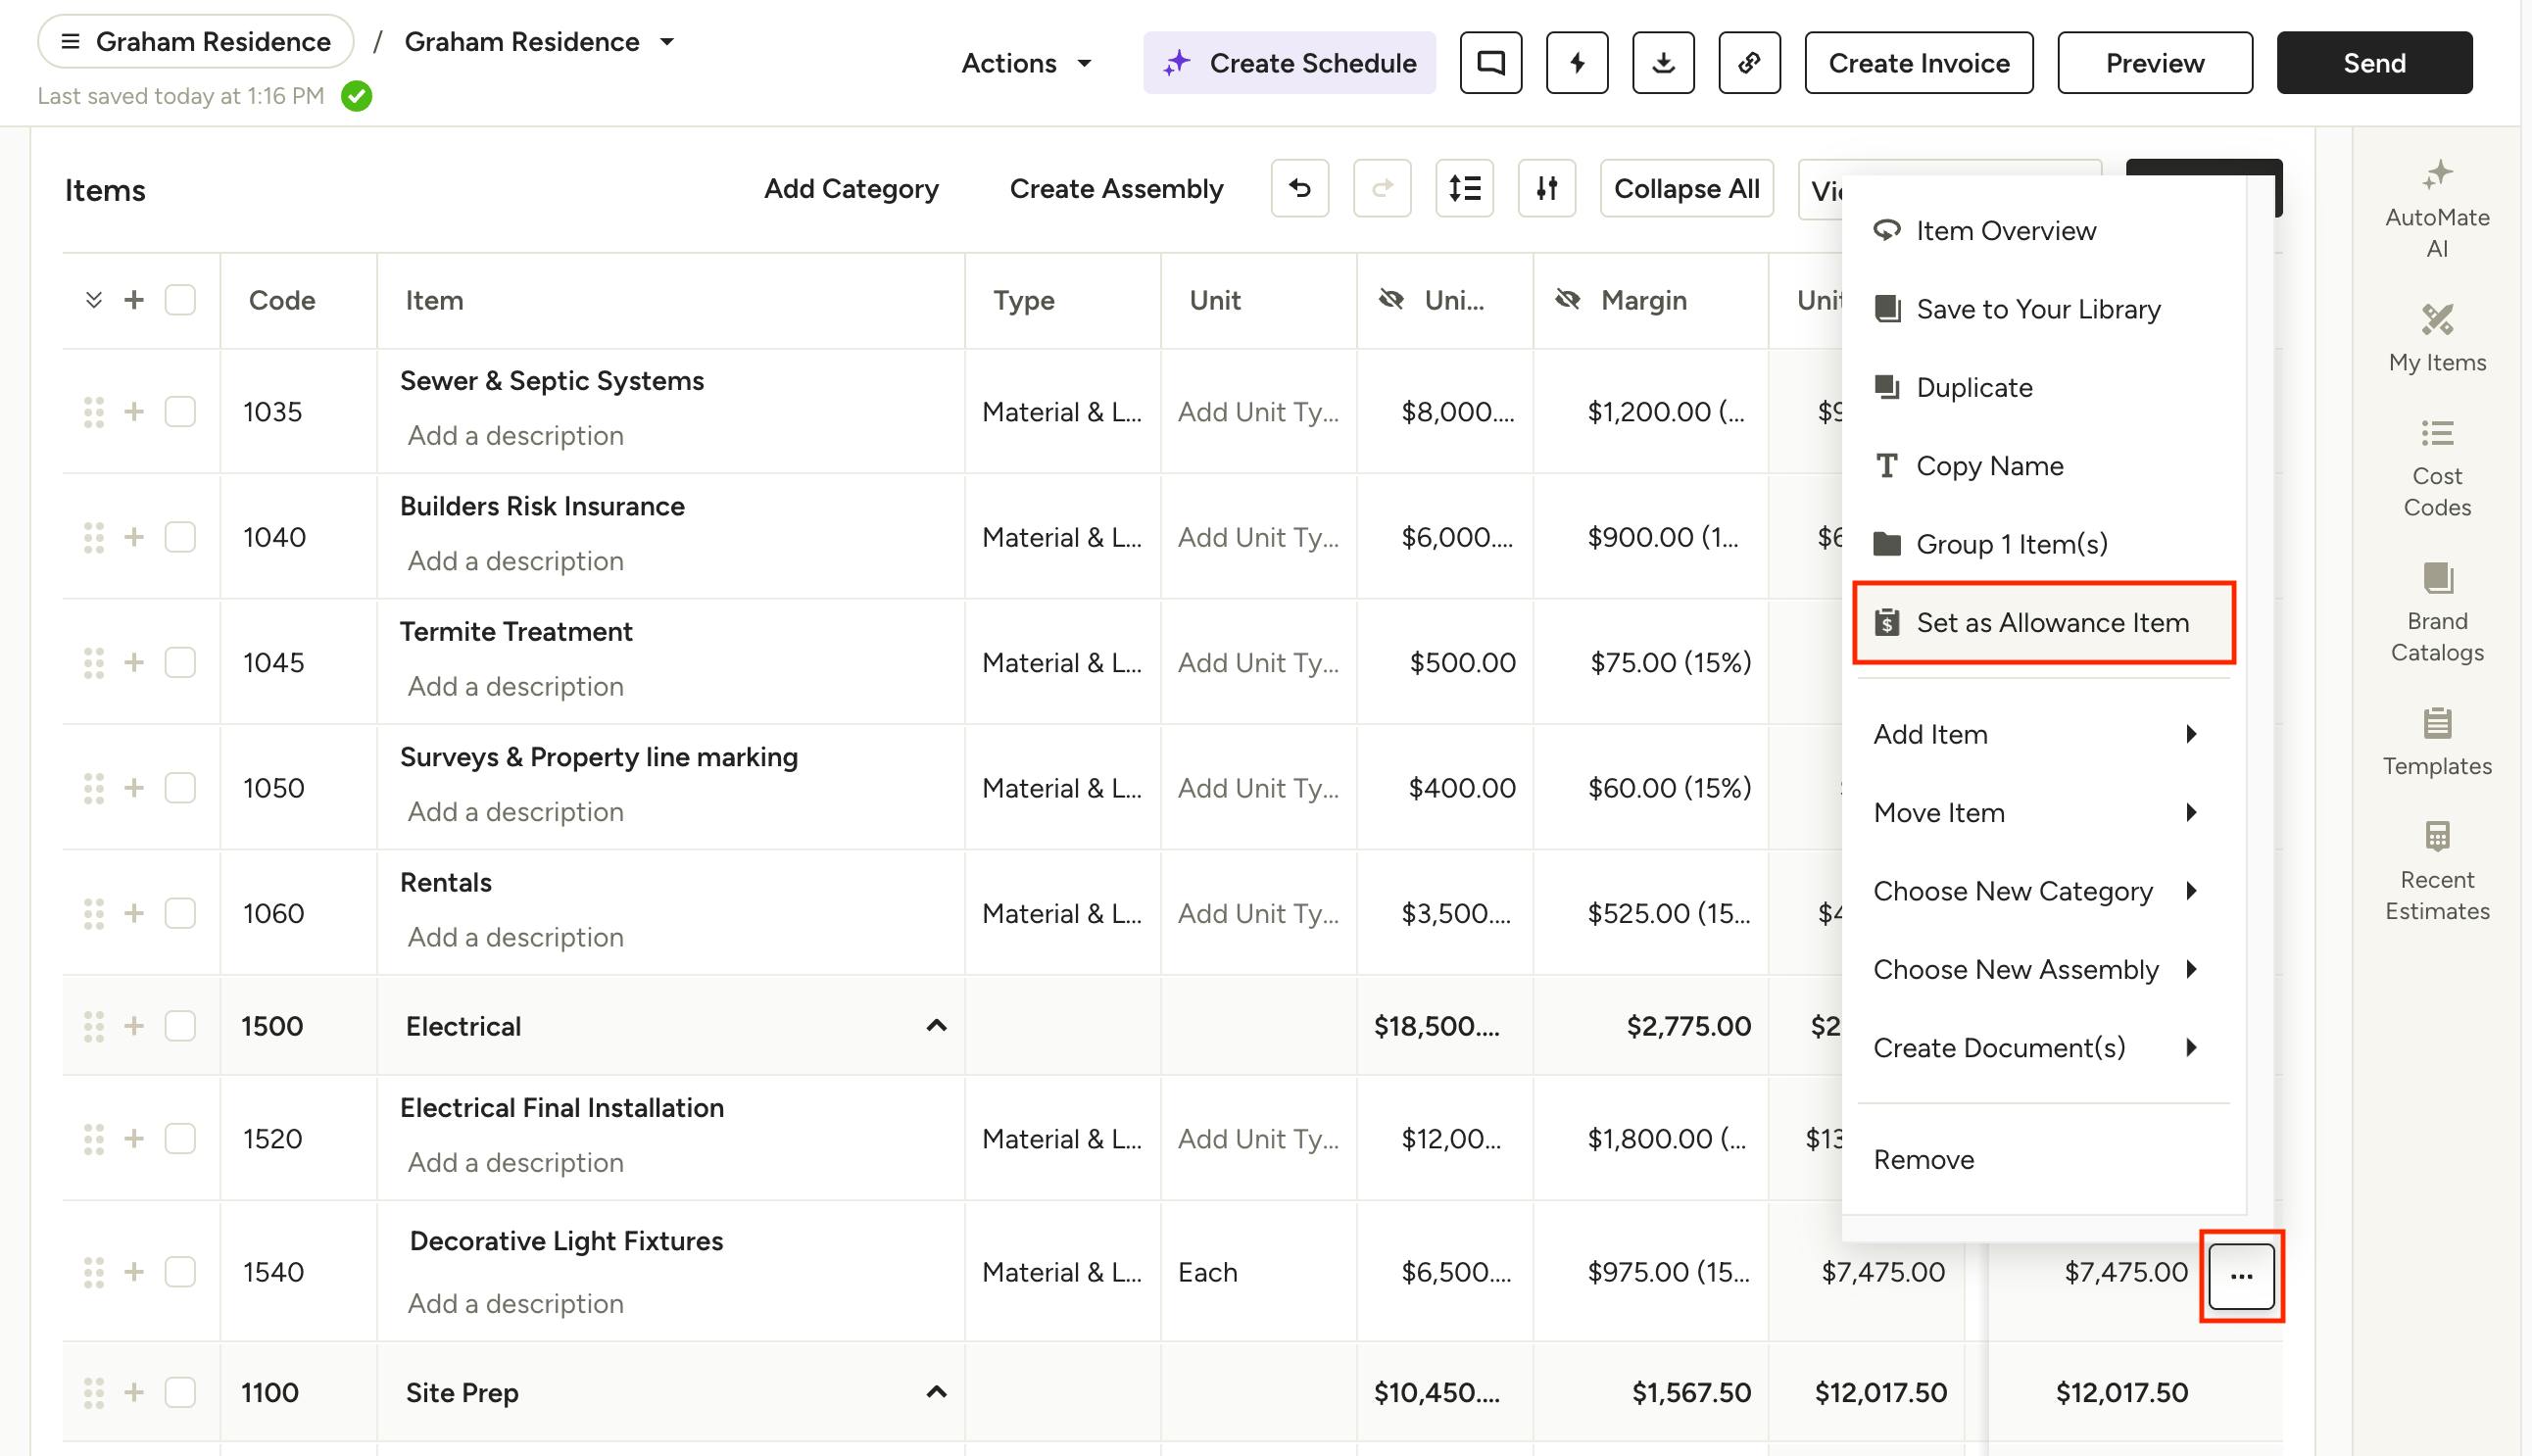
To set an existing item as an allowance in an estimate or proposal, click the three dots menu on the right of the item and select Set as Allowance Item.
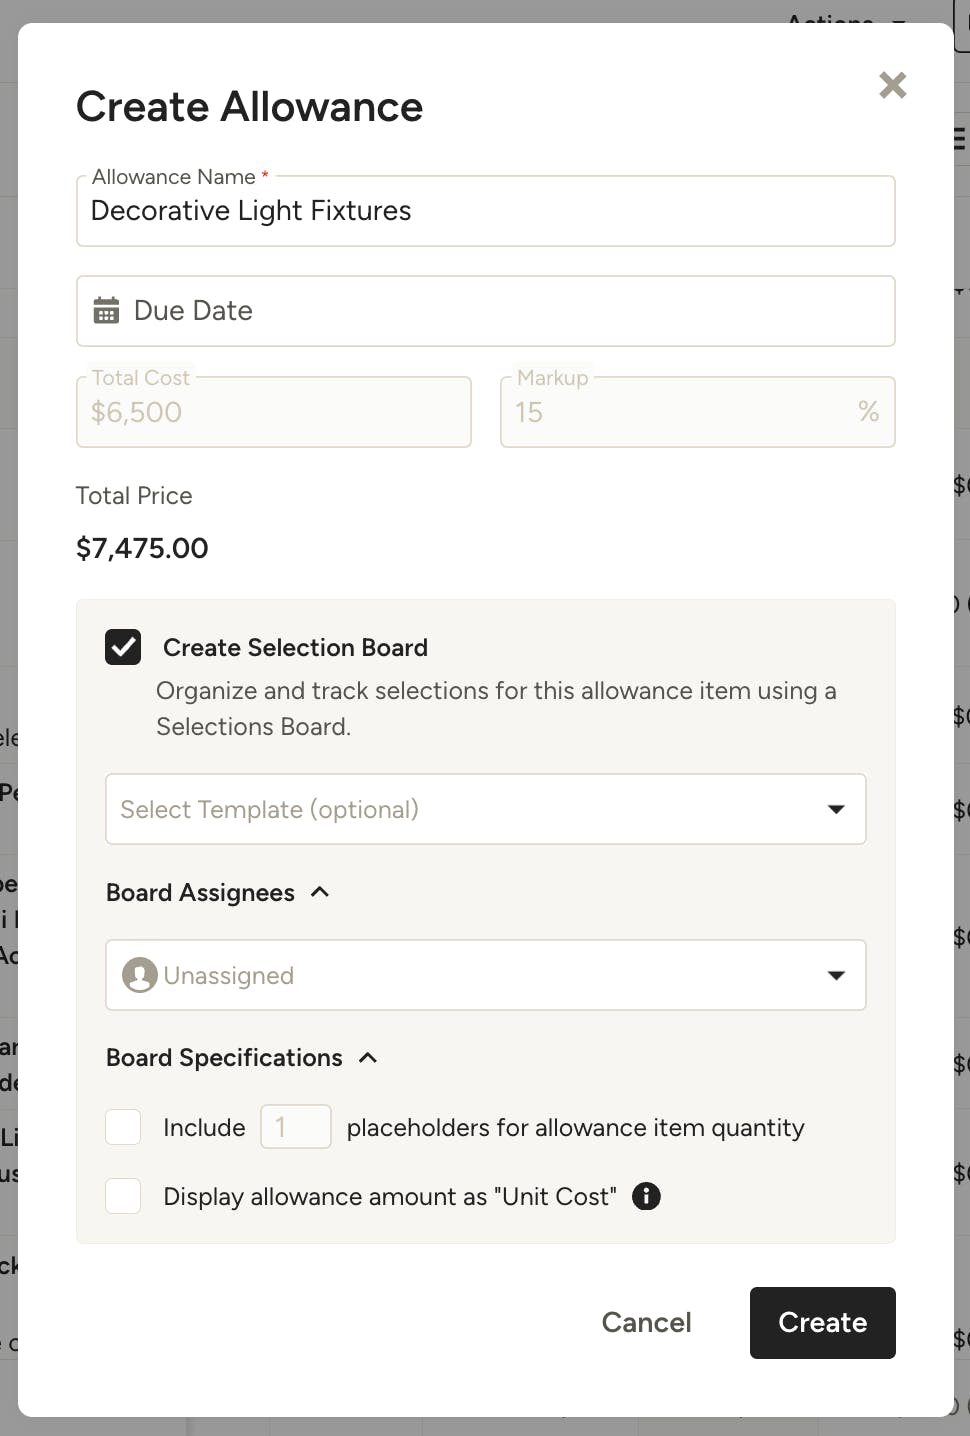
This will open a modal for you to set up the allowance. Fill out the relevant information, as detailed here:
- Allowance Name: This will automatically fill in with the line item name. You can adjust it as needed.
- Due Date: Set the due date for when the allowance needs to be finalized.
- Total Cost / Markup: These are based off the numbers set in the estimate. If you need to change them, click Cancel and make edits in the estimate before continuing with the allowance.
Create Selections Board — check the box to create a linked board to organize and track selections for this allowance, then fill in the following information.
- Template: If you have a selections board template you want to apply to the allowance board, select it here. This is optional.
- Board Assignees: Assign relevant team members to the selections board.
- Include X placeholders for allowance item quantity: Check this box to create a placeholder for the line item. If you need 2 sinks, for example, enter 2 and two placeholders will be created.
- Display allowance item as "Unit Cost": Check this to show your client the actual cost of each item before markup. This is ideal for cost plus projects. You can also set this in the allowance board settings later.
Click Create and your new allowance will be set. If you opted to create a linked Selections Board, click the link in the popup at the bottom of the page, or navigate to the Selection Boards section of your project to access the board.
Create Allowance From Scratch
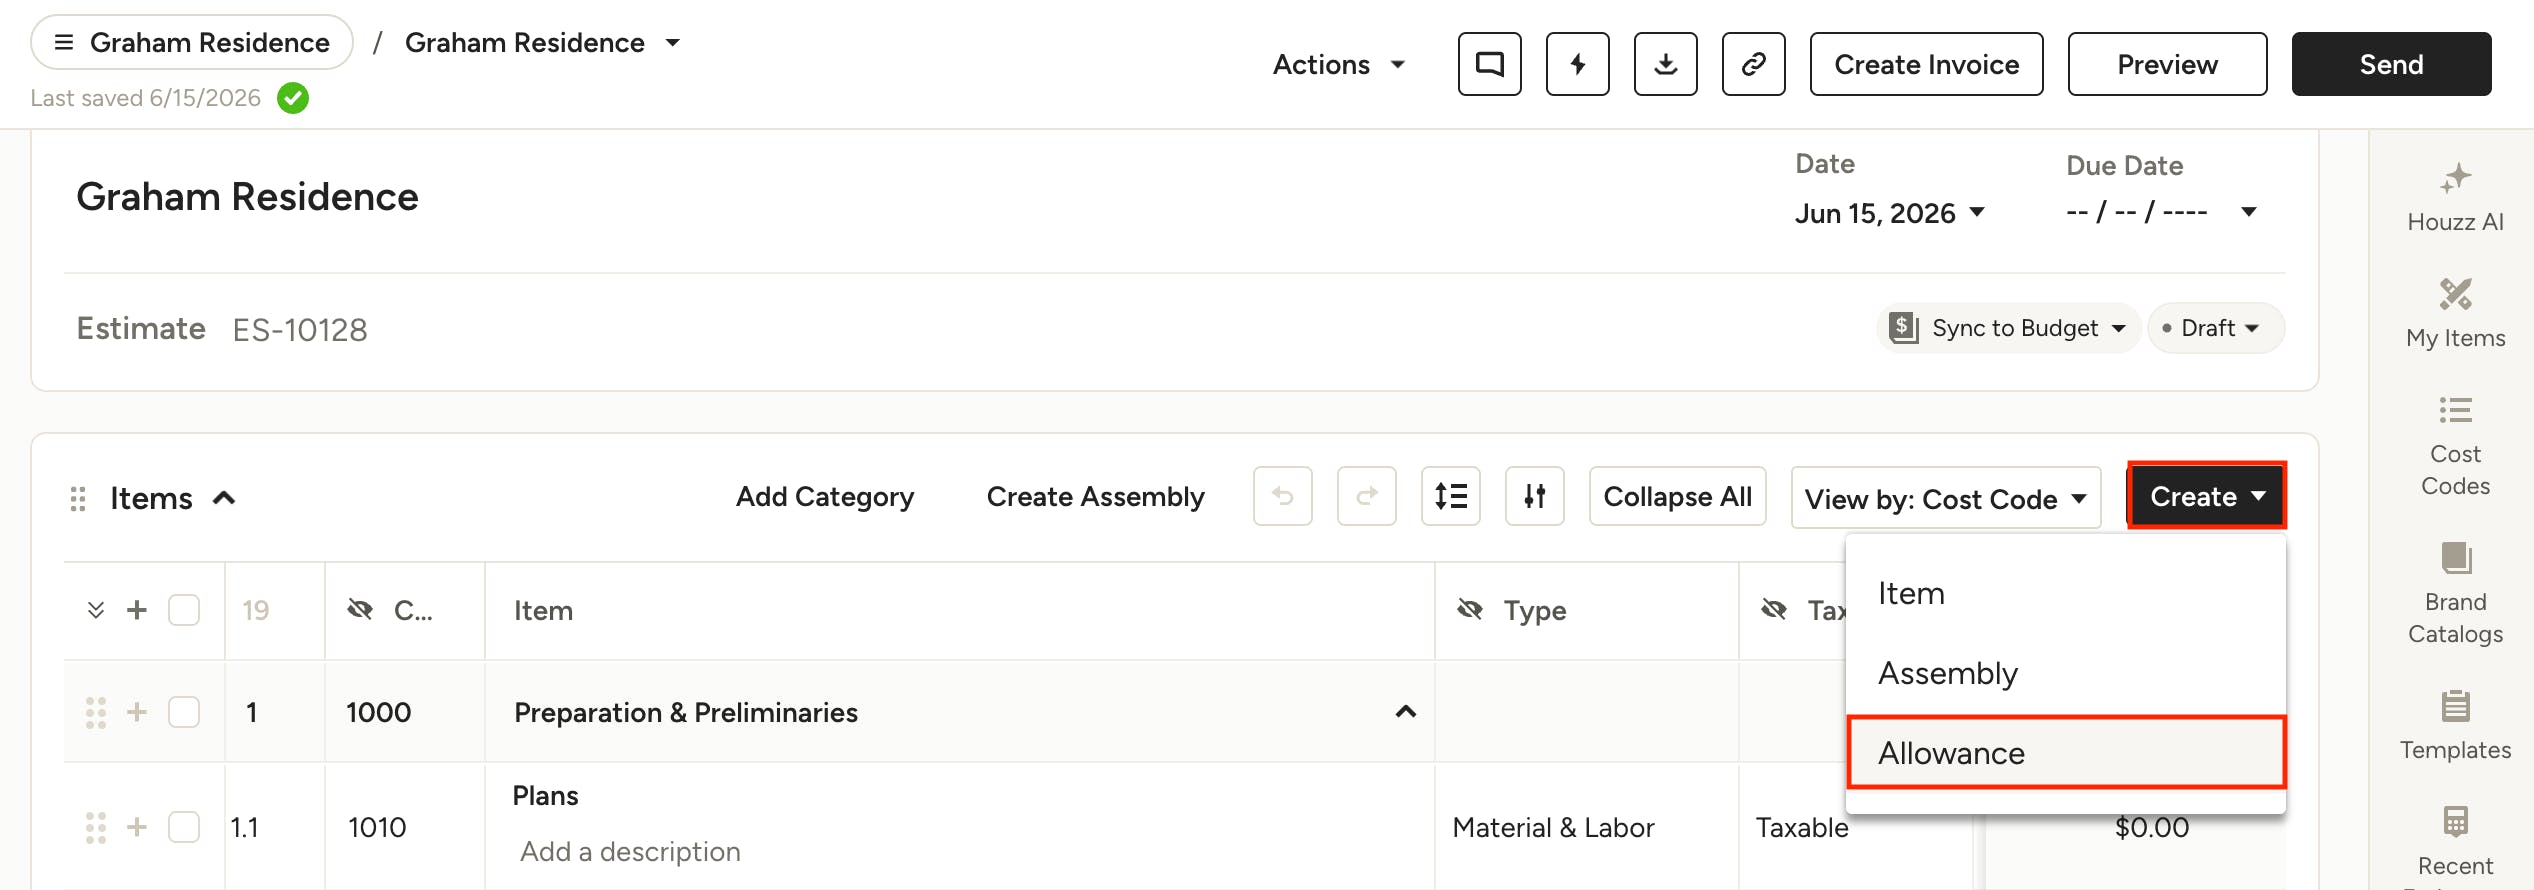
To create an allowance from scratch in an estimate or proposal, click the Create menu at the top right of your items list, then select Allowance.
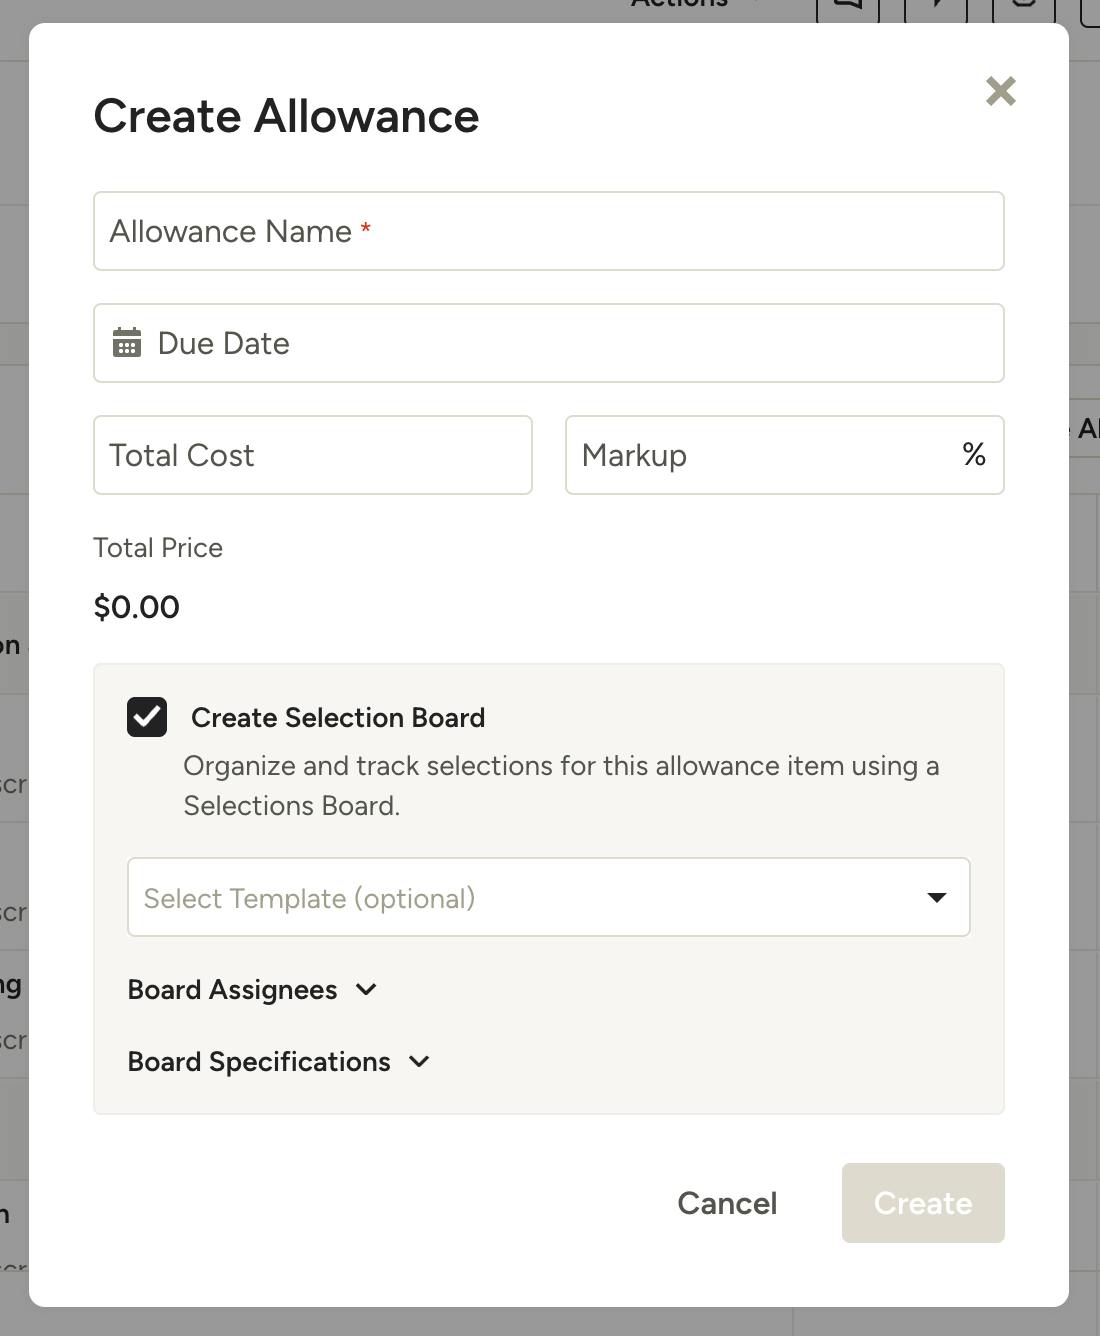
This will open a modal for you to set up the allowance. Fill out the relevant information, as detailed here:
- Allowance Name: This is required and will appear as the line item name on your document.
- Due Date: Set the due date for when the allowance needs to be finalized.
- Total Cost / Markup: Add the estimated total cost and any markup relevant to the allowance.
Create Selections Board — check the box to create a linked board to organize and track selections for this allowance, then fill in the following information.
- Template: If you have a selections board template you want to apply to the allowance board, select it here. This is optional.
- Board Assignees: Assign relevant team members to the selections board.
- Include X placeholders for allowance item quantity: Check this box to create a placeholder for the line item. If you need 2 sinks, for example, enter 2 and two placeholders will be created.
- Display allowance item as "Unit Cost": Check this to show your client the actual cost of each item before markup. This is ideal for cost plus projects. You can also set this in the allowance board settings later.
Click Create and your new allowance will be set. If you opted to create a linked Selections Board, click the link in the popup at the bottom of the page, or navigate to the Selection Boards section of your project to access the board.
Build Allowance Selections Board
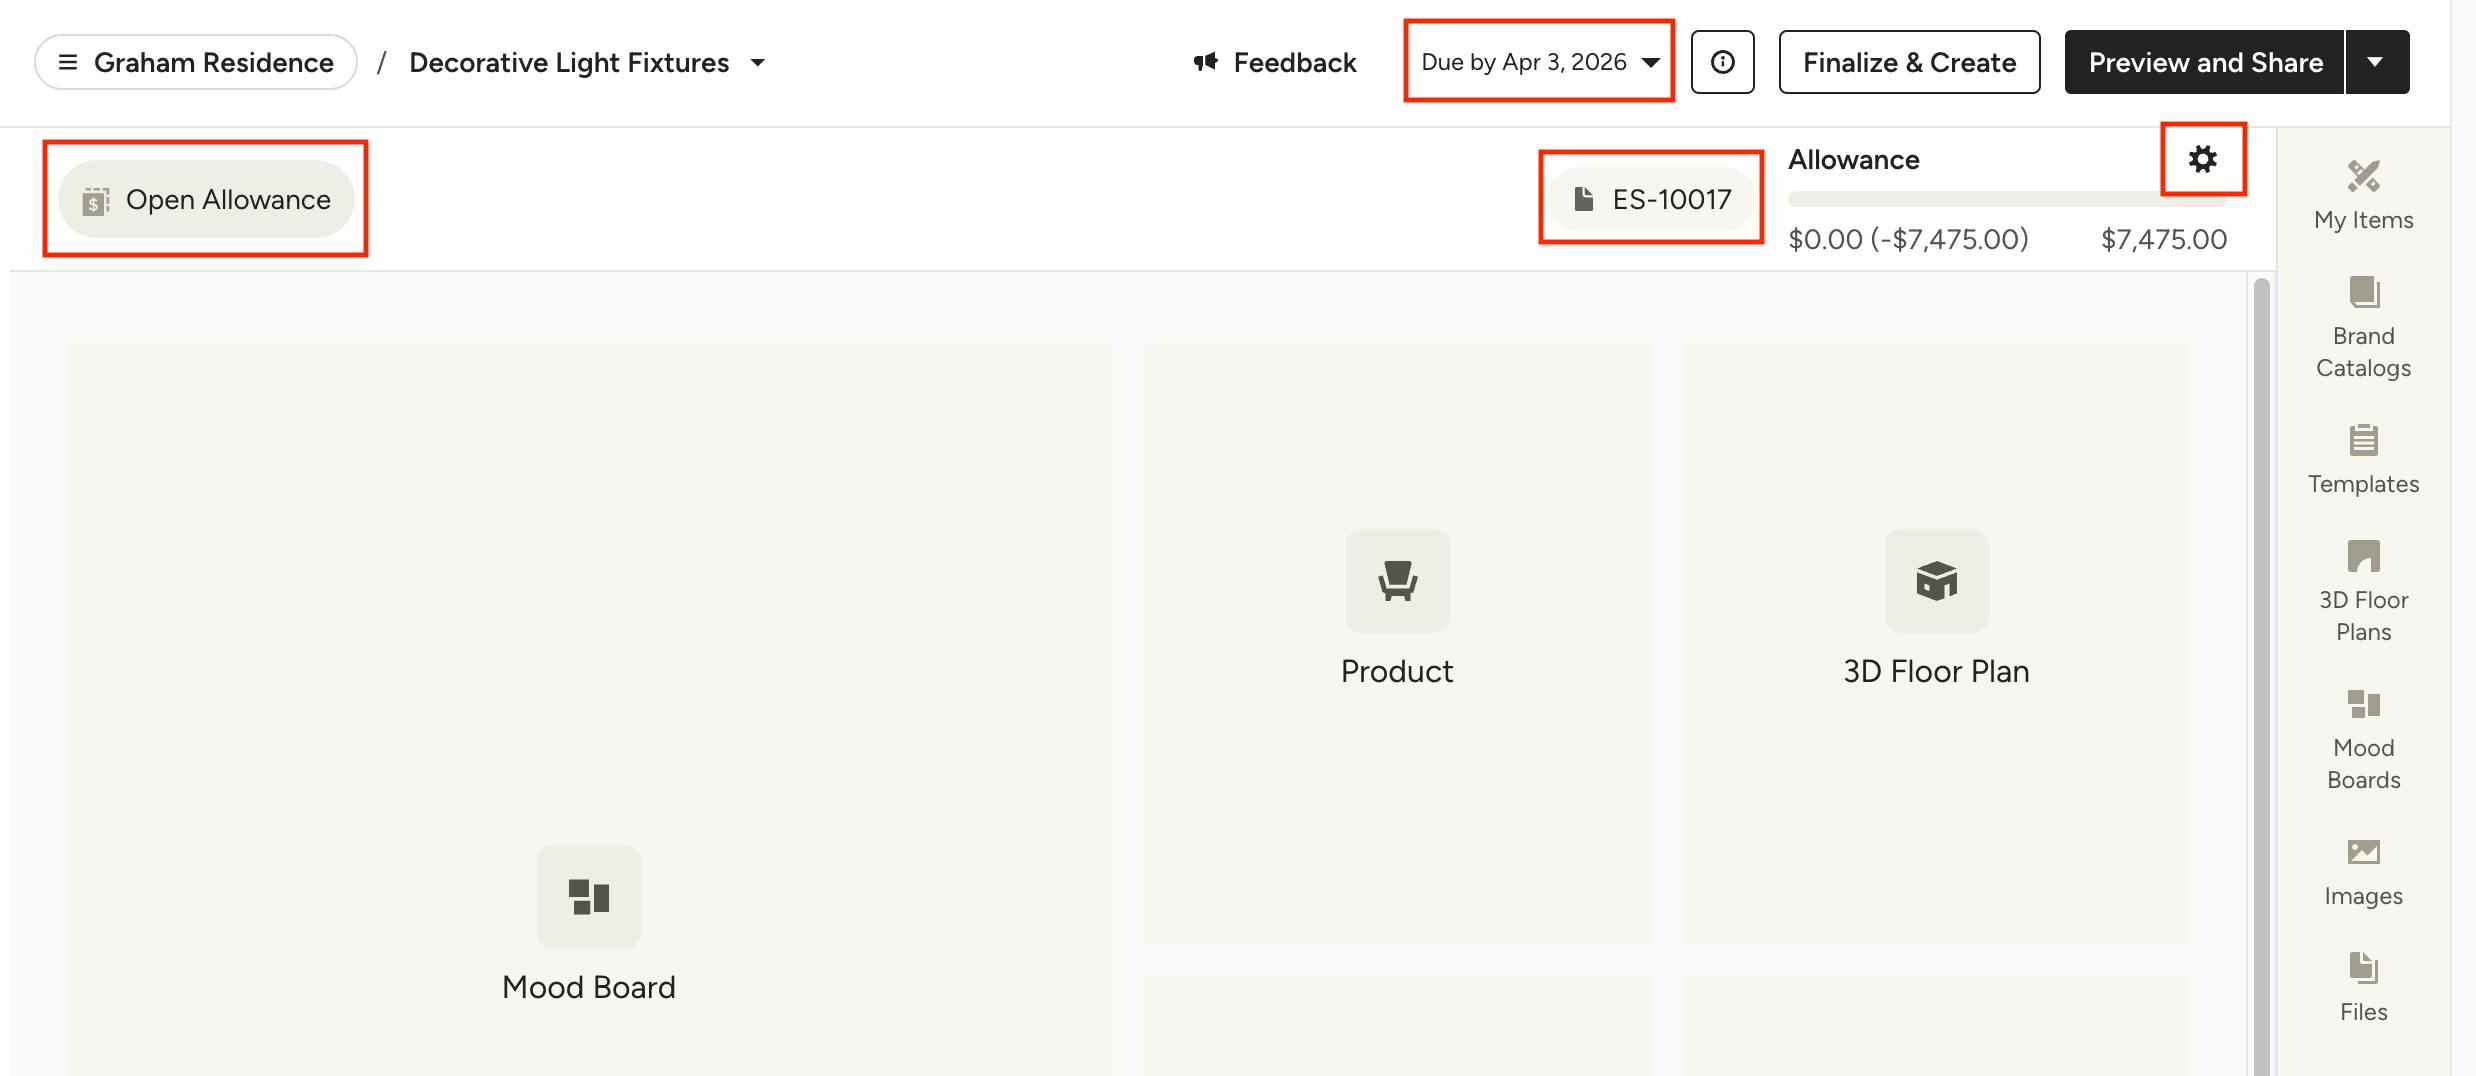
If you opted to create a selections board tethered to your allowance, you'll notice it has a few more pieces of information than a typical selections board.
The status of the allowance (Open, Finalized, Re-opened) will appear in the top left.
The due date will show at the top of the board, and is available to change by clicking on it.
The estimate that the allowance is linked to will show at the top of the board for easy access.
The settings icon, to the right of the allowance budget, is where you can change the display settings to show items Unit Cost or Unit Price.
Add Items
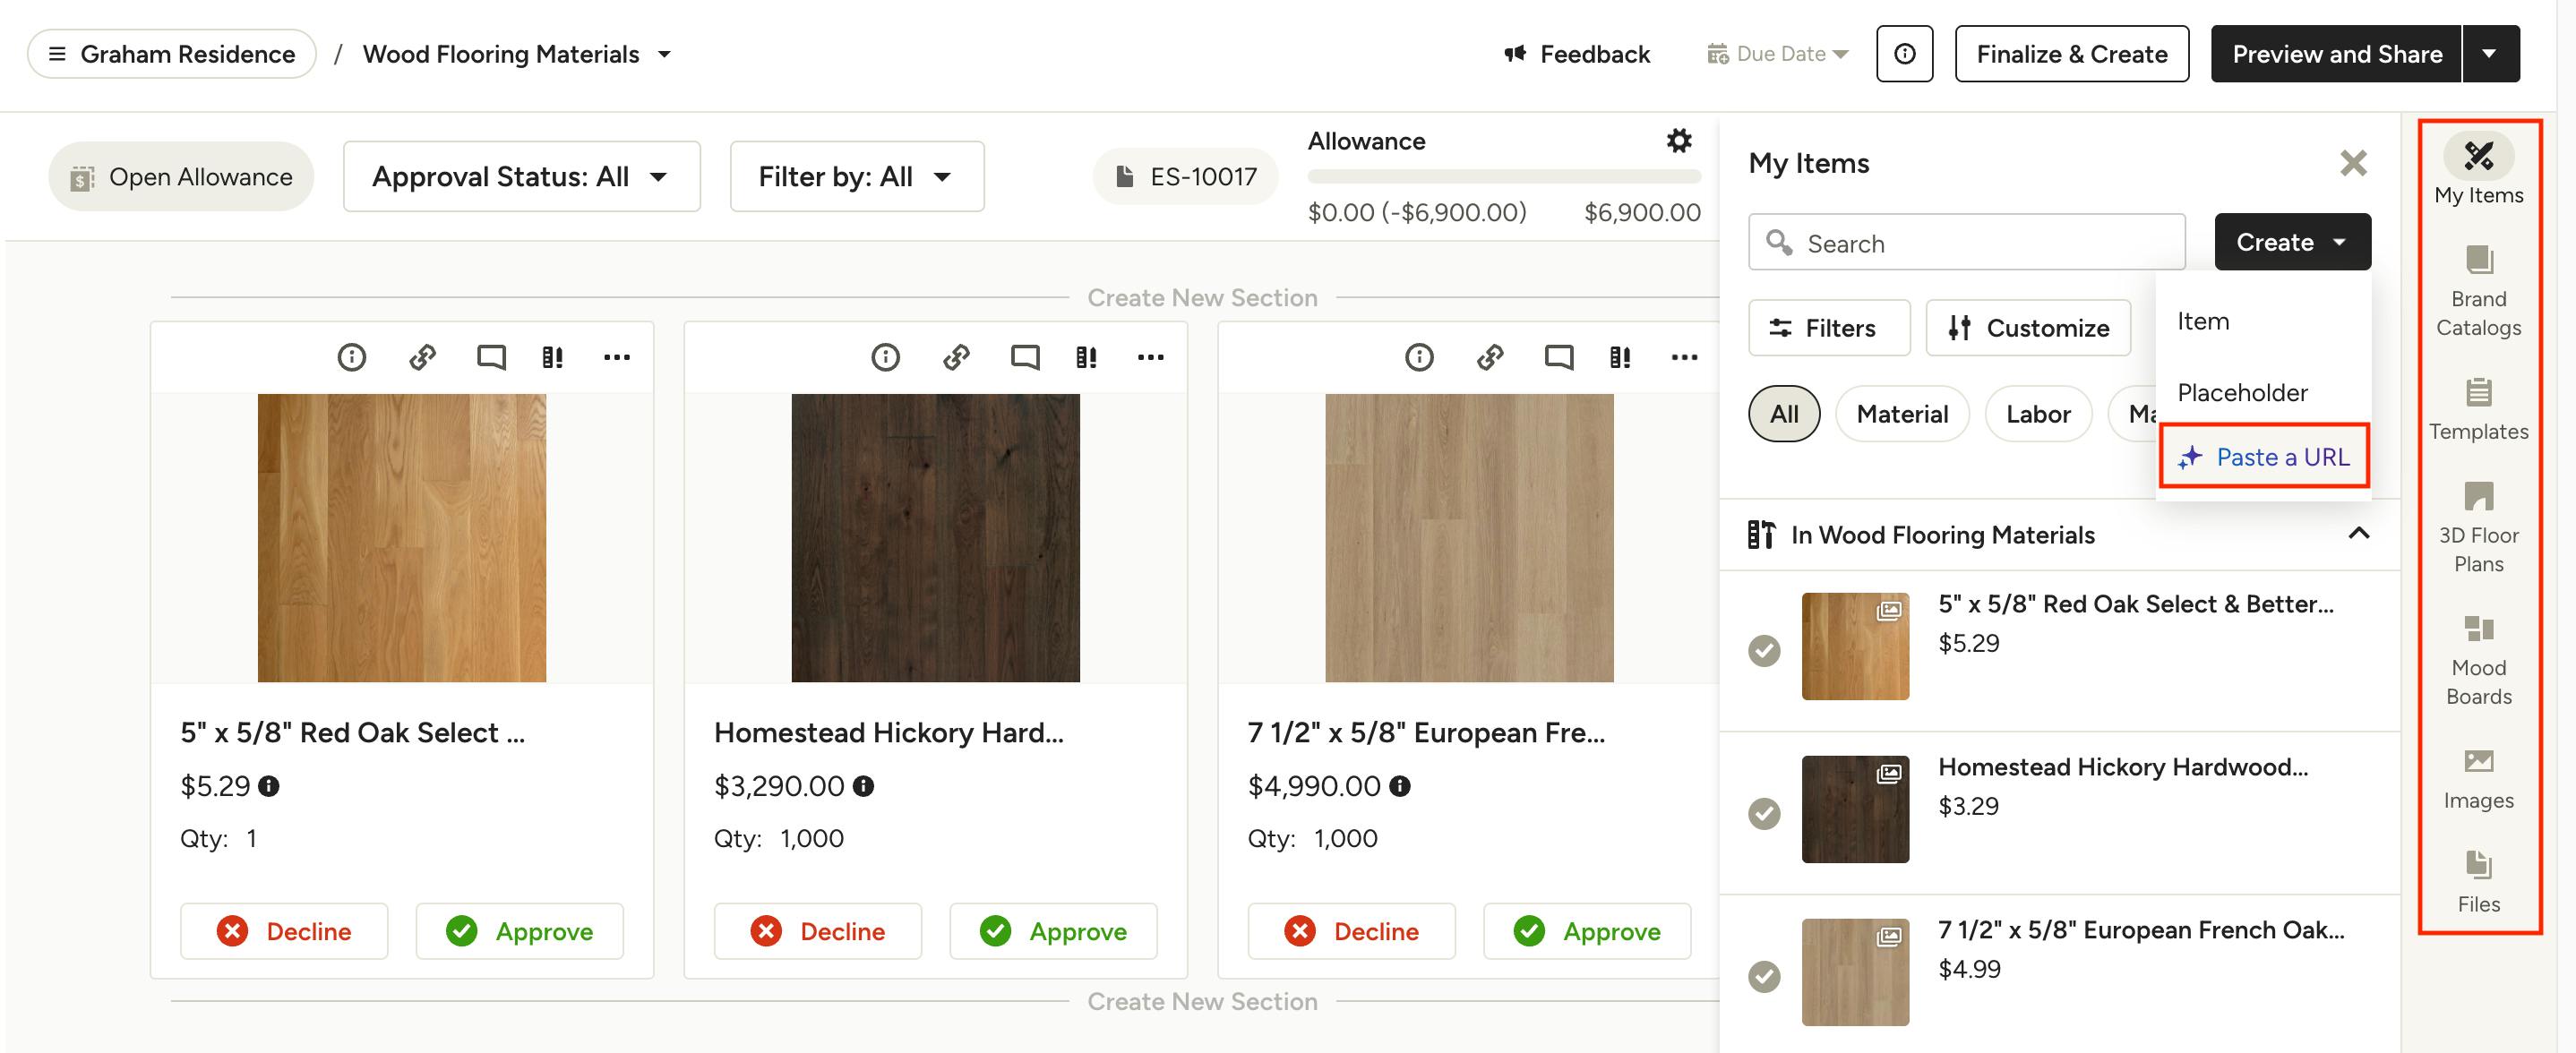
Use the options in the right panel to add items to your board. Add existing items from your My Items library, or use the Clipper or AI Paste URL feature to quickly add items as you source from your vendors online. Learn more about adding items to selection boards in How to Use Selection Boards.
Finalize & Create
Finalize Standalone Allowance
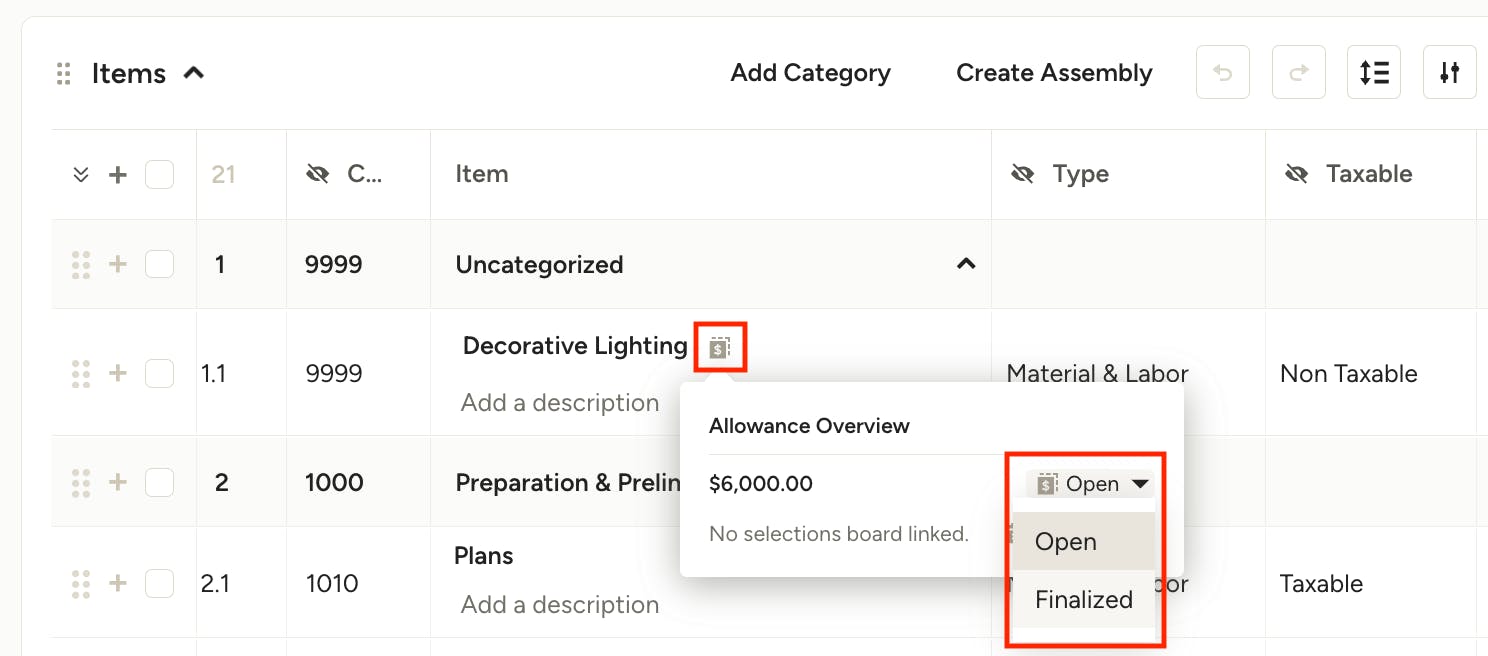
To lock in the budget for a standalone allowance (one without a linked selections board), hover over the allowance icon on the line item, then click the status dropdown (it will say Open) and select Finalized.
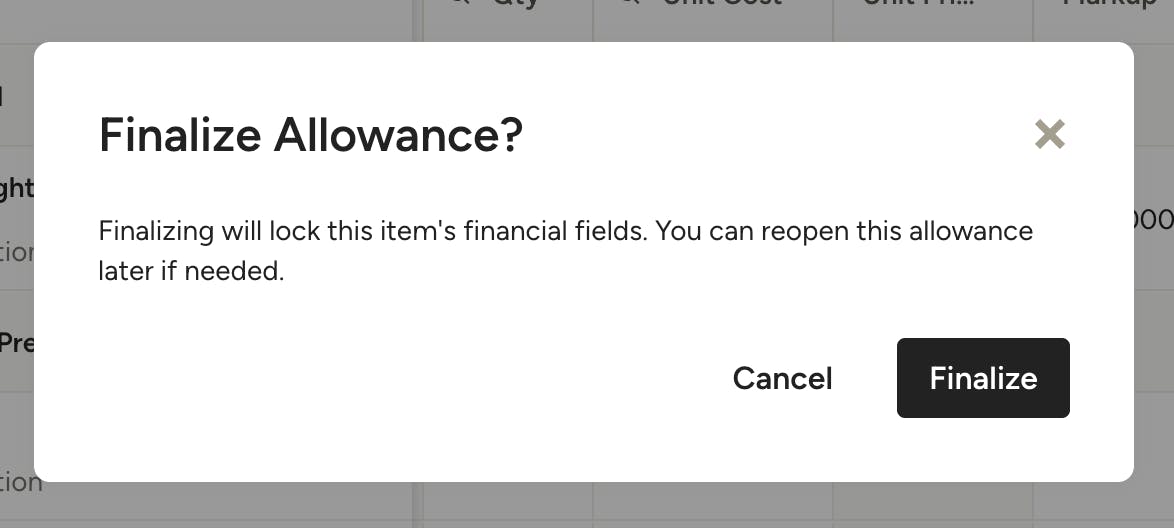
Confirm that you want to finalize the allowance. This will lock the item's financial fields. You can reopen this allowance later if needed.
Finalize Allowance with Linked Selections Board
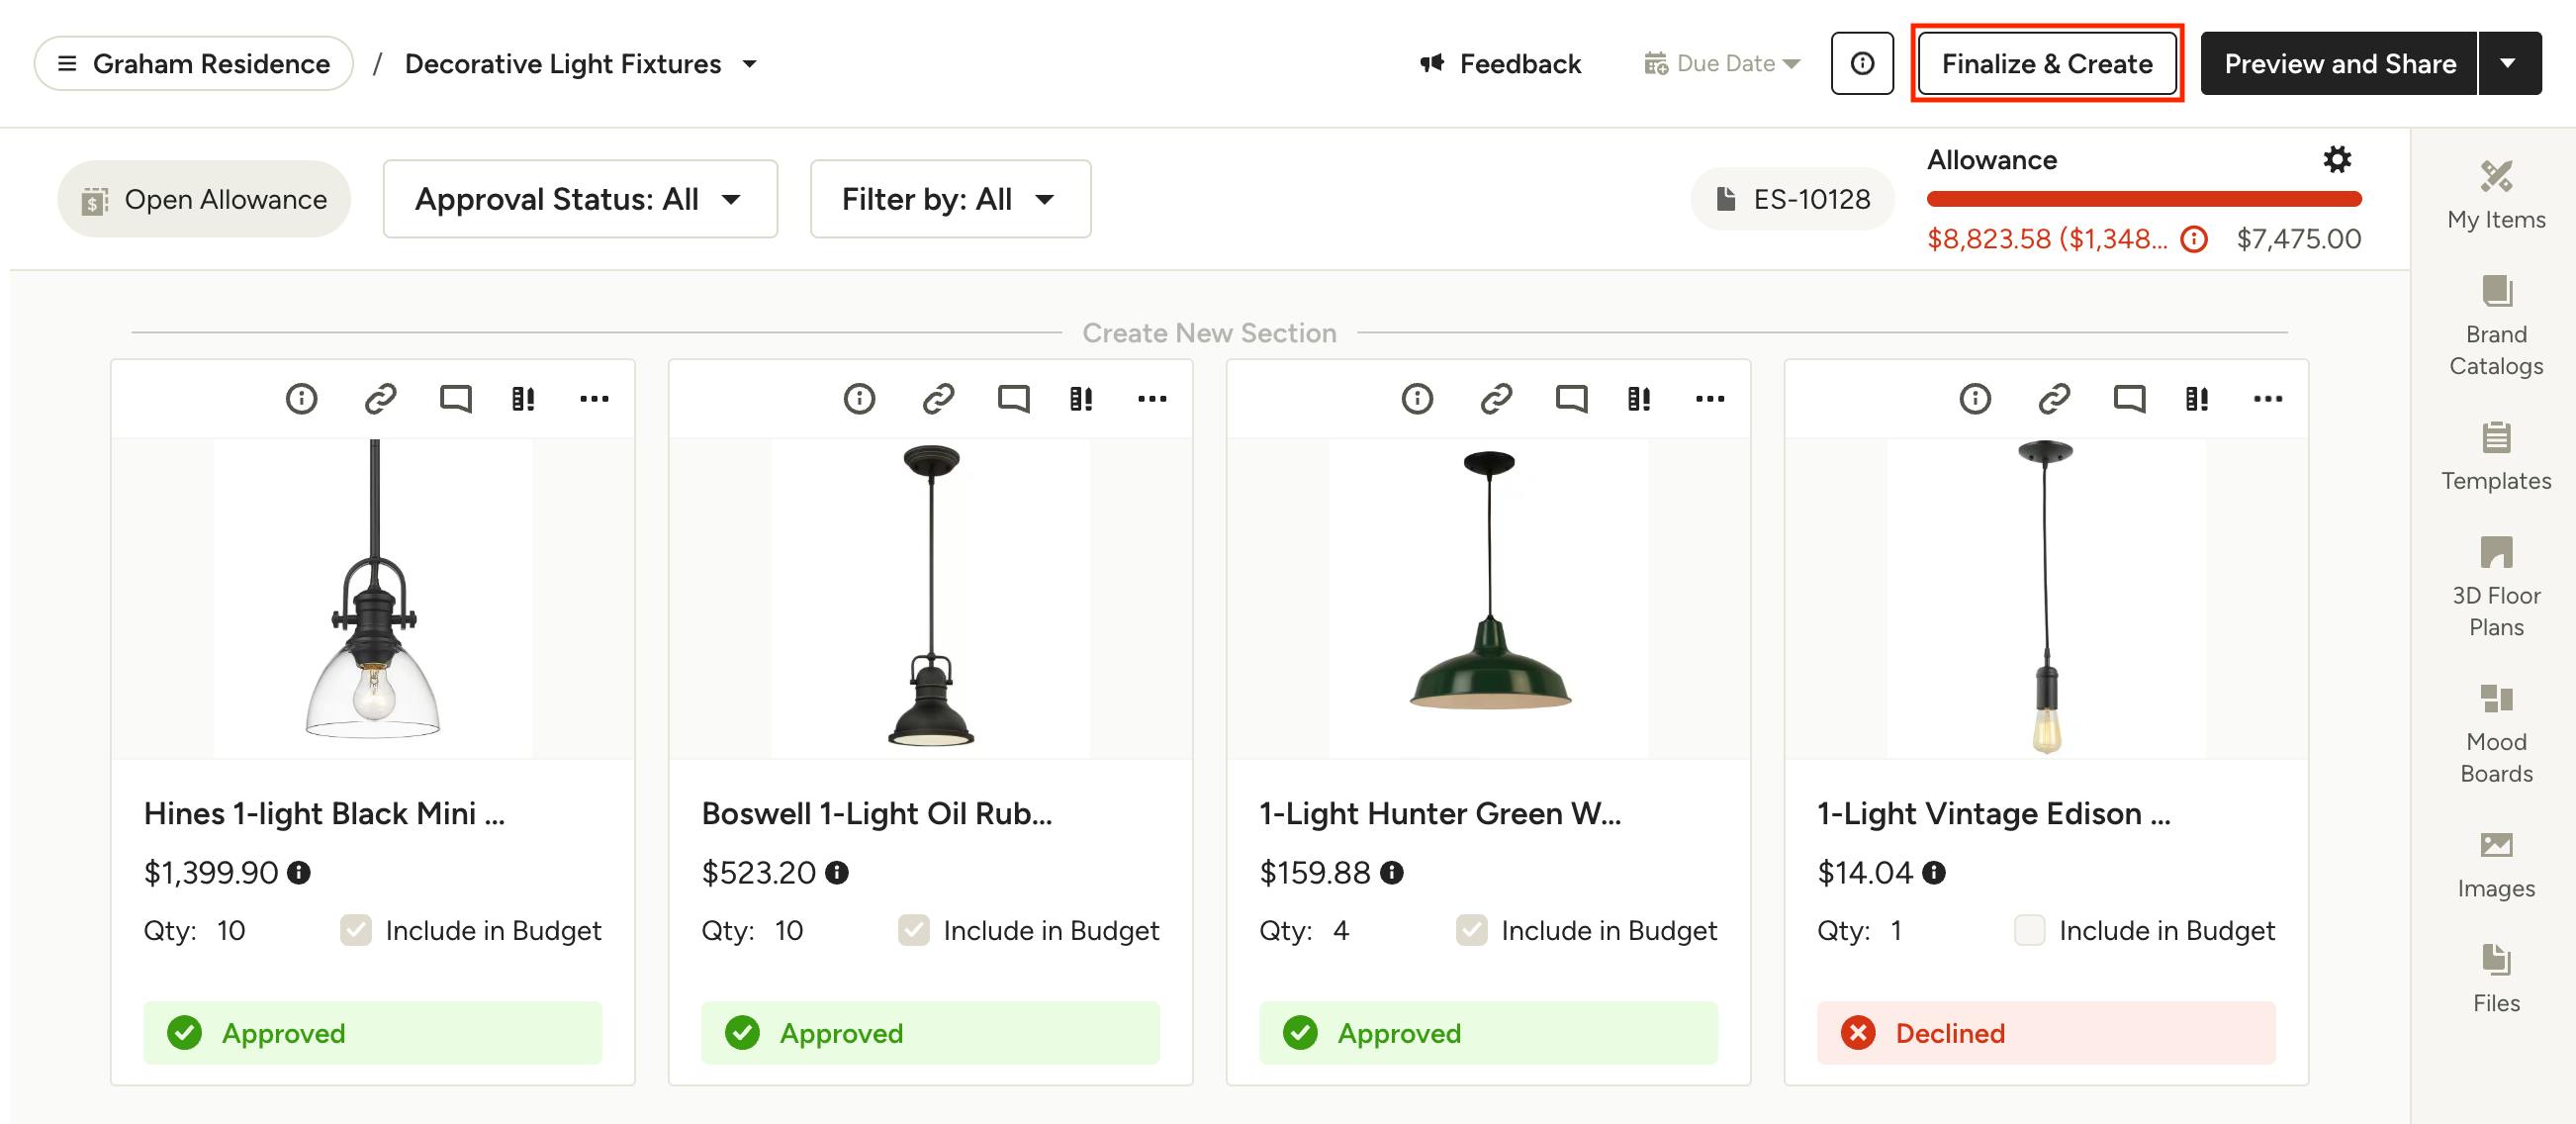
Once your client has made their selections, you can finalize them and either create a change order, merge them with the original estimate, create a purchase order(s), or finalize only (no document is created). You can access these options from the original estimate/proposal or from the selections board.
From Selections Board: Click Finalize & Create in the top right of the board.
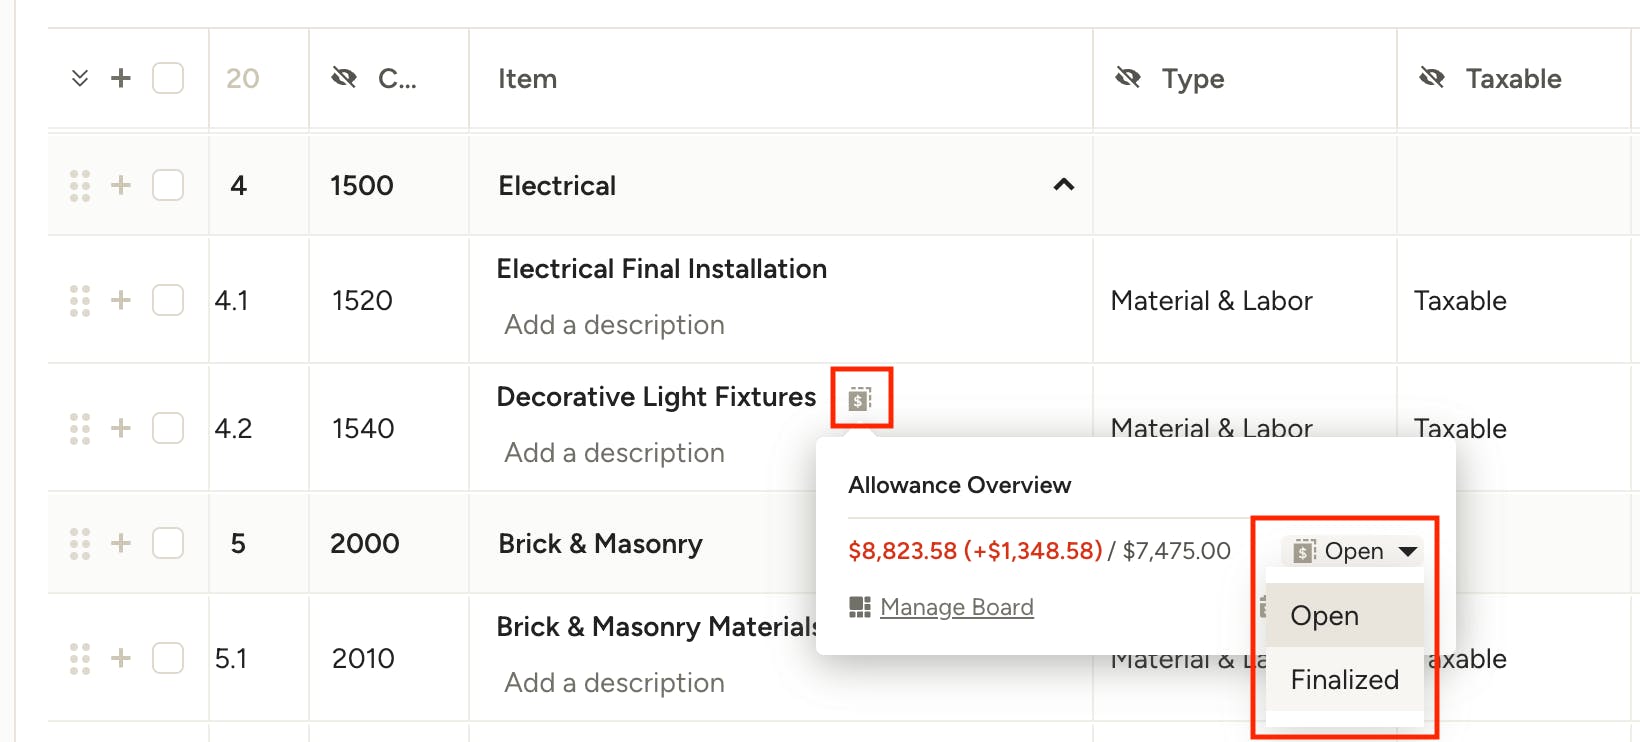
From Estimate/Proposal: Hover over the allowance icon on the line item, then click the status dropdown (it will say Open) and select Finalized.
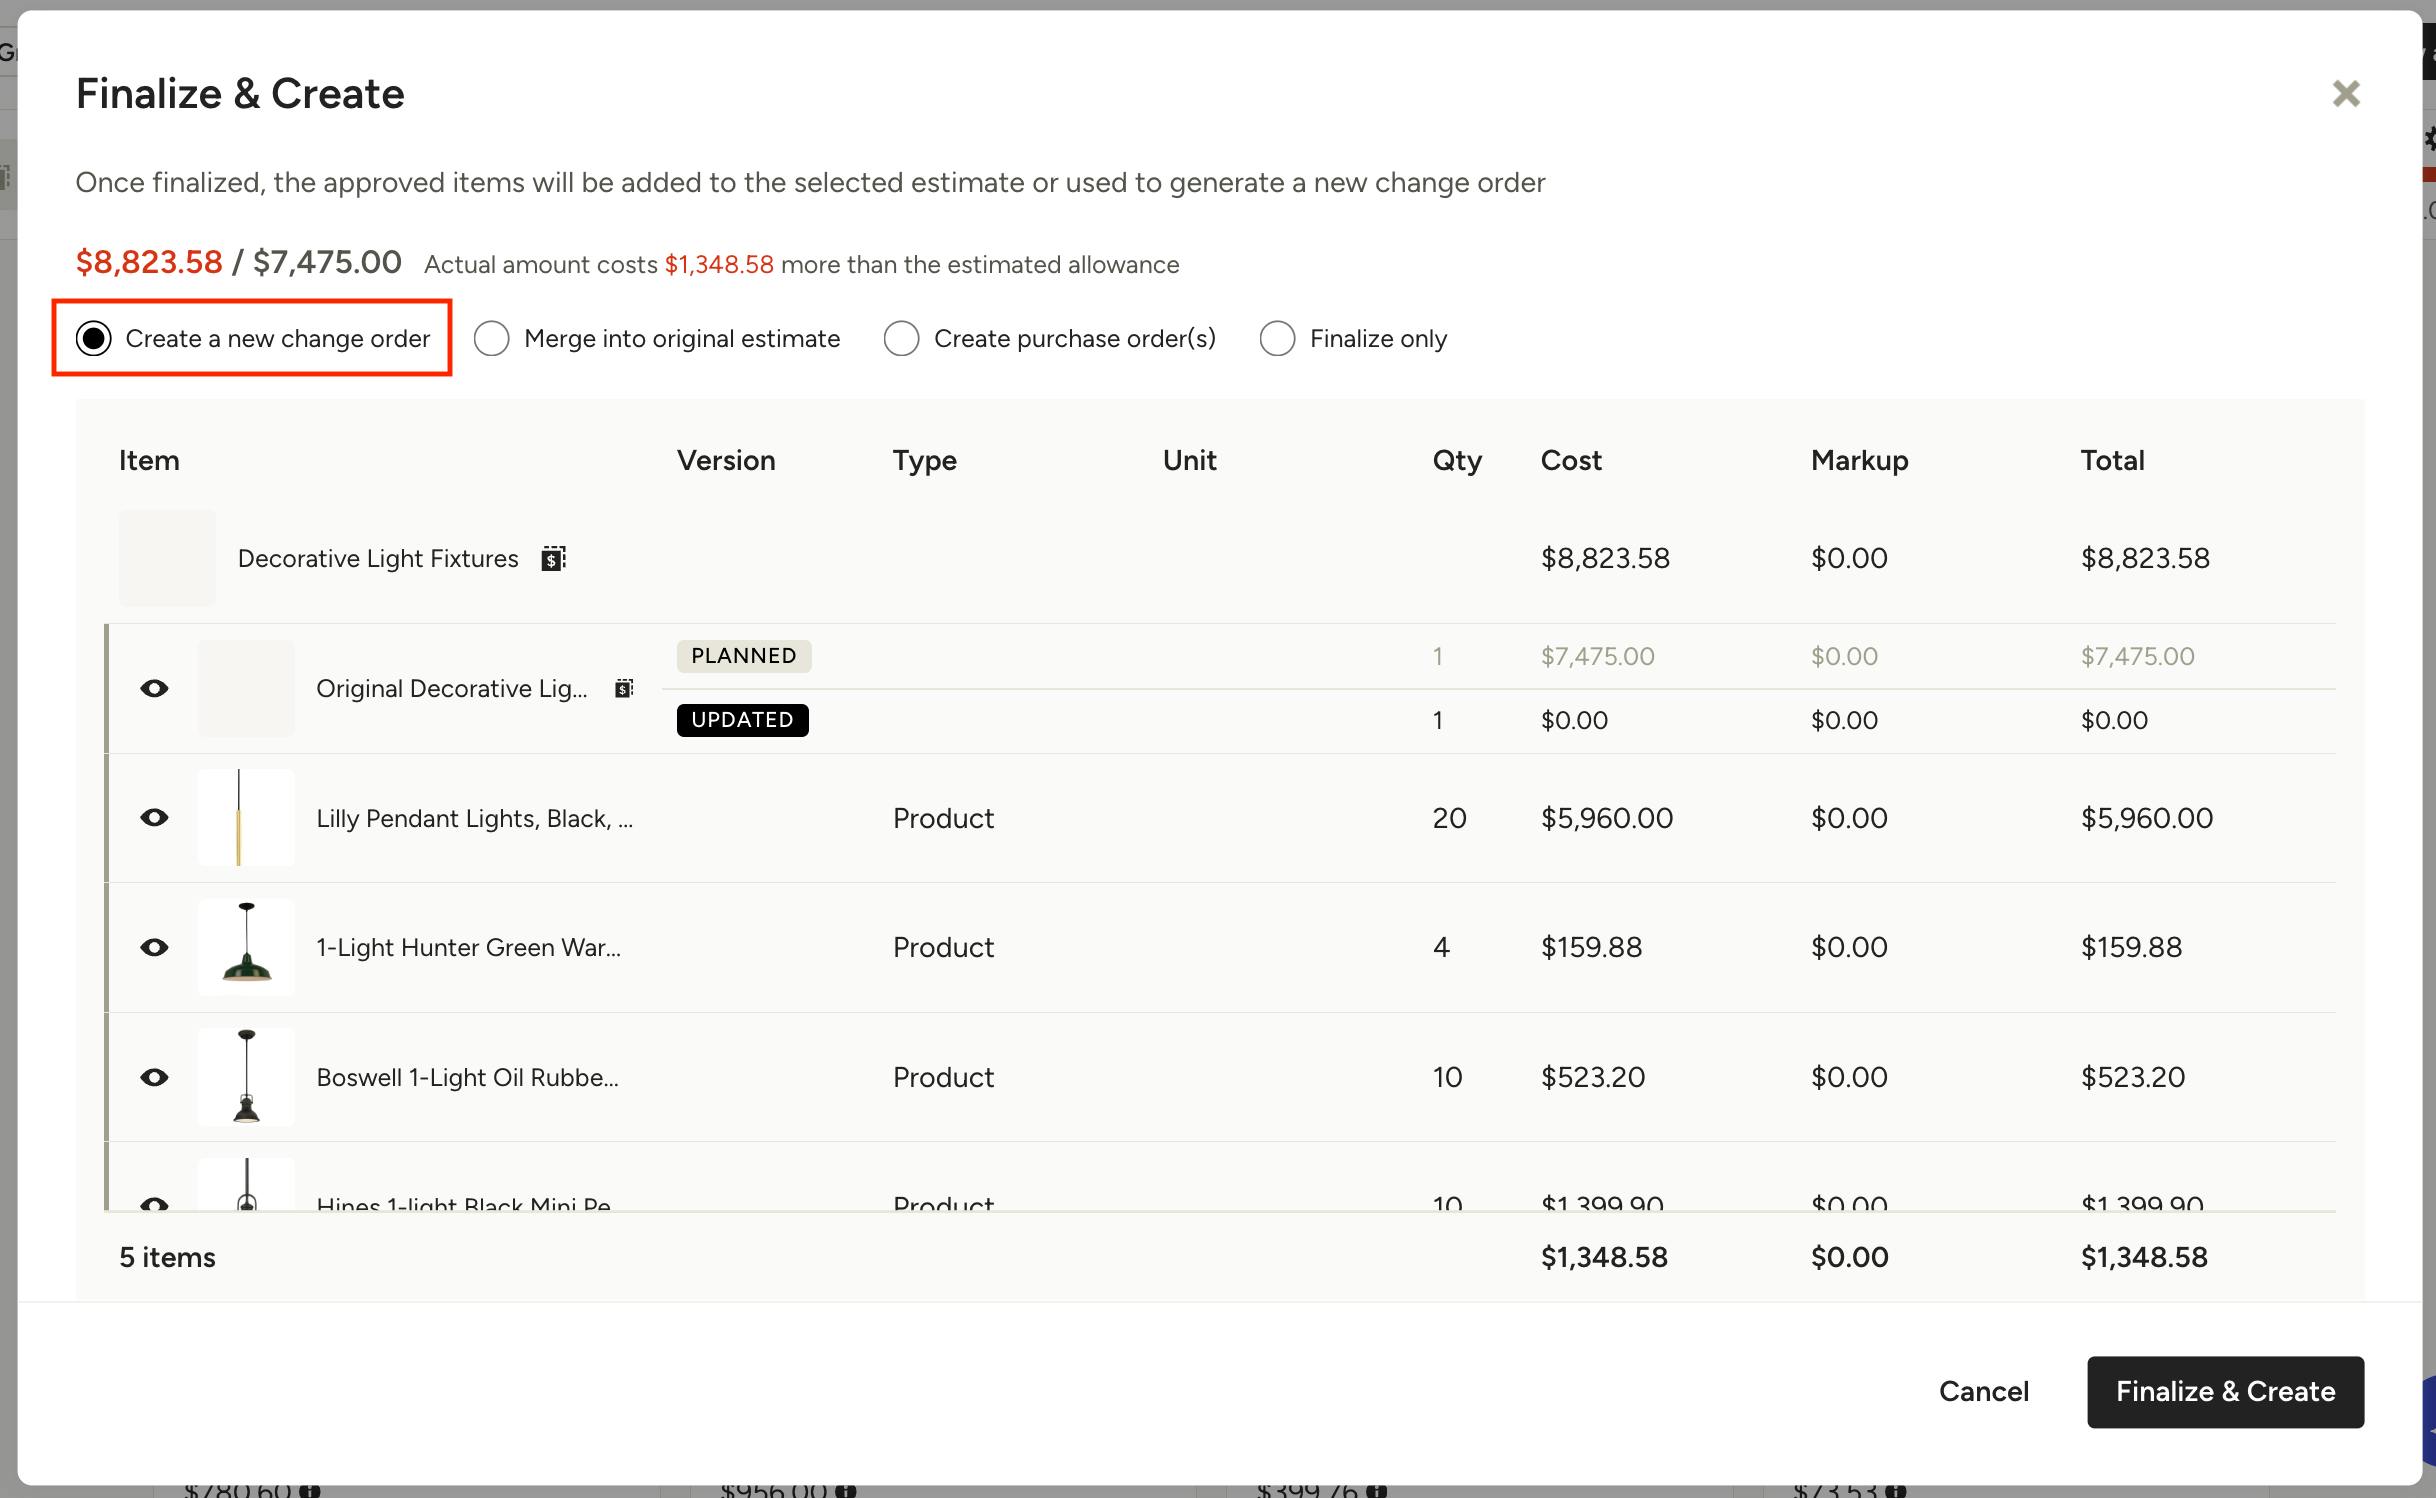
Create Change Order
To create a change order for the finalized selections, click the option for Create a New Change Order. You will see a preview of the change order, along with planned and updated cost. Click Finalize & Create to add the approved items to a new change order.
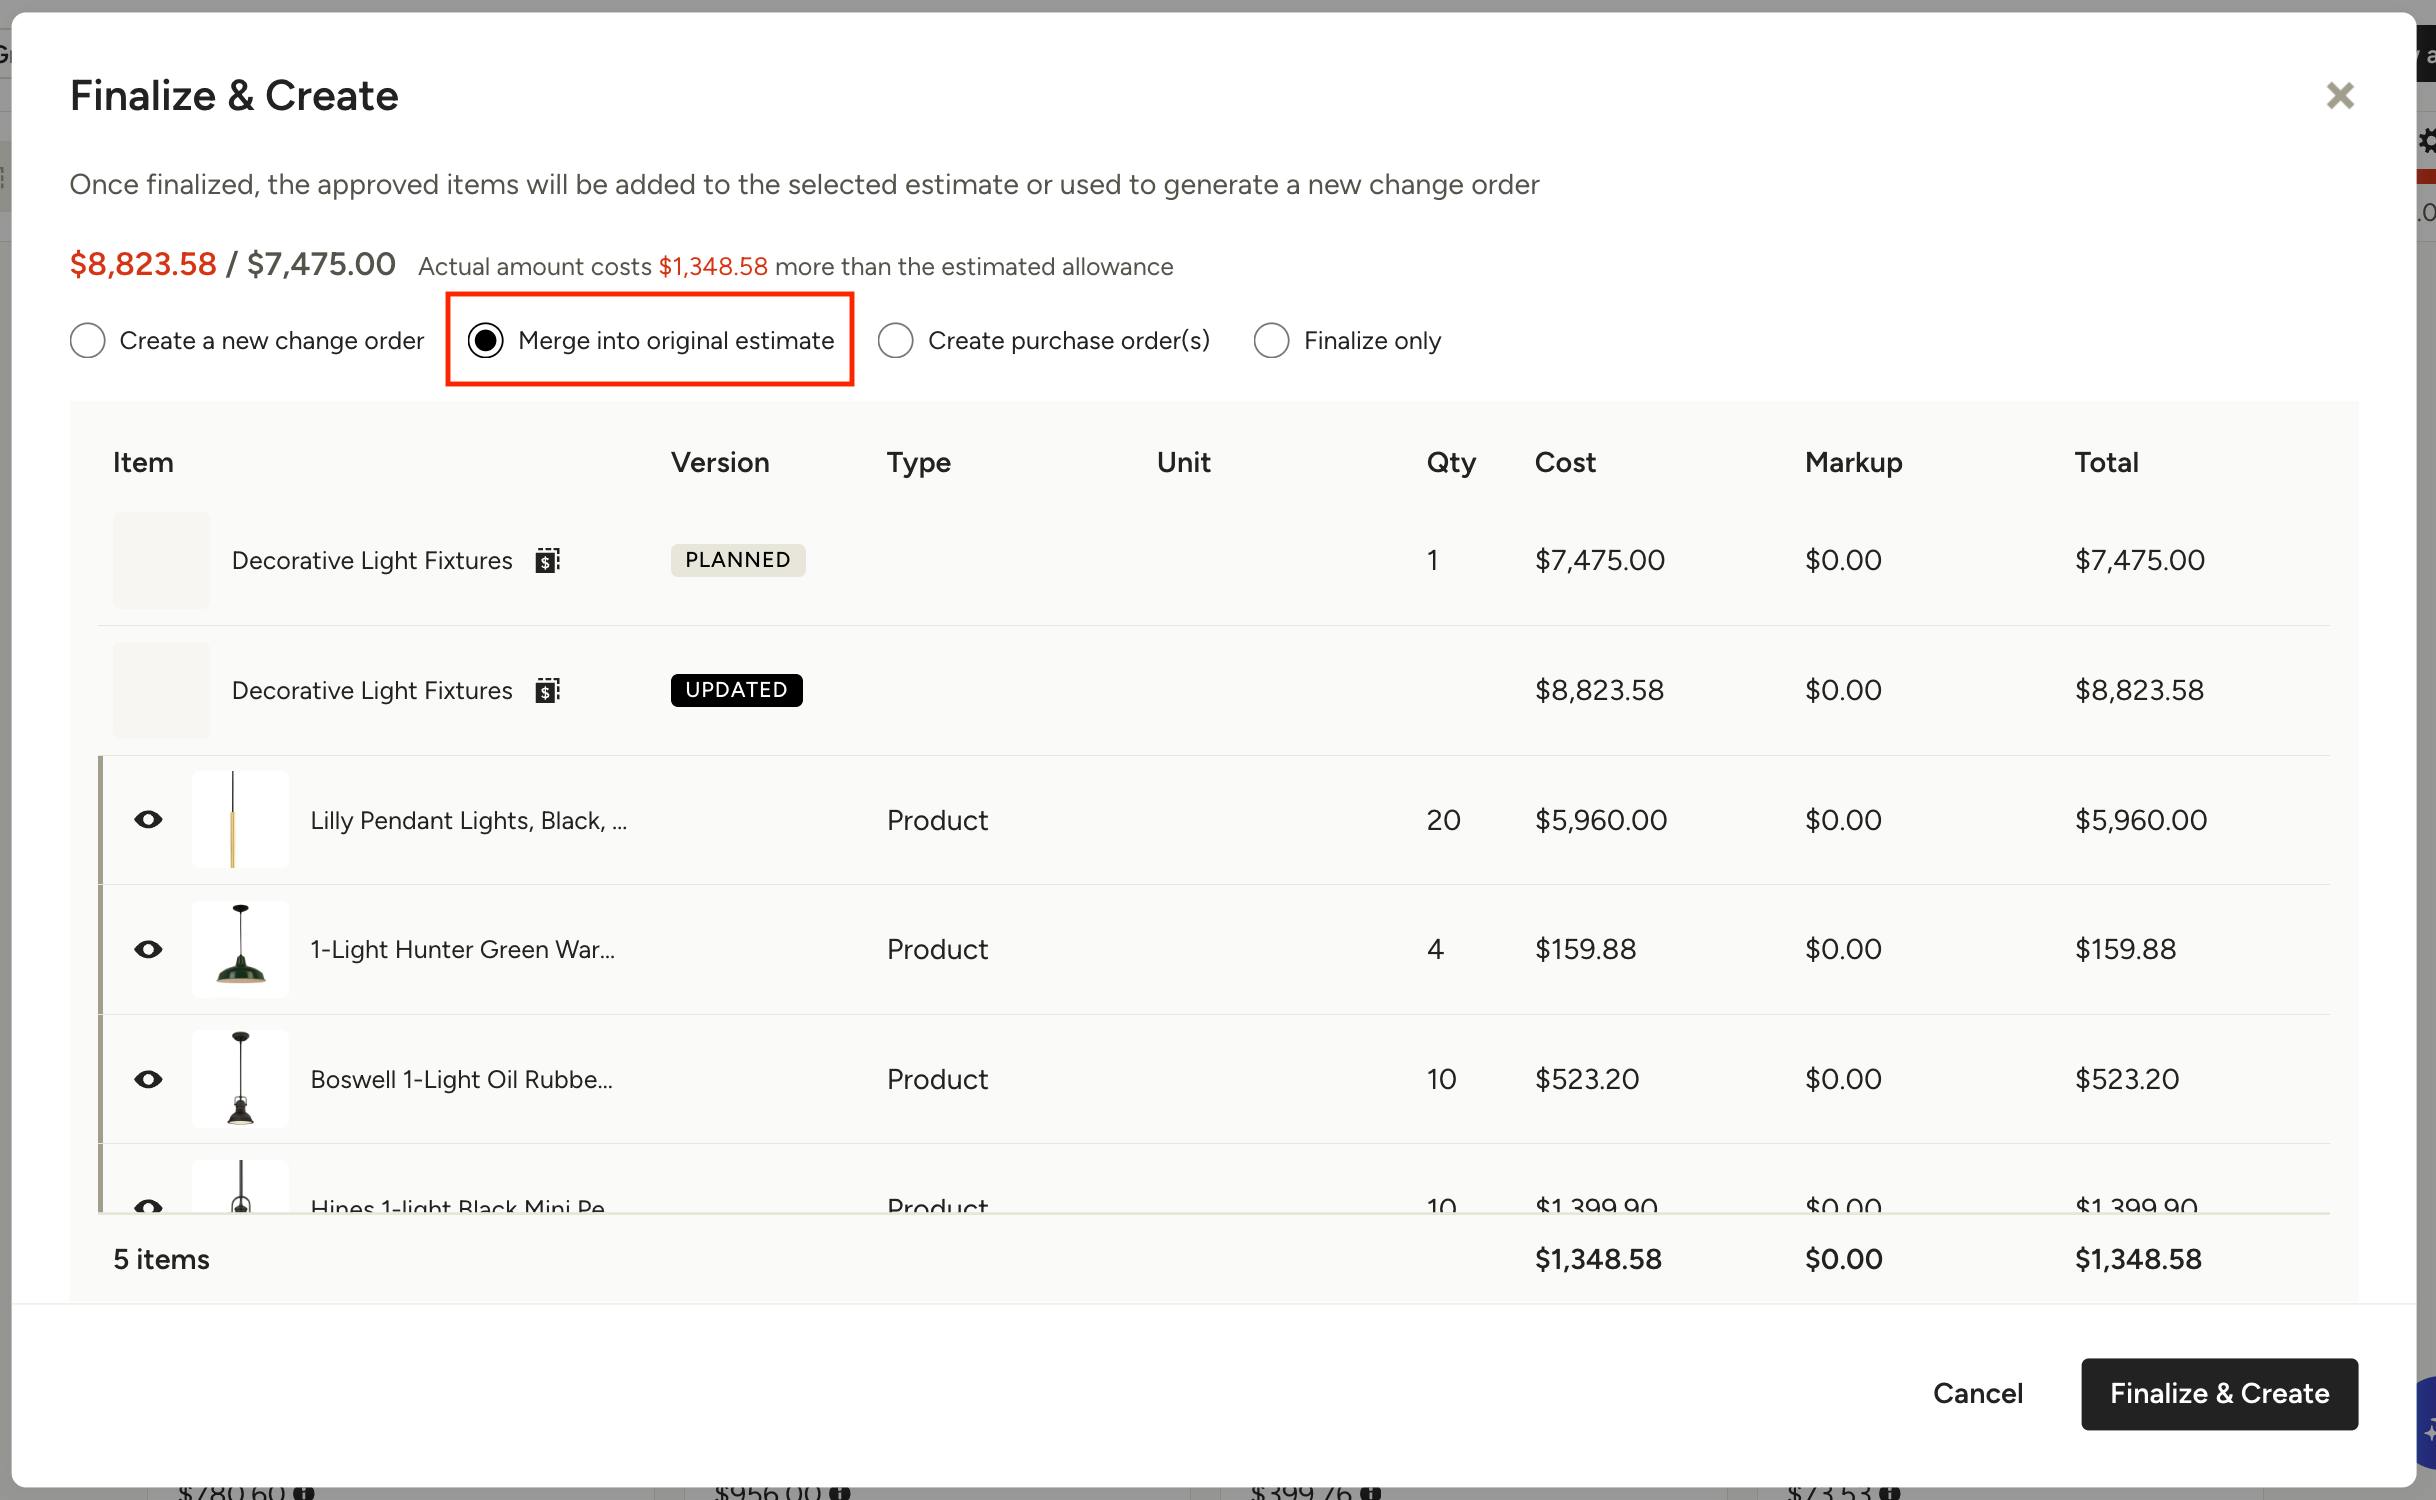
Merge into Original Estimate
To merge the finalized selections into the original estimate, click the option for Merge into Original Estimate. You will see a preview of the planned allowance, along with updated items and cost. Click Finalize & Create to add the approved items to the existing estimate.
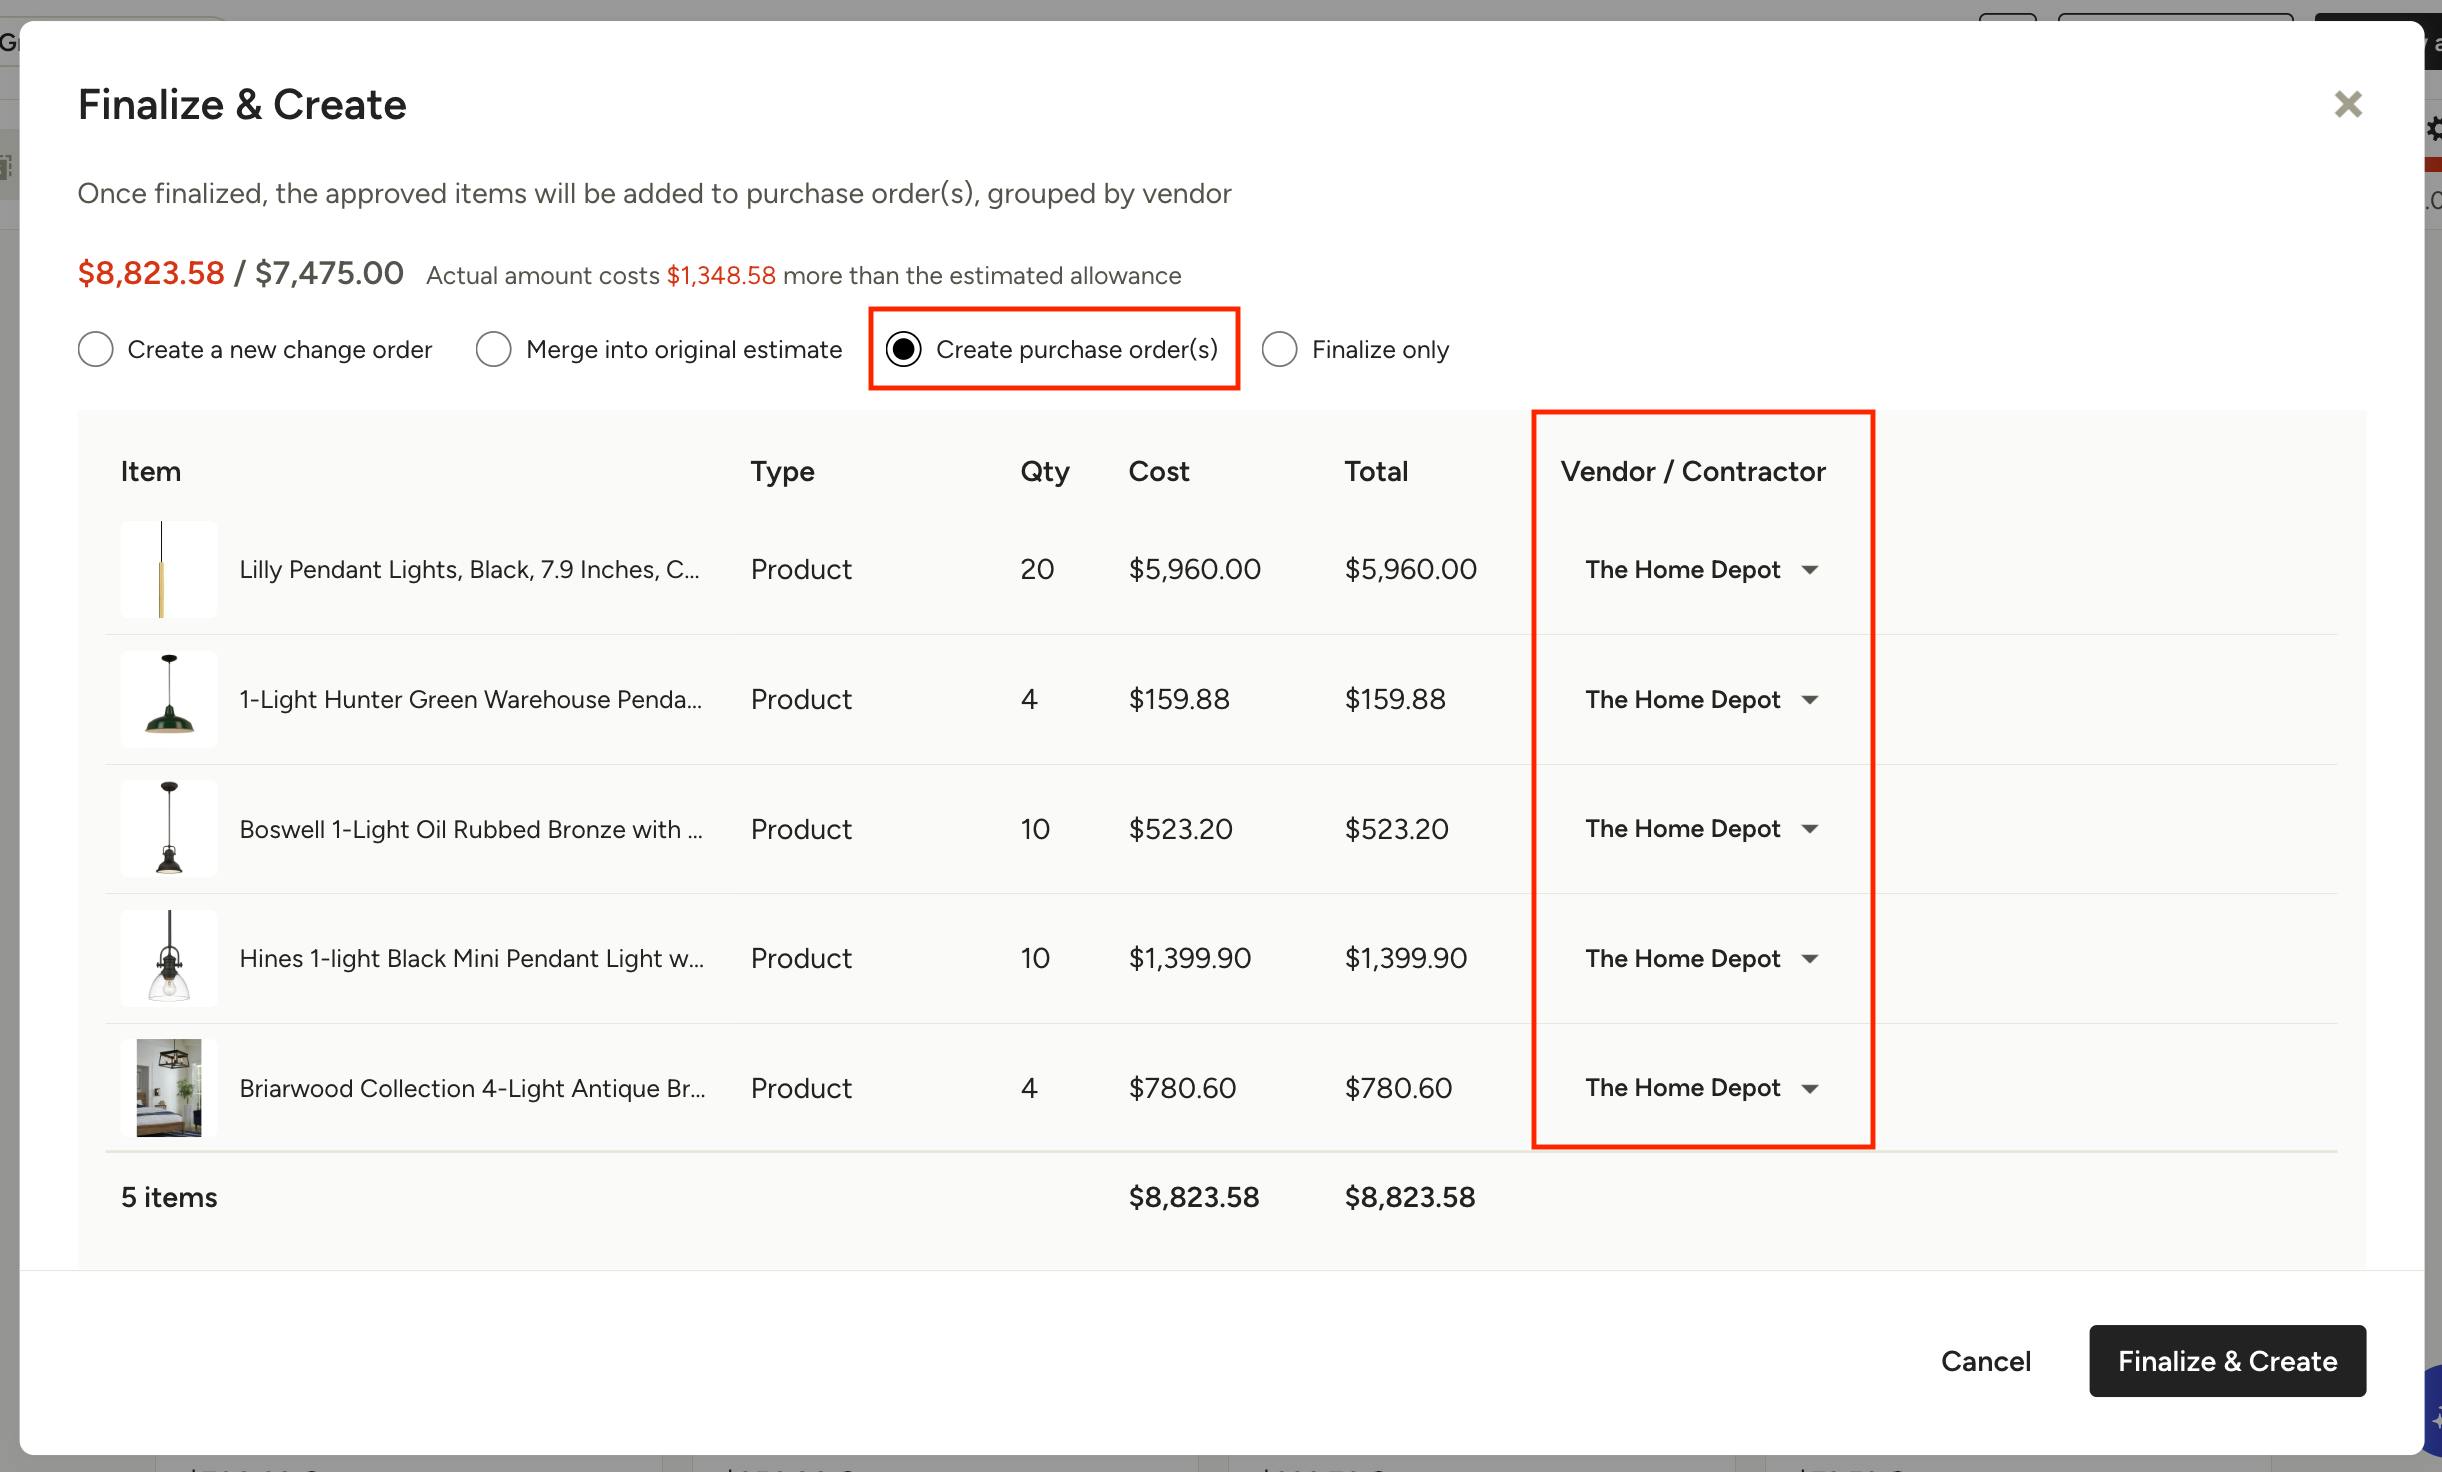
Create Purchase Order
To create a purchase order(s) for the finalized selections, click the option for Create Purchase Order(s). You will see a preview of the items, along with their quantity and cost information. Use the Vendor/Contractor column to set or update the vendor/subcontractor for each item. Click Finalize & Create to add the approved items to a new purchase order(s), grouped by vendor/sub.
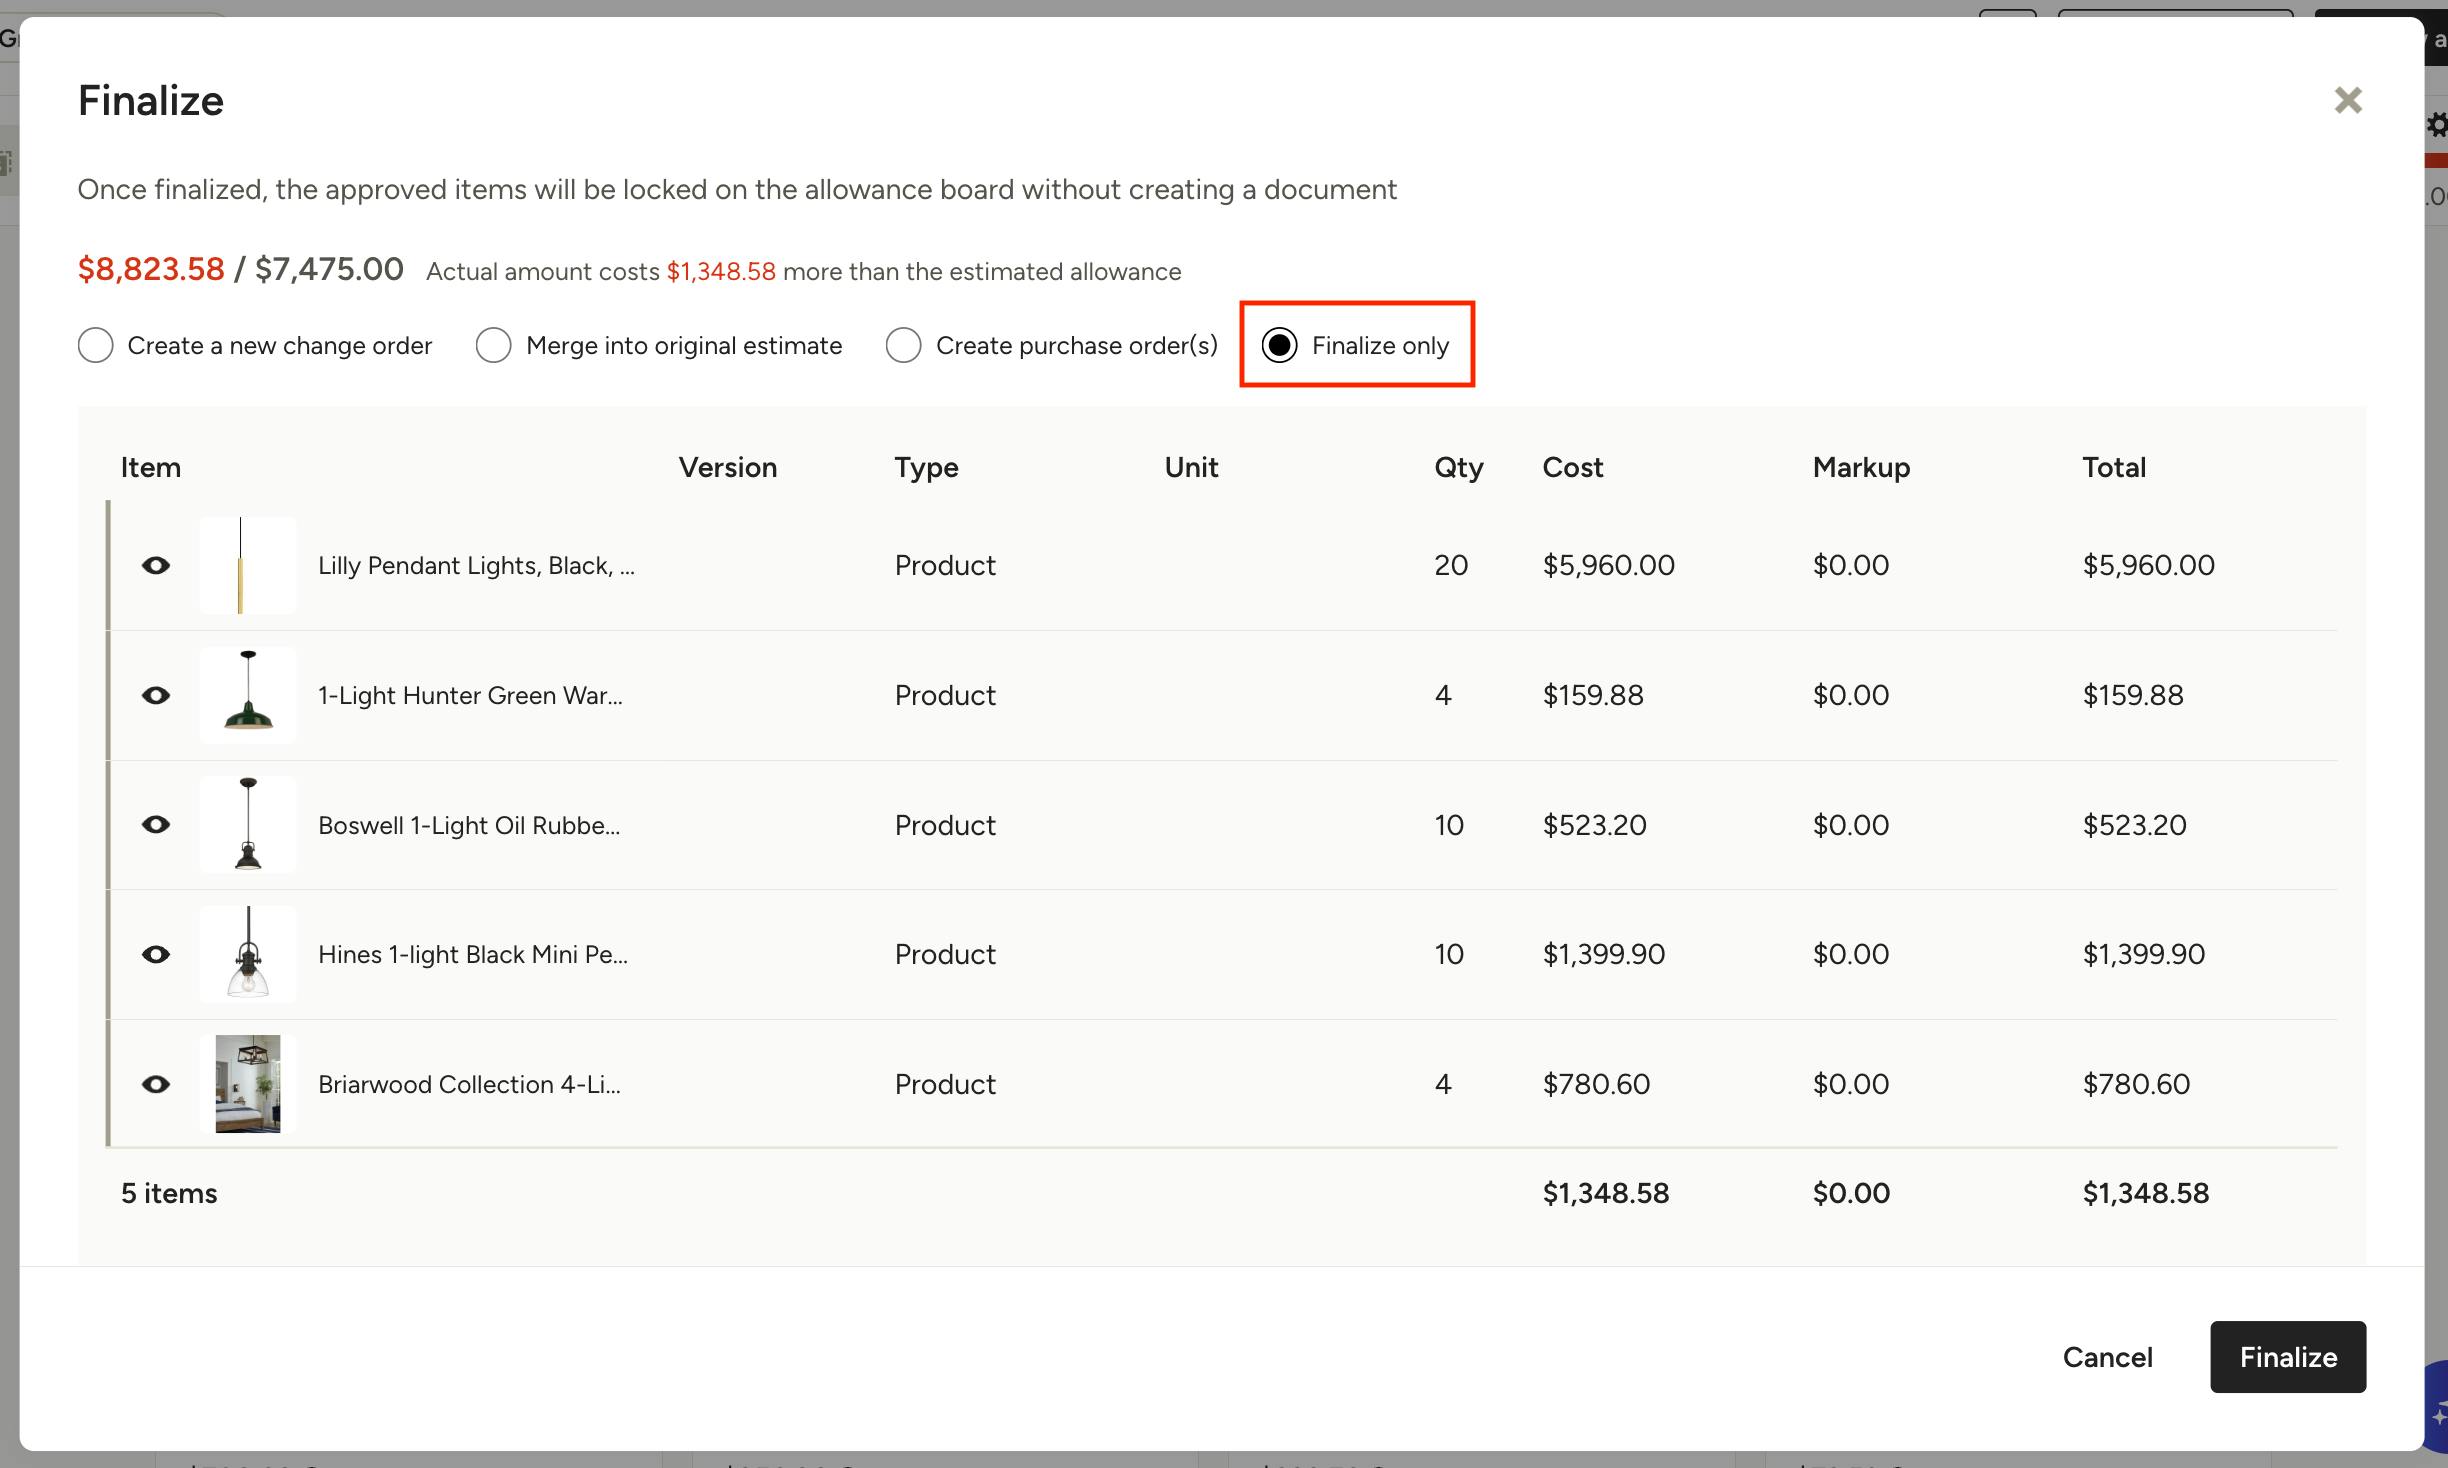
Finalize Only
To finalize an allowance without generating any document, click the option Finalize Only. This locks in the selections and marks the allowance as done, letting you continue on with the project when no extra document is required.
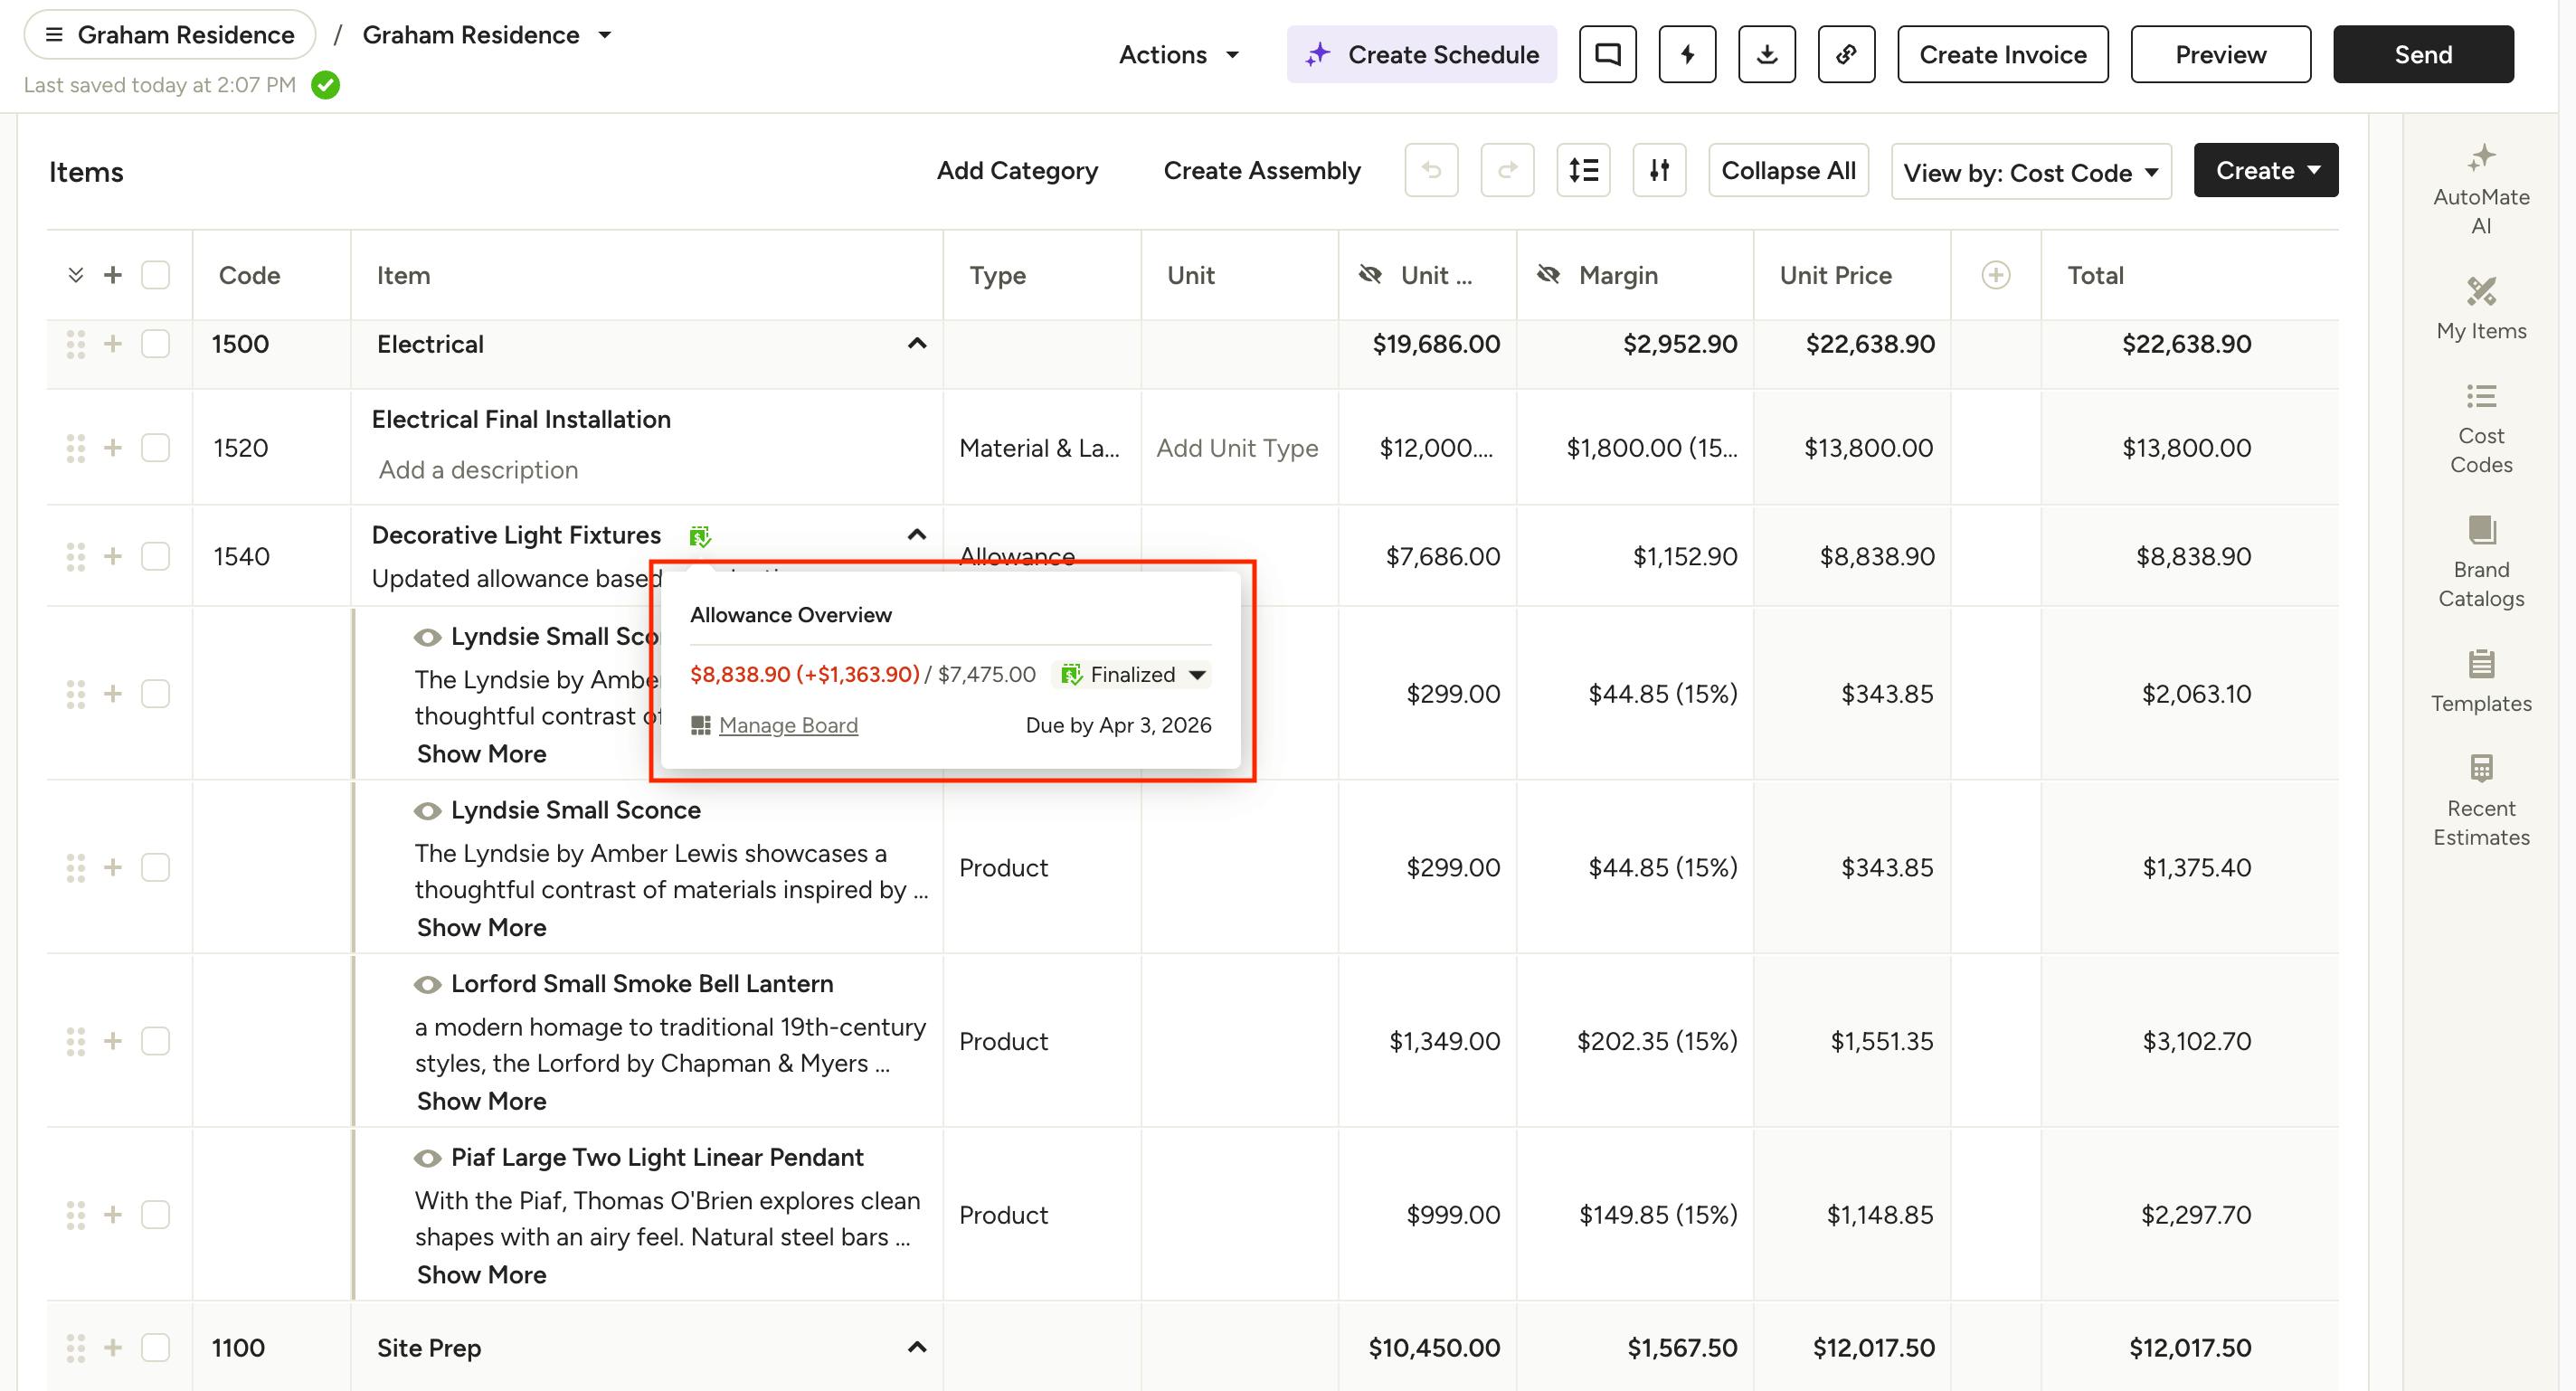
View Allowances
Once an allowance has been created, you can view it in the estimate/proposal, the selections board (if applicable) and in the project Budget. If it has been finalized, you can view it in either the original estimate or the change order, depending on where it was finalized.
View in Documents
To view an allowance in its relevant document, hover over icon on the allowance line item to see the overview. This will show you the final amount, the difference, and the original allowance amount. You will also see the due date and any connected selections board, which you can click to access directly.
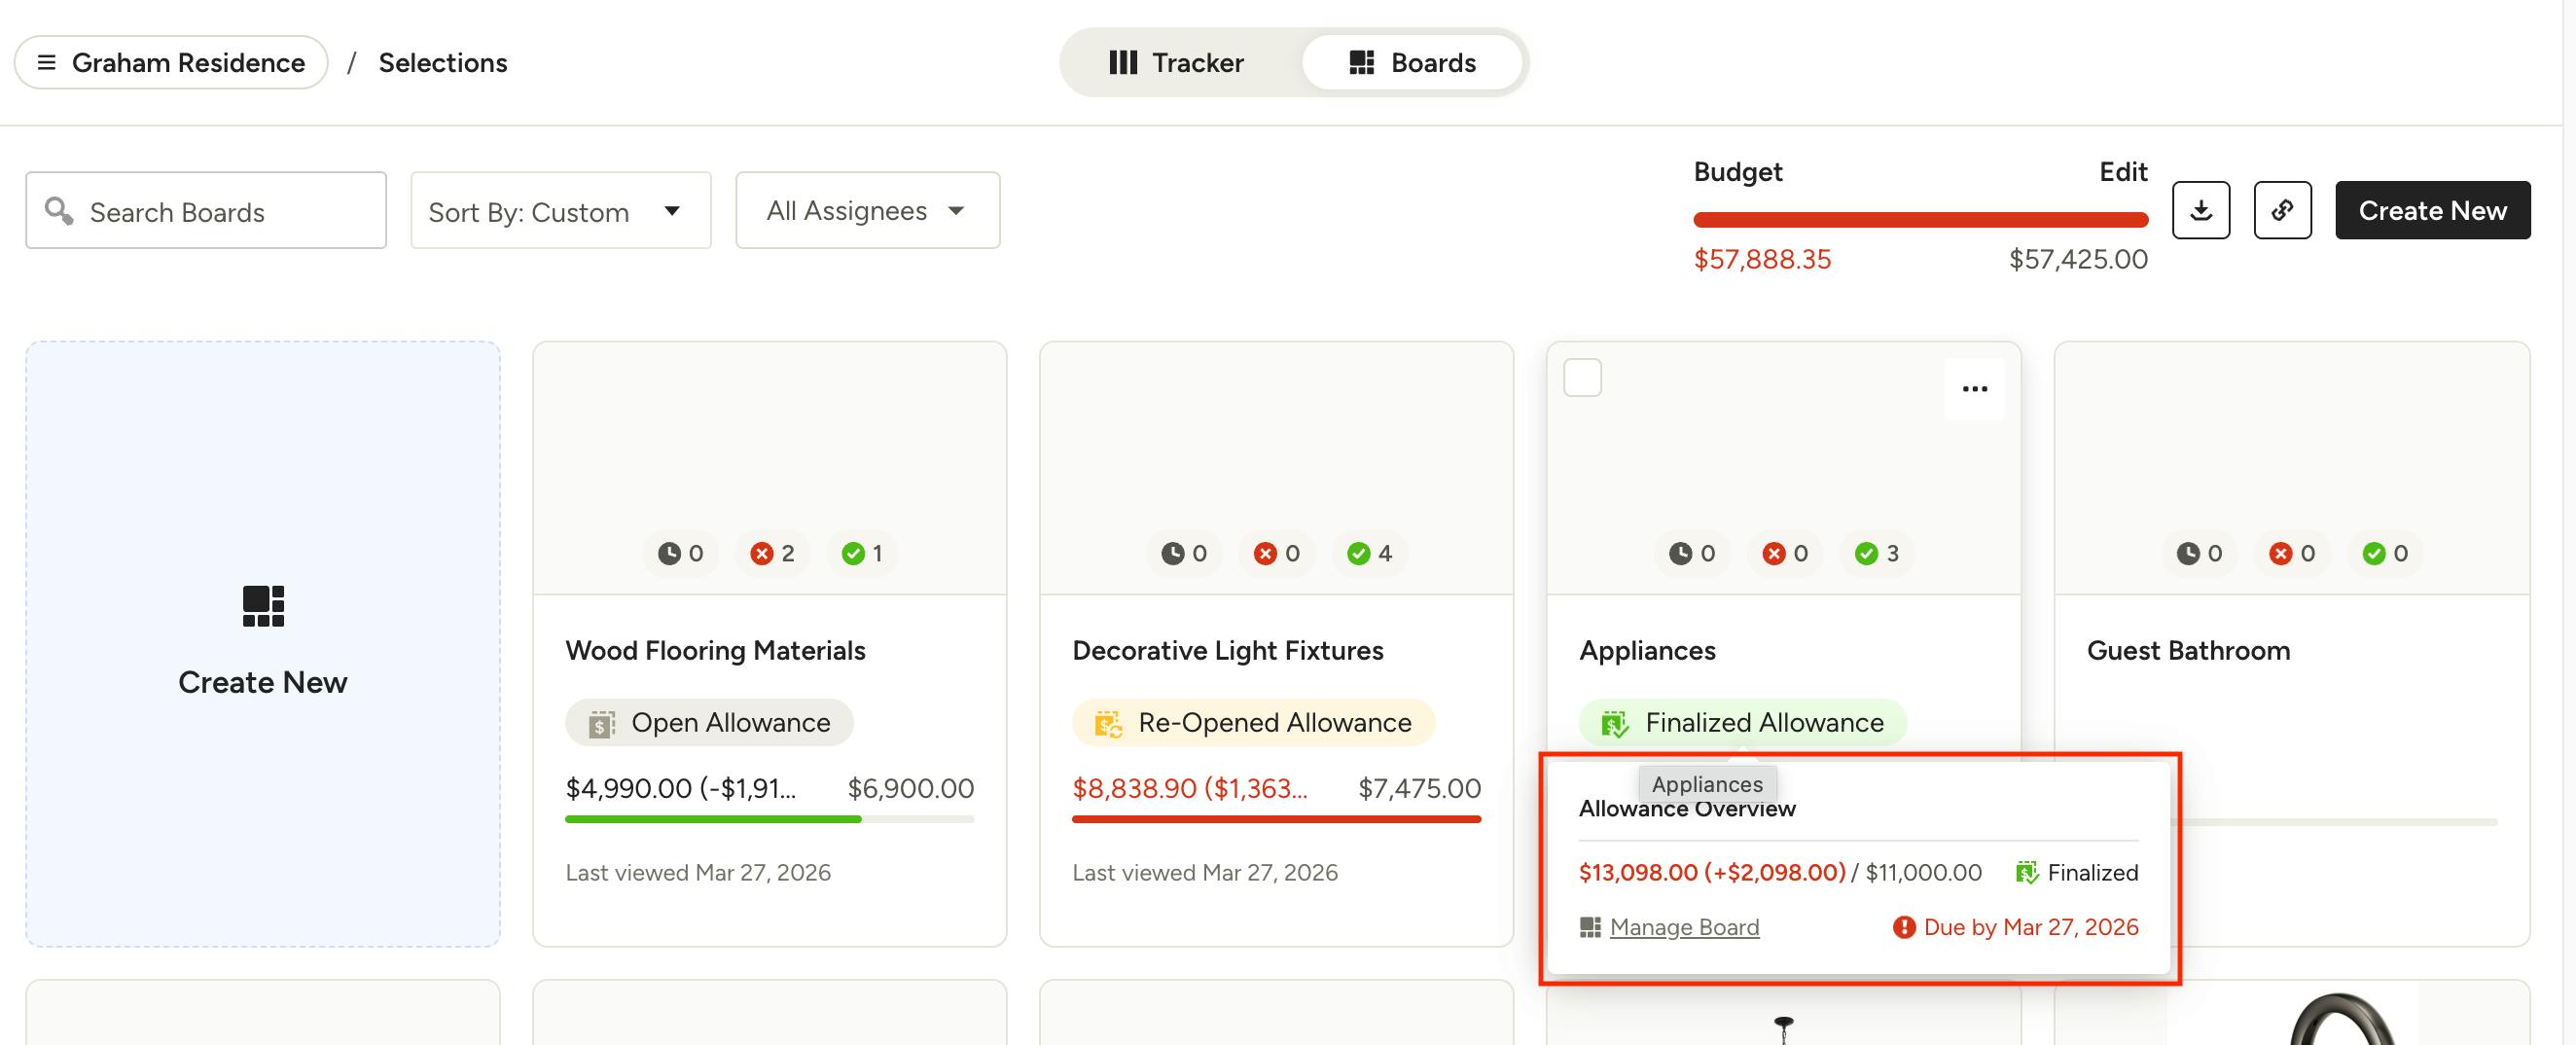
View in Selection Boards
Within your selection boards overview, you will see the allowance boards denoted by either Open Allowance, Finalized Allowance or Re-opened Allowance. You can hover over this status on each board to see the allowance overview.
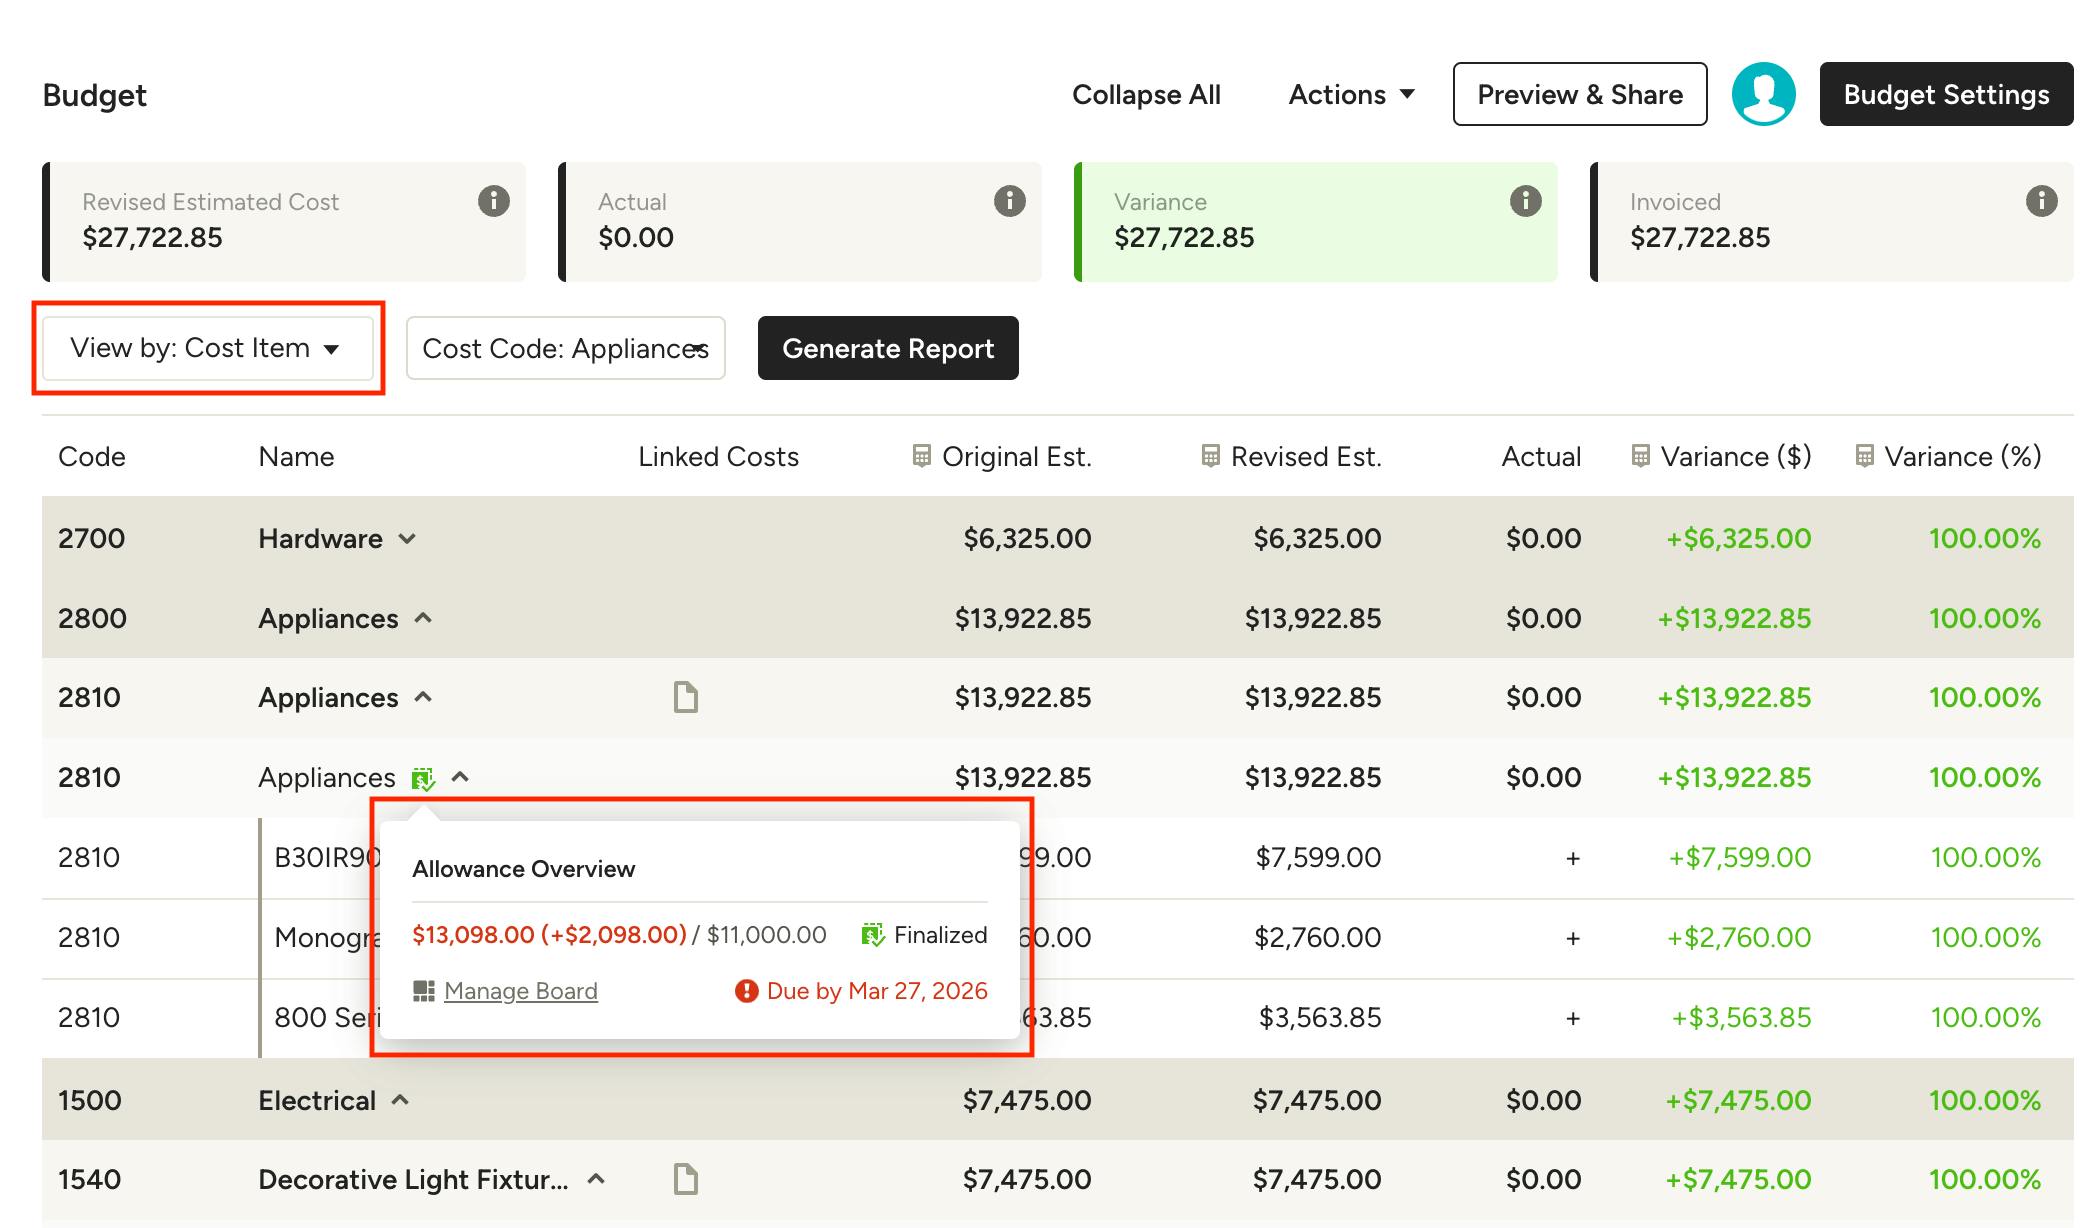
View in Budget
Within your project budget, hover over icon on the allowance line item to see the overview. Note the budget must be set to View By: Cost Item in order for allowances to appear.
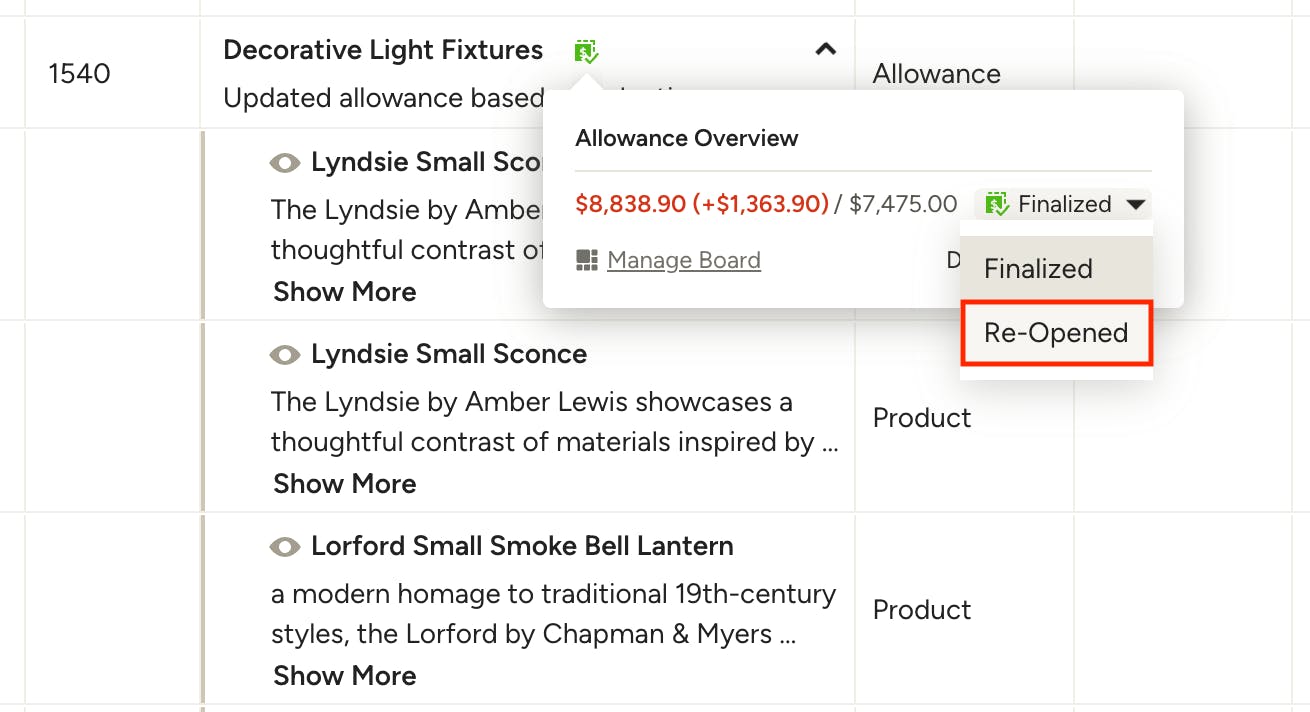
Re-open Allowance
You can reopen a finalized allowance from its relevant document (the original estimate or change order) by clicking the dropdown in the allowance overview and selecting Re-Opened.
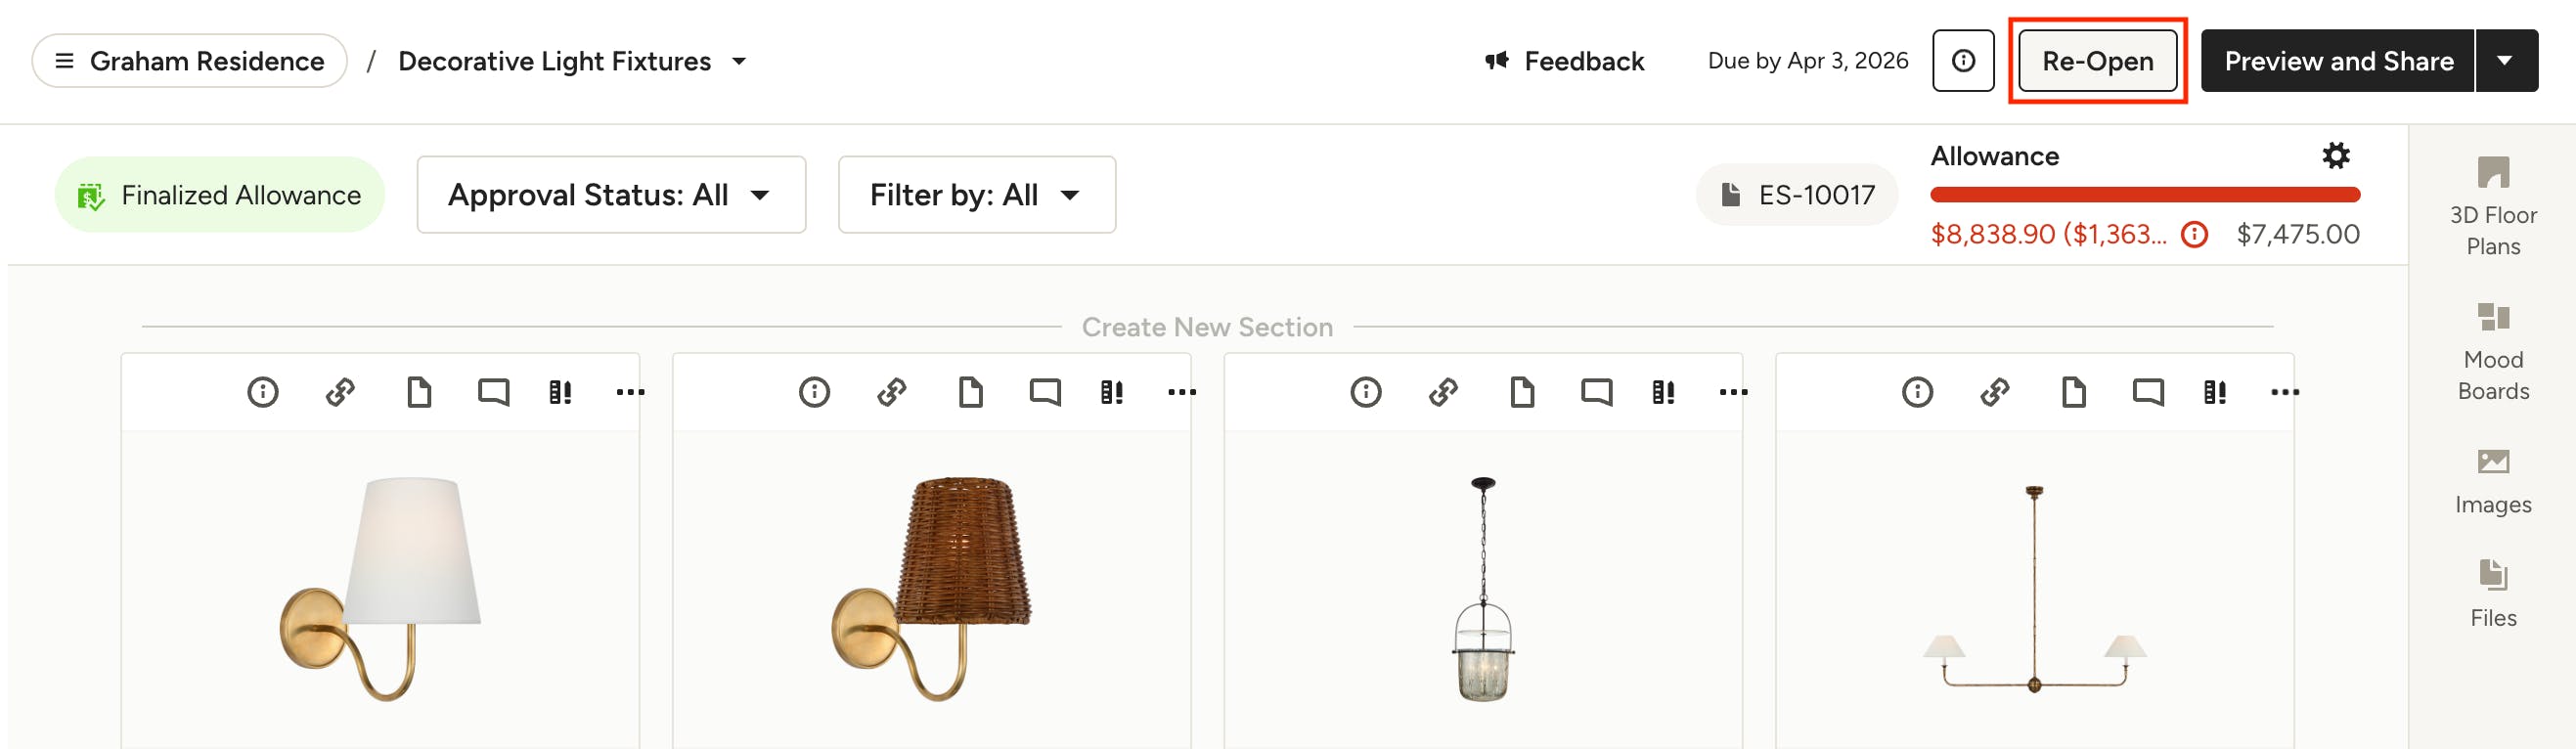
You can also re-open an allowance from a linked selections board, by clicking Re-Open in the top right of the board.
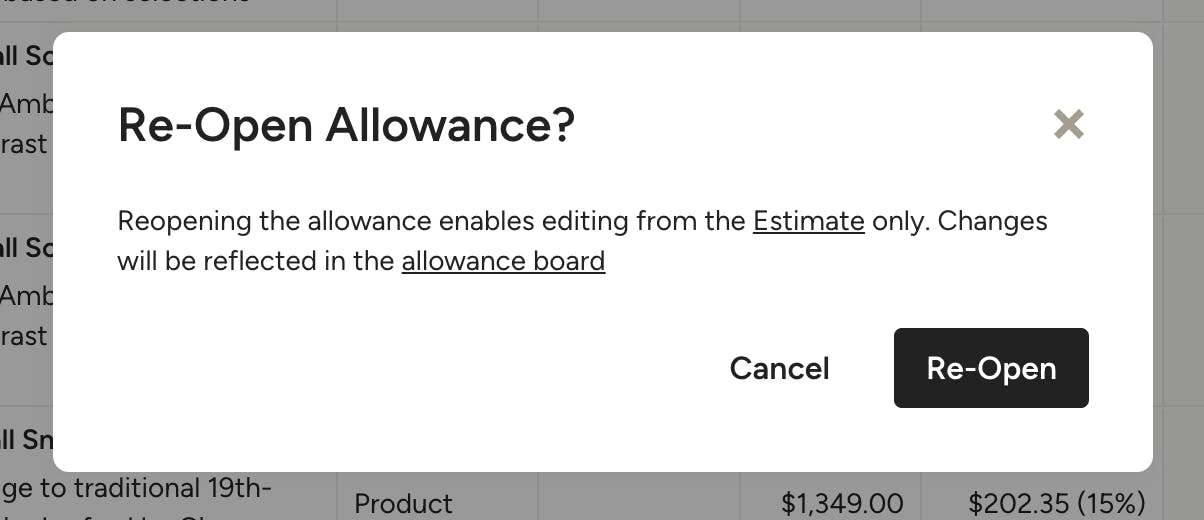
From both locations, you will be asked to confirm that you want to re-open the allowance. This allows editing in the estimate/change order only, and changes will be reflected on the allowance selections board (if applicable).
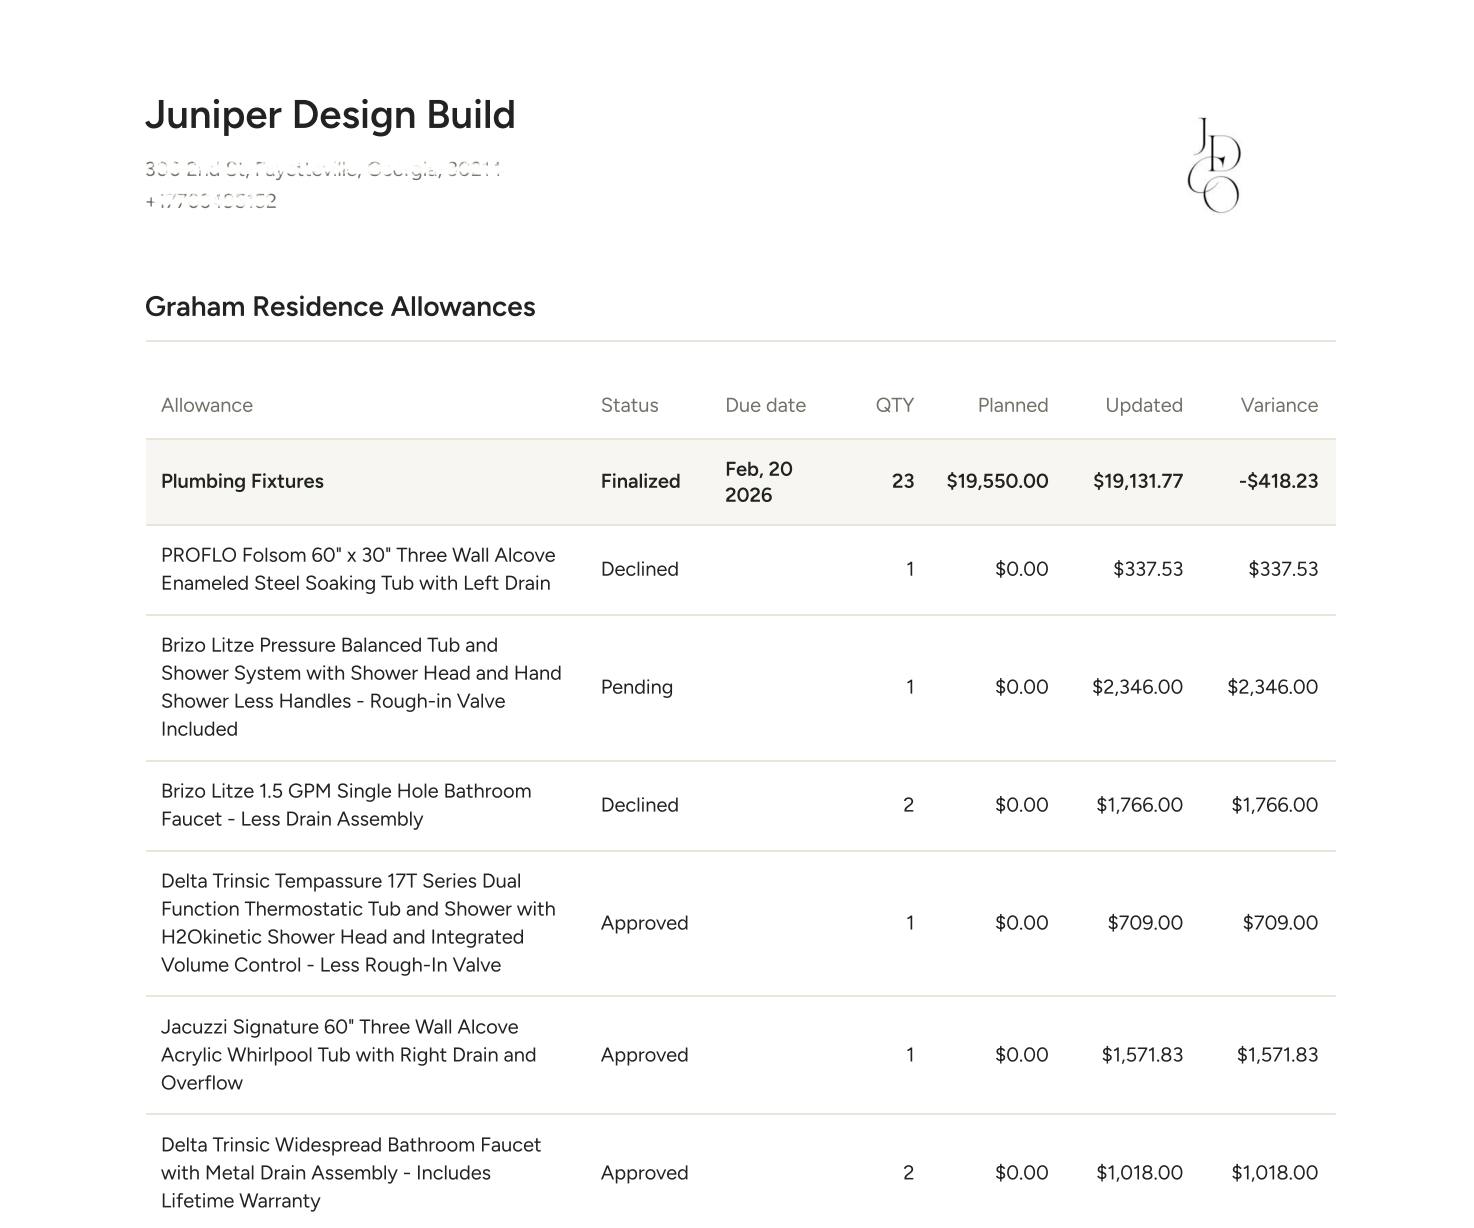
Allowance Reports
Track all of your allowances with the Allowance Report, which provides a professional, customizable PDF of your allowances per project, as well as a way to share a summary of allowances with your client. For builders, this is a great collaboration tool to share with a 3rd party designer what your allowances are for the project.
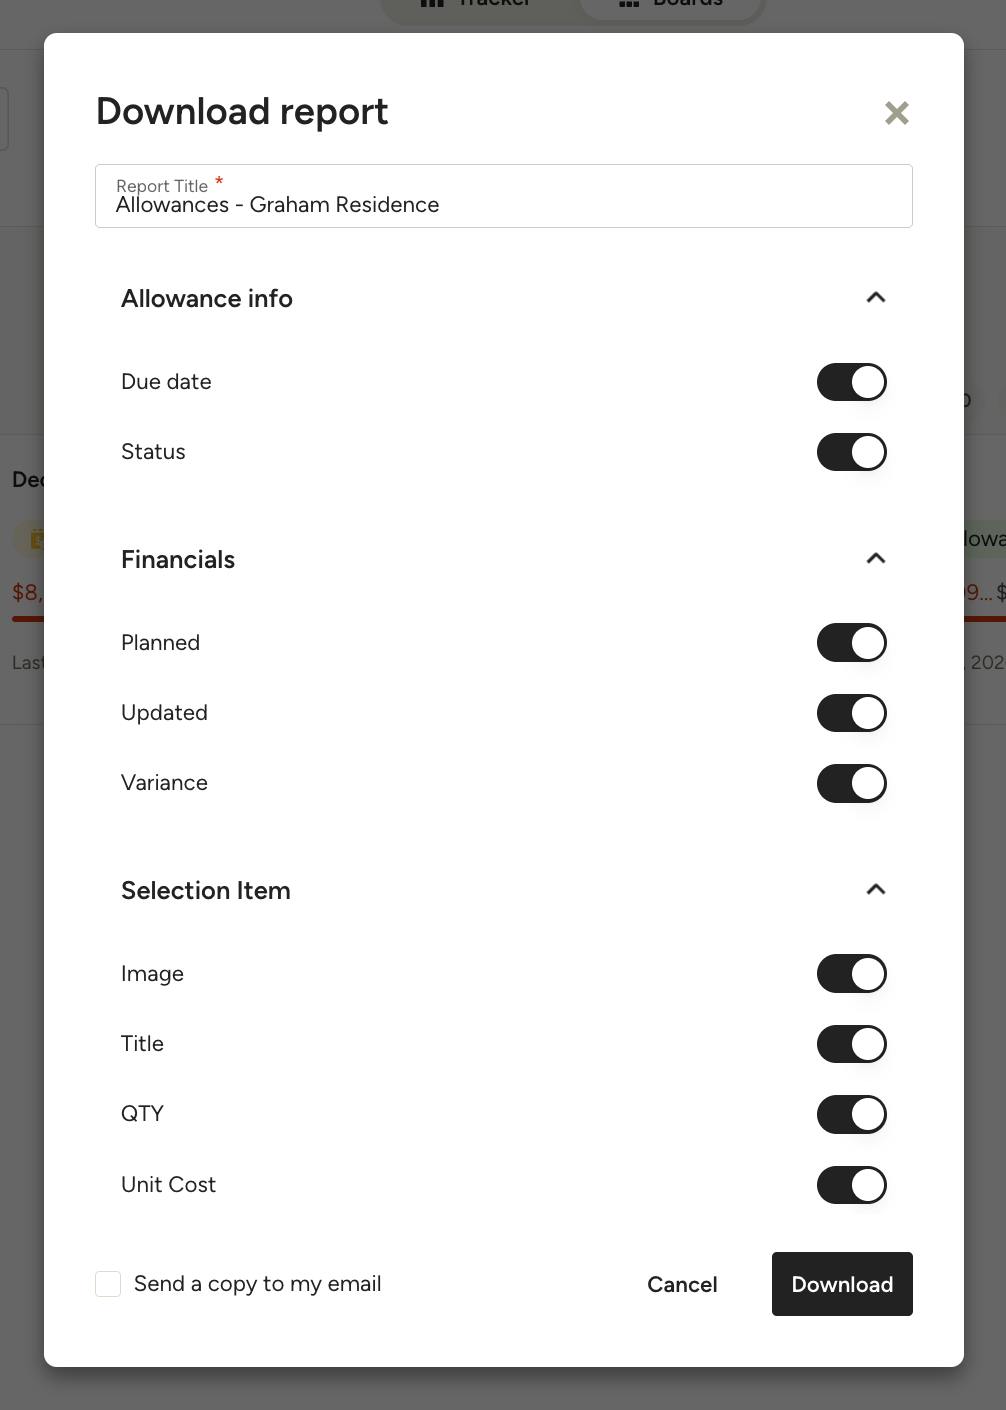
Allowance reports can be generated from the Selection Boards list, Selections Tracker and Budget within each project (more below).
The report can be customized to include relevant details, such as Actuals, Planned amounts, and the Status of the allowance(s). You can also choose which selection items (Draft, Approved, Declined) to include, as well as which item details to show (Image, Title, Quantity etc.).
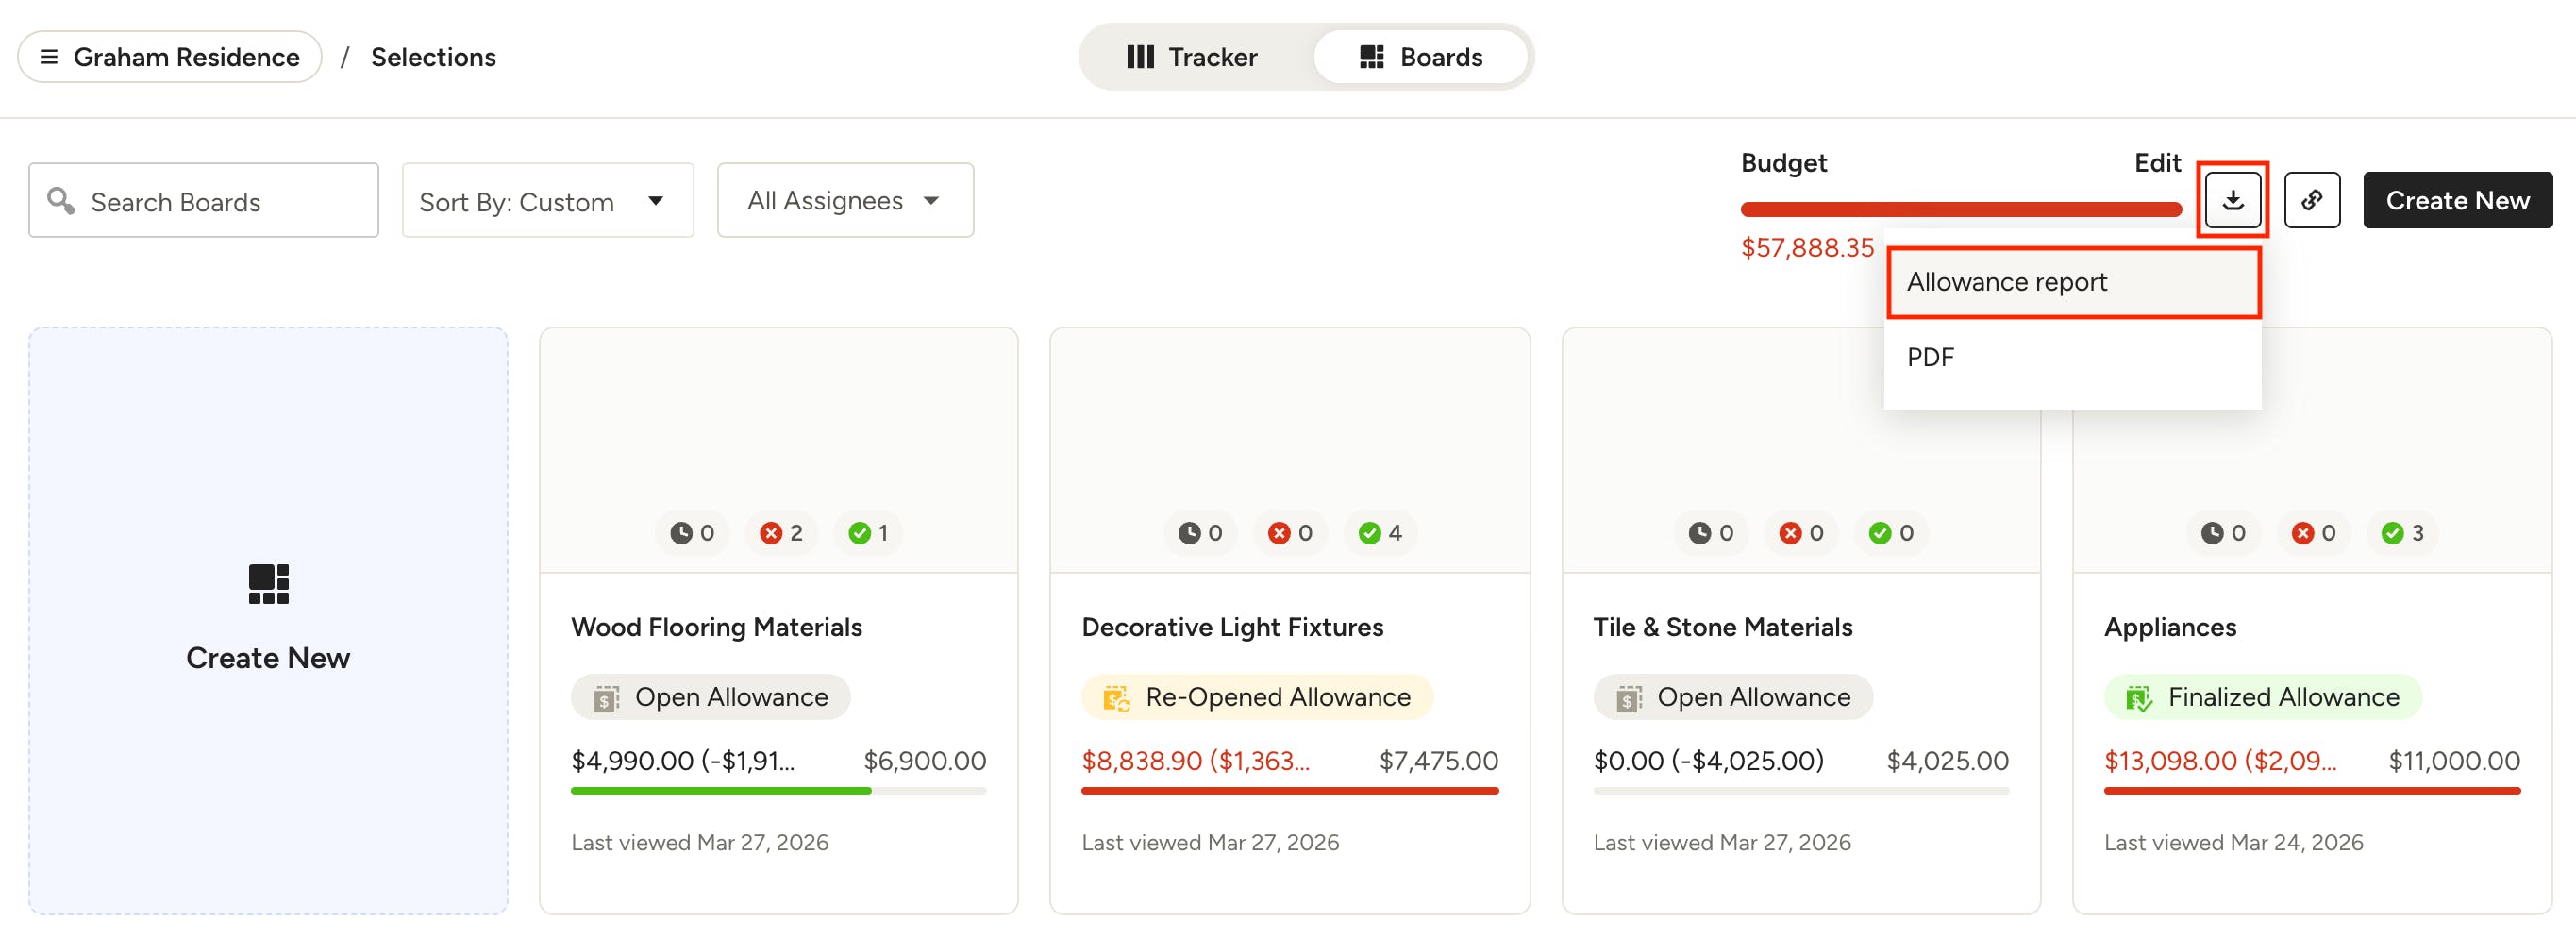
Download From Selection Boards List
Within a project's selections board page, click the download icon at the top of the page, then select Allowance Report.
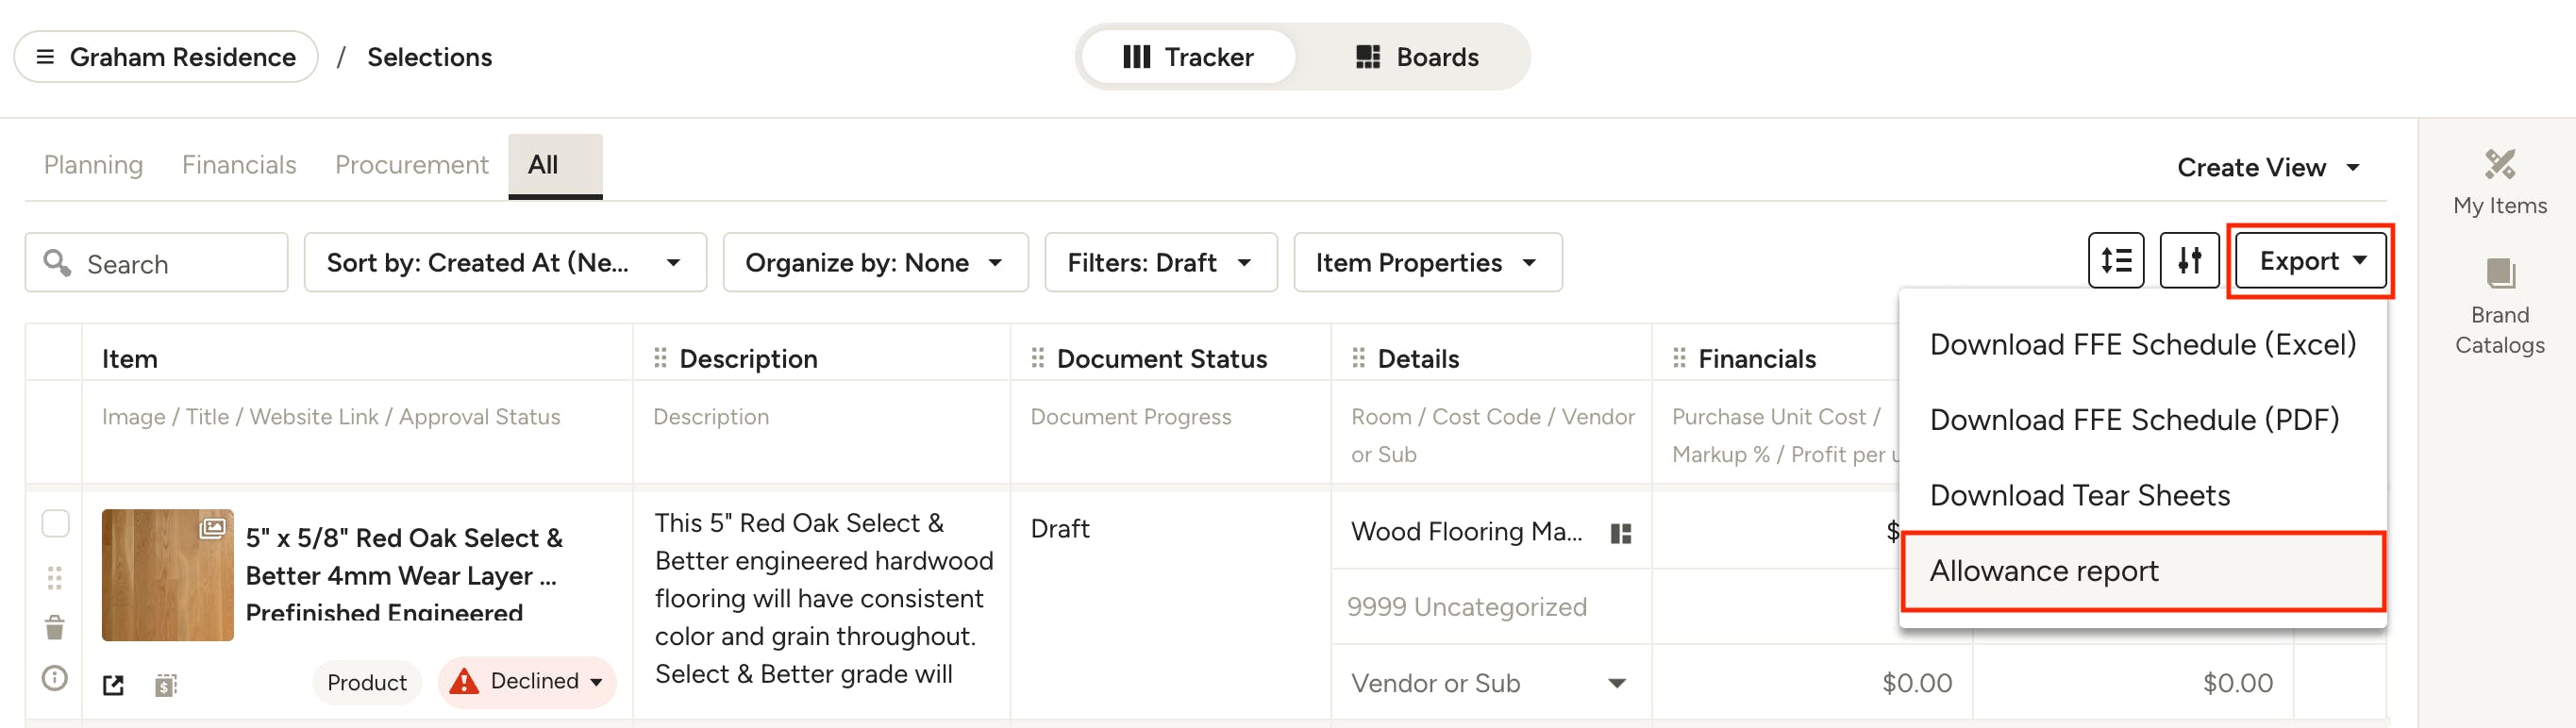
Download From Selections Tracker
Within a project's selections tracker, click Export at the top of the page, then select Allowance Report.
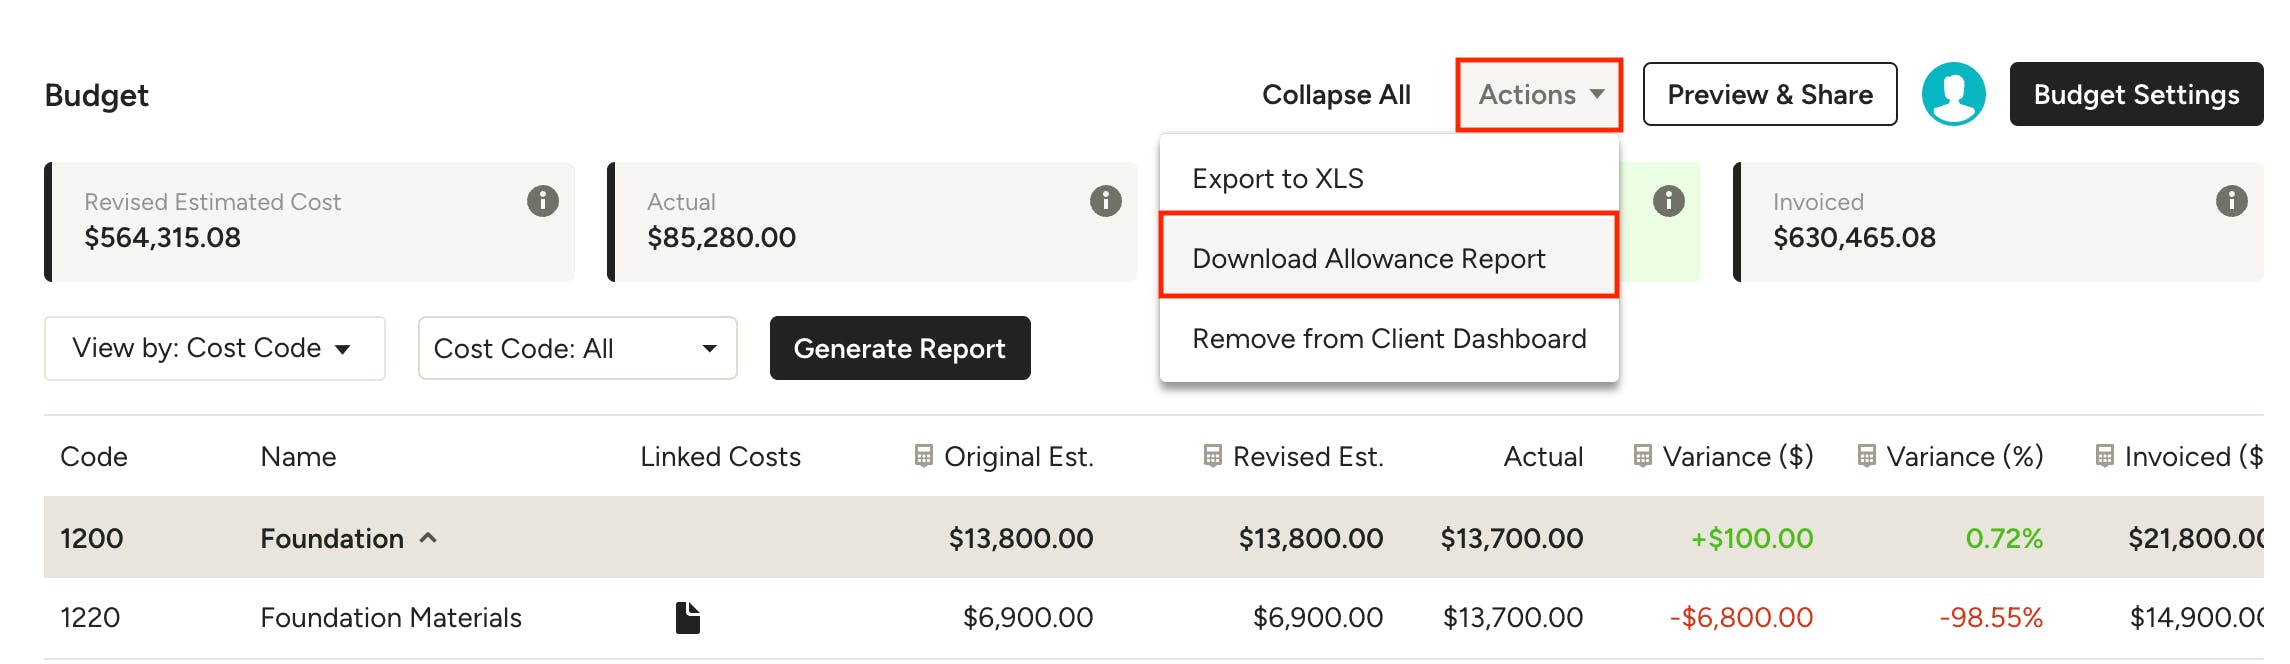
Download From Budget
Within a project's Budget page, click Actions at the top of the page, then select Download Allowance Report.