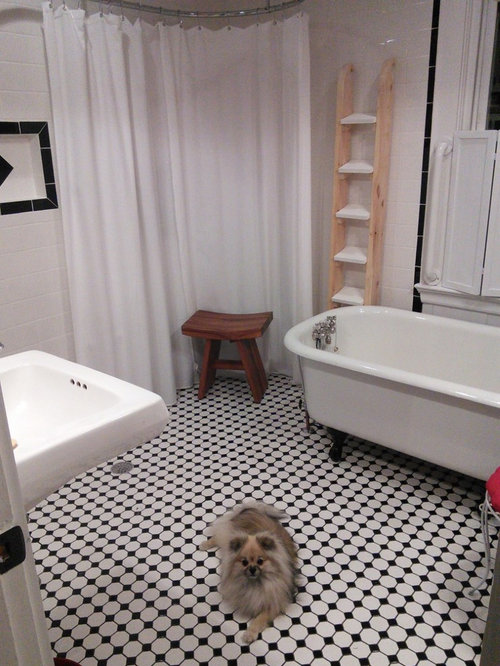
The former hall bathroom in our 1950s bungalow was small and crowded. The "facilities" were tiny and tucked into the corner. The linen closet took up almost as much space as the tub and provided less than half the actual storage space. The tub itself was barely five feet long, 28 inches wide, and less than a foot deep. There was only one light, which was fine as long as the sun shined thru the window. I wanted to keep the vintage look and feel, but accommodate taller and older guests. Three years ago I purchased an awesome claw foot tub and drew up plans.
Here is a "Before" picture:

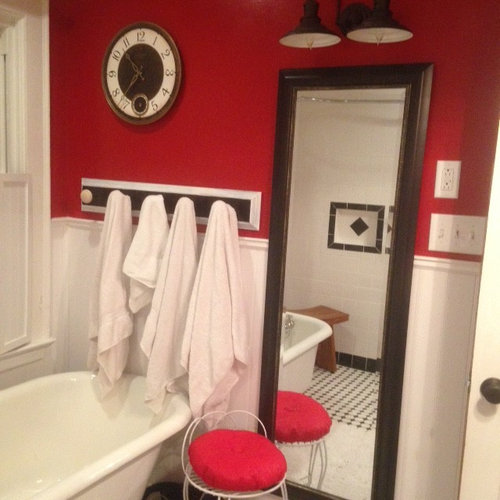
I had planned to have the shower in the tub, and wanted a quiet, normal, vintage black and white bathroom, but hubby wanted a bigger bath with a floor shower, a door leading to the bedroom next door, and he wanted to keep the red walls. So we compromised and decided to demo the wall between the living room and the bathroom to borrow 18" for the shower and modified the plans to include an open "wet area" inside the room. In other words, I agreed to the floor shower as long as it disappeared when not in use. I could see no reason to increase the size of the bathroom only to close it back up in a shower stall, so planned for an open shower with no threshold. I also opted to install the drain closer to the middle of the room to make floor cleaning a breeze and be able to bathe our poms. As we progressed, we decided a second door would take away needed wall space so that was taken back out of the plans.
Putting our first hole in the wall March 29, 2016, we did 99% of the demo ourselves, which took about three weeks. These old bodies can't do but so much in a day! Ha! My first disappointment was to say goodbye to my white chinese porcelain 1" mosaic floor tile that I had been protecting under a layer of vinyl planks for eight years, as it is no longer manufactured. All the existing wall tile ended up going too, as it was barely hanging on. Then we lost the ceiling. I had really hoped it would be simple, but hey, if your tiles start falling when the mallet hits another wall, you know it's time to start over. When you see that the ceiling wasn't done right the first time, tear it down and do it right! What started as an easy fix turned out to be a full gut job, and my original estimated budget became a distant memory! However, my plans were not sealed in stone, and we remained flexible to new possibilities, which helped keep our costs down. Although we were not able to keep the original floor tile or reuse the old wall tile, I was able to find the same wall tile design, "salt and pepper", 4x4" from American Olean, and had it installed by Michael Kirby from Performance Flooring. For the floor we opted to add black accents and black grout to white octagons, for a classic, but unique, vintage look with an easy care floor. The niches were set at various heights to accommodate adults, children, and sitting adults, and Michael and I came up with this simple yet bold placement of black and white diamonds. To go with my tub and accent wall, I also decided to install a vinyl wide plank bead board on the dry side of the bathroom. The window shutters got a new coat of paint and were put back into the windows after we replaced them with tempered glass, to code. During demo I uncovered behind a drywall an amazing natural brick chimney that had been formerly used for a gas furnace, and after looking at it for a few days, hubby and I decided to keep it and incorporate it into the new design.
The Pfister rain shower has several settings and is mounted on a flexible ceiling arm that tilts in all directions. The extra long shower curtains, rugs, and pretty teak bench came from Bed, Bath & Beyond. The ceiling mounted shower ring was purchased online from Signature Hardware.
We kept pretty much to the adjusted plan in placement and theory, but the materials changed here and there as the room came together.
Notice that "something" is not visible from the doorway. You'll see that later....
Our red accent wall has turned out to be quite a hit with the neighbors. Unexpected, but it sure brings a smile to people's faces when they enter and are greeted with this bright apple red! At their urging, I have submitted to Houzz to share my ideas, as even some of the inspectors coming through said they had never seen a bathroom like this one, but they loved it. This is where the real fun began:
I rescued these porcelain door knobs from a bin in the back of a local antique store, covered in layers of paint, for $3 each. Now they are shiny and beautiful and are serving as towel holders on a home made towel bar. The vanity chair is almost as old as this spectacular claw foot tub, which we bought at Black Dog Salvage in Roanoke, Virginia. Following the advice of their master plumber and tv host Robert Culp and my truly masterful plumber Steve Pyle, we were able to save the original fixtures and the original brass fittings that came with the tub, and were also able to install matching separate hot and cold handles for the shower that the plumbing contractor found online! As a bonus, I found a portable hand shower at Lowe's for less than $20; with a brass fitting for $5 I can use the hand shower in the tub to bathe the dogs or wash my hair when I don't feel like using the open shower. The handle bar on the window is barely noticable; I have no idea how long it has been there, but it's solid and in the perfect spot, so why move it?
Our fabulous electrician, Richard O'Neal, Hampton Roads Electric, installed two pot lights on dimmers; one in the shower and one over the tub (he calls it "mood lighting"). Both the vintage style aged copper lights (allen and roth) and an exhaust fan each have their own switches, so we can light up only the areas we need. The difference in the colors in the photos are due to the different lighting used, and at various times of the day.
The original wall sink has been reinstalled onto this set of select fir posts at standing height, 36", to reduce back strain. No more awkward leaning to wash! The chrome sink faucet, from Home Depot, features a swivel goose neck spout and porcelain handles. The little white cat below the sink, courtesy of BB&B, hides the bowl cleaner. The robe on the door fits all sizes.
The American Standard commode is not really hidden, but is out of the line of vision until you are well inside the bathroom. Even then, it's not the focal point, but it is special. It never clogs, and the 17" high seat... goes... down... by.. itself...really... slowly.....by itself. There is ample room on both sides for comfort and cleaning, and behind it, the bead board is vinyl for easy cleanup.
The white solid wood built in cabinets were my first carpentry project with my new favorite toy: a pneumatic nail gun! Clear plexiglass windows with bright red interior walls and black vintage hardware invite you to pay attention to what's happening above your waist, not below. Inside are shoe boxes labeled for lotions, medicines, and cleaners, and stackable vegetable wire baskets fitted for individual guest needs so everyone is prepared for a comfortable stay at a moment's notice. The homemade ladder (seen in the photo earlier near the tub) hooks over the horizontal wooden bar so I can reach the items on both sides of the top cabinets.
Finally, that beautiful brick chimney we discovered became a beautiful work space for the original sink. Along with those two 4x4 posts that provide support for lighting, the antique tilting mirror, and a reversible shaving mirror to the side of the sink, it also provides for a nook that holds whatever wire basket is needed for the moment. A convenient personal hand towel hangs from a shower hook. The chrome and copper lines, the wood, and the glass, all seem to work with the red brick, which gives an element of strength that seems to pull it all together.

Because we demo'd the living room wall, we added three extra weeks to the project, and tripled my original $4000 budget. It was a bear to deal with, but I love the outcome. We had issues with one of the trade contractors, who subbed out his job to another company, causing unnecessary delays. This was initially unavoidable, but was consistently aggravating as we lost at total of six weeks time throughout the process for various reasons. I also learned that I had to keep my eye on most of the trades and services, as no matter how concise I was in my instructions, I usually had to either redo or finish their jobs myself. It was frustrating at times, but I learned how to do many new things, and who to depend upon for future projects. I know who I will be hiring when I am ready to work on my kitchen! I had originally planned to complete this project in two months after we decided to demo the wall. We finished in 3 1/2 months.
Mostly I love that the shower disappears when it's not being used. The room is light, open, and airy. The floor pattern provides interest and contrast. The three adorable niches play off the floor pattern and will hold all the necessities for the wet side of the room. The homemade ladder is used for setting bath essentials near the tub when not needed for reaching the top cabinets.
As the professional designers say, there is always the tendency to creep into other areas. Yes, we crept! The entire hallway, doors, trims, and ceiling got treatment, too. To make the area flow better, we swapped the furniture in the master and the guest rooms, (putting the guest room next to the bathroom), and gave them a facelift, too. The electrician upgraded the circuit box so we will be ready when it's time to do the kitchen. We Insulated the bathroom walls to soundproof them, reinsulated the attic, and also reroofed the main house while we were at it, all for around $19,000. That's my kind of renovation!
Even the pups approve!


 PRO
PRO PRO
PRO


J Steel